Move 教程(Move Tutorial)
Welcome to the Move Tutorial! In this tutorial, we are going to go through some steps of developing Move code including design, implementation, unit testing and formal verification of Move modules.
欢迎来到 Move 语言教程,在本教程中,我们通过一些具体的步骤进行 Move 语言代码的开发,包括 Move 模块的设计、实现、单元测试和形式化验证。
There are nine steps in total:
- Step 0: Installation
- Step 1: Writing my first Move module
- Step 2: Adding unit tests to my first Move module
- Step 3: Designing my
BasicCoinmodule - Step 4: Implementing my
BasicCoinmodule - Step 5: Adding and using unit tests with the
BasicCoinmodule - Step 6: Making my
BasicCoinmodule generic - Step 7: Use the Move prover
- Step 8: Writing formal specifications for the
BasicCoinmodule
整个过程共包含9个步骤:
- Step 0: 安装 Move 开发环境
- Step 1: 编写第一个 Move 模块(Move Module)
- Step 2: 给模块(Module)添加单元测试
- Step 3: 设计自己的
BasicCoin模块(Module) - Step 4:
BasicCoin模块(Module)的实现 - Step 5: 给
BasicCoin模块添加单元测试 - Step 6: 使用泛型(generic)编写
BasicCoin模块 - Step 7: 使用
Move prover - Step 8: 为
BasicCoin模块编写形式化规范(formal specifications)
Each step is designed to be self-contained in the corresponding step_x folder. For example, if you would
like to skip the contents in step 1 through 4, feel free to jump to step 5 since all the code we have written
before step 5 will be in step_5 folder. At the end of some steps, we also include
additional material on more advanced topics.
其中每一步都被设计为自包含的文件夹, 相应名字为 step_x。 例如,如果您愿意跳过 step 1 到 step 4 的内容,可直接跳到 step 5,因为所有在 step 5 之前的代码均在在step_5 文件夹之下。在部分步骤结束时,我们还引入有关更高级主题的附加资料。
Now let's get started!
好了,我们现在开始!
Step 0: 安装 Move 开发环境 (Step 0: Installation)
If you haven't already, open your terminal and clone the Move repository:
如果您还没有安装过 Move,首先打开命令终端(terminal) 并clone Move代码库:
git clone https://github.com/move-language/move.git
Go to the move directory and run the dev_setup.sh script:
进入到 move 文件夹下,执行 dev_setup.sh 脚本:
cd move
./scripts/dev_setup.sh -ypt
Follow the script's prompts in order to install all of Move's dependencies.
The script adds environment variable definitions to your ~/.profile file.
Include them by running this command:
根据脚本命令的提示,按顺序安装 Move 的所有依赖项。
脚本将会将(move命令所在路径)环境变量写入到 ~/.profile 文件中。
执行如下命令使环境变量生效:
source ~/.profile
Next, install Move's command-line tool by running this commands:
然后执行如下命令来安装 Move 命令行工具:
cargo install --path language/tools/move-cli
You can check that it is working by running the following command:
通过如下运行命令可以检查 move 命令是否可正常:
move --help
You should see something like this along with a list and description of a number of commands:
您应该会看到类似这样的内容以及许多命令的列表和描述:
move-package
Execute a package command. Executed in the current directory or the closest containing Move package

USAGE:
    move [OPTIONS] <SUBCOMMAND>

OPTIONS:
        --abi                          Generate ABIs for packages
...
If you want to find what commands are available and what they do, running
a command or subcommand with the --help flag will print documentation.
如果想了解有支持哪引命令及其作用, 执行命令或子命令时添加 --help 标记,此时会打印帮助文档。
Before running the next steps, cd to the tutorial directory:
在执行下一步骤之前,请先执行 cd 命令进入到教程对应目录下:
cd <path_to_move>/language/documentation/tutorial
Visual Studio Code Move 支持 (Visual Studio Code Move Support)
There is official Move support for Visual Studio Code. You need to install the move analyzer first:
Visual Studio Code 有正式的 Move 语言支持, 您需要先安装 move analyzer :
cargo install --path language/move-analyzer
Now you can install the VS extension by opening VS Code, searching for the "move-analyzer" in the Extension Pane, and installing it. More detailed instructions can be found in the extension's README.
现在您可以打开 VS Code 并安装 Move 扩展插件了,在扩展页面下找到 move-analyzer 并安装即可。关于扩展的详细信息可以查看扩展的README。
Step 1: 编写第一个Move模块 (Writing my first Move module)
Change directory into the step_1/BasicCoin directory.
You should see a directory called sources -- this is the place where all
the Move code for this package lives. You should also see a
Move.toml file as well. This file specifies dependencies and other information about
the package; if you're familiar with Rust and Cargo, the Move.toml file
is similar to the Cargo.toml file, and the sources directory similar to
the src directory.
切换当前目录到step_1/BasicCoin下,您将看到 sources 子目录 -- 这个包(package)下所有的 Move 代码都在此目录中,同时您还会看到一个 Move.toml 文件。该文件指定当前包的依赖列表和其他信息。
如果您熟悉 Rust 和 Cargo,那 Move.toml 文件类似 Cargo.toml 文件, sources 目录类似 src 目录(它们的作用是一样的)
Let's take a look at some Move code! Open up
sources/FirstModule.move in
your editor of choice. The first thing you'll see is this:
来一起看看 Move 语言代码内容! 用你的编辑器打开sources/FirstModule.move文件,会看到如下内容:
// sources/FirstModule.move
module 0xCAFE::BasicCoin {
    ...
}
This is defining a Move
module. Modules are the
building block of Move code, and are defined with a specific address -- the address that the module can be published under.
In this case, the BasicCoin module can only be published under 0xCAFE.
这是一个 Move module(模块)的定义。
模块是 Move 语言的代码块, 并且它使用指定的地址(address)进行定义 -- 模块只能在该地址下发布。
当前 BasicCoin 模块只能被发布在 0xCAFE 地址下。
Let's now take a look at the next part of this file where we define a struct to represent a Coin with a given value:
再看这个文件的下一部分,这里定义了一个具有字段 value 的结构体 Coin:
module 0xCAFE::BasicCoin {
    struct Coin has key {
        value: u64,
    }
    ...
}
Looking at the rest of the file, we see a function definition that creates a Coin struct and stores it under an account:
再看文件剩余部分,我们会看到一个函数,它会创建一个 Coin 结构体,并将其保存在某个账号(account)下:
module 0xCAFE::BasicCoin {
    struct Coin has key {
        value: u64,
    }

    public fun mint(account: signer, value: u64) {
        move_to(&account, Coin { value })
    }
}
Let's take a look at this function and what it's saying:
- It takes a
signer-- an unforgeable token that represents control over a particular address, and avalueto mint. - It creates a
Coinwith the given value and stores it under theaccountusing themove_tooperator.
Let's make sure it builds! This can be done with the build command from within the package folder (step_1/BasicCoin):
让我们来看看这个函数和它的含义:
- 此函数需要一个
signer参数 -- 表示不可伪造的 token 受此特定地址的控制; 和一个需要铸造的数量参数value。 - 此函数使用给定的参数值铸造一个
Coin,然后通过move_to操作将其保存在(全局存储中)给定的account账户下。
我们需要确保它真的执行,这可以通过在包文件夹(step_1/BasicCoin)下的运行 build 命令来完成:
move build
进阶概念及参考引用 (Advanced concepts and references)
-
You can create an empty Move package by calling:
move new <pkg_name> -
Move code can also live a number of other places. More information on the Move package system can be found in the Move book
-
More information on the
Move.tomlfile can be found in the package section of the Move book. -
Move also supports the idea of named addresses, Named addresses are a way to parametrize Move source code so that you can compile the module using different values for
NamedAddrto get different bytecode that you can deploy, depending on what address(es) you control. They are used quite frequently, and can be defined in theMove.tomlfile in the[addresses]section, e.g.,[addresses] SomeNamedAddress = "0xC0FFEE" -
你可以通过以下命令创建一个空的 Move 包(move package):
move new <pkg_name> -
Move 代码也可以放在其他很多地方, 更多关于 Move 包系统的信息请参阅Move book
-
更多关于
Move.toml文件的信息可以参阅package section of the Move book. -
Move语言也支持命名地址的概念(named addresses), 命名地址是一种参数化 Move 源代码的方法, 就是如果对
NamedAddr使用的不同赋值编译,编译后会获得部署到你控制地址的不同字节码. 这种用法很常见,一般都将地址变量其定义在Move.toml文件 的[addresses]部分. 例如:[addresses] SomeNamedAddress = "0xC0FFEE" -
Structures in Move can be given different abilities that describe what can be done with that type. There are four different abilities:
copy: Allows values of types with this ability to be copied.drop: Allows values of types with this ability to be popped/dropped.store: Allows values of types with this ability to exist inside a struct in global storage.key: Allows the type to serve as a key for global storage operations.
So in the
BasicCoinmodule we are saying that theCoinstruct can be used as a key in global storage and, because it has no other abilities, it cannot be copied, dropped, or stored as a non-key value in storage. So you can't copy coins, and you also can't lose coins by accident! -
Functions are default private, and can also be
public,public(friend), orpublic(script). The last of these states that this function can be called from a transaction script.public(script)functions can also be called by otherpublic(script)functions. -
move_tois one of the five different global storage operators. -
Move 结构体可以通过给类型设定不同的能力abilities让类型下支持对应的行为. 有四种能力:
copy: 允许此类型的值被复制drop: 允许此类型的值被弹出/丢弃store: 允许此类型的值存在于全局存储的某个结构体中key: 允许此类型作为全局存储中的键(具有key能力的类型才能保存到全局存储中)
所以
BasicCoin模块下的Coin结构体可以用作全局存储(global storage)的键(key), 因为它又不具备其他能力,它不能 被拷贝,不能被丢弃, 也不能作为非key来保存在(全局)存储里. 你无法复制Coin,也不会意外弄丢它. -
函数Functions默认是私有的(private), 也可以声明为
publicpublic(friend),public(script). 最后一个声明(指public(script))的函数可以被事务脚本调用。public(script)函数也可以被其他public(script)函数调用。(注意:在最新版本的 Move中,public(script)已经被废弃,被public entry取代,下同,译者注) -
move_to是五种不同的全局存储操作之一
Step 2: 给模块(Module)添加单元测试 (Adding unit tests to my first Move module)
Now that we've taken a look at our first Move module, we'll take a look at a test to make sure minting works the way we expect it to by changing directory to step_2/BasicCoin. Unit tests in Move are similar to unit tests in Rust if you're familiar with them -- tests are annotated with #[test] and written like normal Move functions.
You can run the tests with the move test command: (原文是 package test,应该有误)
现在我们已经完成了我们的第一个 Move 模块,我们将切换到目录step_2/BasicCoin下并完成一个测试,确保铸币按我们预期的方式工作。
如果你熟悉它们(Move 和 Rust)的话,Move 中的单元测试类似于 Rust 中的单元测试 —— 测试代码使用 #[test] 注解,并像编写普通的 Move 函数一样。
可以通过 move test 命令来执行测试:
move test
Let's now take a look at the contents of the FirstModule.movefile. The first new thing you'll
see is this test:
现在我们来完成文件FirstModule.move的具体内容,你将看到的第一个新事项是这个测试:
module 0xCAFE::BasicCoin {
    ...
    // Declare a unit test. It takes a signer called `account` with an
    // address value of `0xC0FFEE`.
    #[test(account = @0xC0FFEE)]
    fun test_mint_10(account: signer) acquires Coin {
        let addr = signer::address_of(&account);
        mint(account, 10);
        // Make sure there is a `Coin` resource under `addr` with a value of `10`.
        // We can access this resource and its value since we are in the
        // same module that defined the `Coin` resource.
        assert!(borrow_global<Coin>(addr).value == 10, 0);
    }
}
This is declaring a unit test called test_mint_10 that mints a Coin struct under the account with a value of 10. It is then checking that the minted
coin in storage has the value that is expected with the assert! call. If the assertion fails the unit test will fail.
这里声明了一个命名为 test_mint_10 的单元测试,它在 account 账户地址下铸造了一个包含 value 为 10的 Coin,然后通过 assert! 断言检查已经铸造成功并保存在(全局)存储中的 Coin 的值是否与期望值一致。如果断言 assert 执行失败,则单元测试失败。
进阶概念及参考练习 (Advanced concepts and exercises)
-
There are a number of test-related annotations that are worth exploring, they can be found here. You'll see some of these used in Step 5.
-
Before running unit tests, you'll always need to add a dependency on the Move standard library. This can be done by adding an entry to the
[dependencies]section of theMove.toml, e.g.,[dependencies] MoveStdlib = { local = "../../../../move-stdlib/", addr_subst = { "Std" = "0x1" } }Note that you may need to alter the path to point to the
move-stdlibdirectory under<path_to_move>/language. You can also specify git dependencies. You can read more on Move package dependencies here. -
很多测试相关的注解(annotations)都值得仔细探索, 参阅用法。 在
Step 5中会看到更多用法. -
执行测试之前,需要设定Move标准库依赖关系,找到
Move.toml并在[dependencies]段内进行设定, 例如[dependencies] MoveStdlib = { local = "../../../../move-stdlib/", addr_subst = { "Std" = "0x1" } }
注意, 需要修改 <path_to_move>/language 中的内容来匹配实际 move-stdlib 所在的目录路径. 也可以用 git 方式指定依赖, 关于 Move 包依赖(package denpendices)信息可参阅package文档
练习 (Exercises)
-
Change the assertion to
11so that the test fails. Find a flag that you can pass to themove testcommand that will show you the global state when the test fails. It should look something like this: -
将断言值改为
11将导致断言执行失败, 找一个可以传递给move test命令的标志,当测试失败时它会显示全局状态。看起来像这样:┌── test_mint_10 ────── │ error[E11001]: test failure │ ┌─ ./sources/FirstModule.move:24:9 │ │ │ 18 │ fun test_mint_10(account: signer) acquires Coin { │ │ ------------ In this function in 0xcafe::BasicCoin │ · │ 24 │ assert!(borrow_global<Coin>(addr).value == 11, 0); │ │ ^^^^^^^^^^^^^^^^^^^^^^^^^^^^^^^^^^^^^^^^^^^^^^^^^ Test was not expected to abort but it aborted with 0 here │ │ │ ────── Storage state at point of failure ────── │ 0xc0ffee: │ => key 0xcafe::BasicCoin::Coin { │ value: 10 │ } │ └────────────────── -
Find a flag that allows you to gather test coverage information, and then play around with using the
move coveragecommand to look at coverage statistics and source coverage. -
找一个允许您收集测试覆盖率信息的标志,然后使用
move coverage命令查看覆盖率统计信息和源码覆盖率。
Step 3: 设计 BasicCoin 模块(Module) (Designing my BasicCoin module)
In this section, we are going to design a module implementing a basic coin and balance interface, where coins can be minted and transferred between balances held under different addresses.
在本节中,我们将设计一个具有基本代币和余额(balance)接口功能的模块,通过他们来实现币的挖矿铸造,不同地址之下钱包的转账。
The signatures of the public Move function are the following:
Move 语言的 public function 签名如下:
/// Publish an empty balance resource under `account`'s address. This function must be called before
/// minting or transferring to the account.
public fun publish_balance(account: &signer) { ... }

/// Mint `amount` tokens to `mint_addr`. Mint must be approved by the module owner.
public fun mint(module_owner: &signer, mint_addr: address, amount: u64) acquires Balance { ... }

/// Returns the balance of `owner`.
public fun balance_of(owner: address): u64 acquires Balance { ... }

/// Transfers `amount` of tokens from `from` to `to`.
public fun transfer(from: &signer, to: address, amount: u64) acquires Balance { ... }
Next we look at the data structs we need for this module.
接下来再看本模块所需要各数据结构.
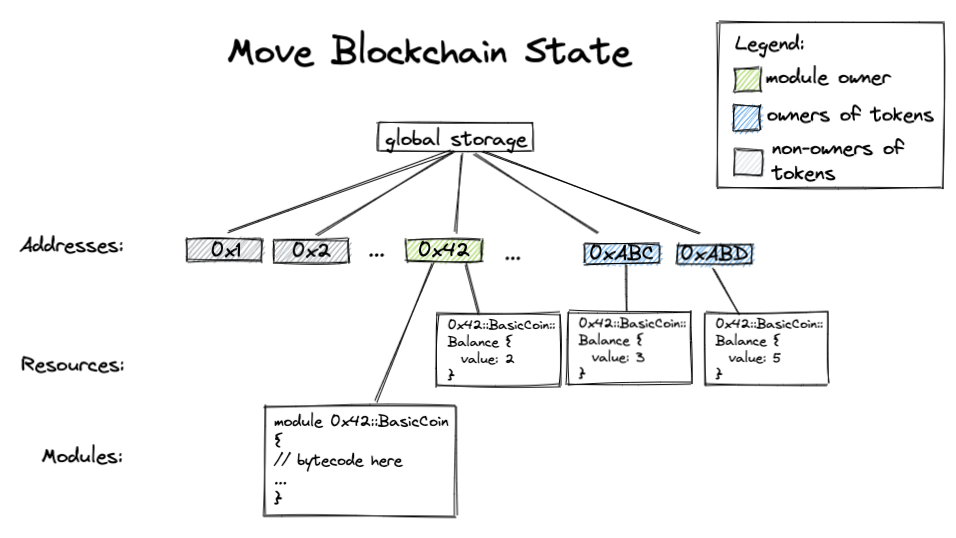
A Move module doesn't have its own storage. Instead, Move "global storage" (what we call our blockchain state) is indexed by addresses. Under each address there are Move modules (code) and Move resources (values).
Move 语言的模块没有自己的数据存储,相反的是 Move 语言提供按地址(addresses) 索引的 全局存储 (也是就是我们所说的区块链状态(blockchain state)). 每个地址之下包含有 Move 模块(代码)和 Move 资源 (数据)。
The global storage looks roughly like this in Rust syntax:
在 Rust 语法中,全局存储看起来有点像这样:
#![allow(unused)]
fn main() {
struct GlobalStorage {
    resources: Map<address, Map<ResourceType, ResourceValue>>
    modules: Map<address, Map<ModuleName, ModuleBytecode>>
}
}
The Move resource storage under each address is a map from types to values. (An observant reader might observe that this means each address can only have one value of each type.) This conveniently provides us a native mapping indexed by addresses.
In our BasicCoin module, we define the following Balance resource representing the number of coins each address holds:
每个地址下的 Move 资源存储是一个类型到数值的映射。(细心的读者也许已经注意到每个地址, 每个类型下只能对应一个具体值)。这方便地为我们提供了一个按地址索引的本地映射。
在 BasicCoin 模块中,定义了每个 Balance (钱包,余额)资源表示每个地址下持有的币的数量:
/// Struct representing the balance of each address.
struct Balance has key {
    coin: Coin // same Coin from Step 1
}
Roughly the Move blockchain state should look like this:
区块链状态(Move blockchain state)看起来大致如下:
进阶主题 (Advanced topics) :
public(script) functionsOnly functions with public(script) visibility can be invoked directly in transactions. So if you would like to call the transfer method directly from a transaction, you'll want to change its signature to:
只有public(script)可见行的函数才能直接被交易调用,所以如果你要直接在交易内调用transfer方法,那么需要将函数签改成如下格式:
public(script) fun transfer(from: signer, to: address, amount: u64) acquires Balance { ... }
Read more on Move function visibilities here.
关于函数可见性的更多信息,请参阅Move function visibilities。
与 Ethereum/Solidity 的比较 (Comparison with Ethereum/Solidity)
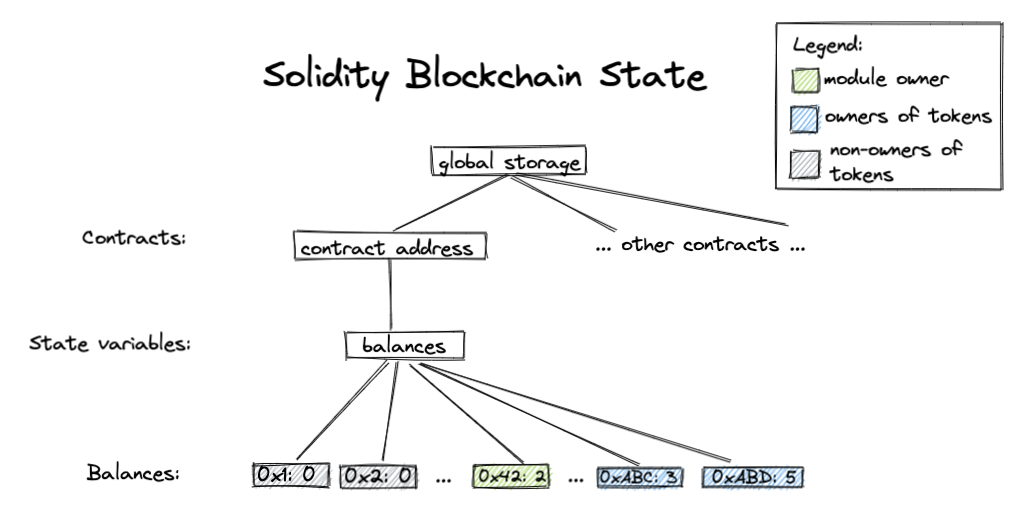
In most Ethereum ERC-20 contracts, the balance of each address is stored in a state variable of type mapping(address => uint256). This state variable is stored in the storage of a particular smart contract.
在大多数以太坊ERC-20智能合约中,各个账户地址下的余额保存在类型为 mapping(address => uint256)的 状态变量 中,此状态变量存储在具体的智能合约内部存储中。
The Ethereum blockchain state might look like this:
以太坊区块链的状态看起来大致如下:
Step 4: 实现 BasicCoin 模块span id="Step4"> (Implementing my BasicCoin module)
We have created a Move package for you in folder step_4 called BasicCoin. The sources folder contains source code for all your Move modules in the package, including BasicCoin.move. In this section, we will take a closer look at the implementation of the methods inside BasicCoin.move.
我们已经在 step_4 文件夹上创建了名叫 BasicCoin 的 Move 包。sources 文件夹包含所有的 Move 包(package)的模块源码,包括 BasicCoin.move。 在本节中,我们将仔细研究BasicCoin.move内部方法的实现。
编译代码 (Compiling our code)
Let's first try building the code using Move package by running the following command in step_4/BasicCoin folder:
首先尝试在文件夹step_4/BasicCoin中运行以下命令,使用 Move 包构建代码:
move build
方法的实现 (Implementation of methods)
Now let's take a closer look at the implementation of the methods inside BasicCoin.move.
现在仔细看看BasicCoin.move中内部方法的实现。
publish_balance方法 (Method publish_balance)
This method publishes a Balance resource to a given address. Since this resource is needed to receive coins through minting or transferring, publish_balance method must be called by a user before they can receive money, including the module owner.
此方法将 Balance 资源发布到指定地址名下。由于此资源需要通过铸造或转账来接收代币,必须由用户先调用方法 publish_balance 才能接收钱,包括模块所有者。
This method uses a move_to operation to publish the resource:
此方法使用 move_to 操作来发布资源:
let empty_coin = Coin { value: 0 };
move_to(account, Balance { coin:  empty_coin });
mint方法 (Method mint)
)
Here we require that mint must be approved by the module owner. We enforce this using the assert statement:
mint method mints coins to a given account.
mint 方法将代币铸造到指定的帐户。在此我们要求 mint 必须得到模块所有者的批准。我们使用 assert 语句强制执行此操作:
assert!(signer::address_of(&module_owner) == MODULE_OWNER, errors::requires_address(ENOT_MODULE_OWNER));
Assert statements in Move can be used in this way: assert!(<predicate>, <abort_code>);. This means that if the <predicate> is false, then abort the transaction with <abort_code>. Here MODULE_OWNER and ENOT_MODULE_OWNER are both constants defined at the beginning of the module. And errors module defines common error categories we can use.
It is important to note that Move is transactional in its execution -- so if an abort is raised no unwinding of state needs to be performed, as no changes from that transaction will be persisted to the blockchain.
Move 中的 assert 语句可以这样使用:assert!(<predicate>, <abort_code>);。这意味着如果 <predicate> 为假,则使用中止错误码 <abort_code> 来终止交易。此处的 MODULE_OWNER 和 ENOT_MODULE_OWNER 都是在模块开头定义的常量。errors 模块定义了我们可以使用的常见错误种类。重点是我们需要注意 Move 在其执行过程中是事务性的-- 因此,如果触发中止(abort),并不用回退已执行状态的,因为该事务的任何更改都不会持久保存到区块链。
We then deposit a coin with value amount to the balance of mint_addr.
然后将数量为 amount 的代币存入 mint_addr 的余额中。
deposit(mint_addr, Coin { value: amount });
balance_of方法 (Method balance_of)
We use borrow_global, one of the global storage operators, to read from the global storage.
我们使用全局存储操作之一的 borrow_global 从全局存储中读取资源(数据)。
borrow_global<Balance>(owner).coin.value
                 |       |       \    /
        resource type  address  field names
transfer方法 (Method transfer)
This function withdraws tokens from from's balance and deposits the tokens into tos balance. We take a closer look at withdraw helper function:
该函数从 from 的余额中提取代币并将代币存入 to 的余额中。我们仔细研究帮助函数 withdraw:
fun withdraw(addr: address, amount: u64) : Coin acquires Balance {
    let balance = balance_of(addr);
    assert!(balance >= amount, EINSUFFICIENT_BALANCE);
    let balance_ref = &mut borrow_global_mut<Balance>(addr).coin.value;
    *balance_ref = balance - amount;
    Coin { value: amount }
}
At the beginning of the method, we assert that the withdrawing account has enough balance. We then use borrow_global_mut to get a mutable reference to the global storage, and &mut is used to create a mutable reference to a field of a struct. We then modify the balance through this mutable reference and return a new coin with the withdrawn amount.
在方法开始,我们断言提款账户有足够的余额。然后我们使用 borrow_global_mut 来获得全局存储的可变引用,并用 &mut 创建结构体字段的可变引用。然后我们通过这个可变引用修改余额并返回一个带有提取金额的新代币。
练习 (Exercises)
There are two TODOs in our module, left as exercises for the reader:
- Finish implementing the
publish_balancemethod. - Implement the
depositmethod.
在模块中有两个 TODOs,留给读者练习:
- 完成
publish_balance方法的实现。 - 实现
deposit方法。
The solution to this exercise can be found in step_4_sol folder.
此练习的解决方案可以在step_4_sol文件夹中找到。
额外练习 (Bonus exercise)
- What would happen if we deposit too many tokens to a balance?
- 如果我们在余额中存入太多会发生什么?
Step 5: 在模块 BasicCoin 中添加和使用单元测试 (Adding and using unit tests with the BasicCoin module)
In this step we're going to take a look at all the different unit tests we've written to cover the code we wrote in step 4. We're also going to take a look at some tools we can use to help us write tests.
在这一步中,来看看我们为覆盖在 step 4 中编写的代码而编写的所有不同的单元测试。还将看看我们可以用来帮助我们编写测试用例的一些工具。
To get started, run the move test command in the step_5/BasicCoin folder
首先,请在文件夹 step_5/BasicCoin中 运行 move test 命令。
move test
You should see something like this:
您应该看到如下内容:
INCLUDING DEPENDENCY MoveStdlib
BUILDING BasicCoin
Running Move unit tests
[ PASS    ] 0xcafe::BasicCoin::can_withdraw_amount
[ PASS    ] 0xcafe::BasicCoin::init_check_balance
[ PASS    ] 0xcafe::BasicCoin::init_non_owner
[ PASS    ] 0xcafe::BasicCoin::publish_balance_already_exists
[ PASS    ] 0xcafe::BasicCoin::publish_balance_has_zero
[ PASS    ] 0xcafe::BasicCoin::withdraw_dne
[ PASS    ] 0xcafe::BasicCoin::withdraw_too_much
Test result: OK. Total tests: 7; passed: 7; failed: 0
Taking a look at the tests in the BasicCoin module we've tried to keep each unit test to testing one particular behavior.
看看 BasicCoin 模块中的测试,我们试图让每个单元测试都测试一个具体的行为。
Exercise (练习)
After taking a look at the tests, try and write a unit test called balance_of_dne in the BasicCoin module that tests the case where a Balance resource doesn't exist under the address that balance_of is being called on. It should only be a couple lines!
在查看测试之后,尝试在 BasicCoin 模块中编写一个单元测试 balance_of_dne,测试地址没有 Balance 资源的情况,调用 balance_of 方法的执行结果。它应该只有几行代码。
The solution to this exercise can be found in step_5_sol.
练习的答案可以在step_5_sol中找到。
Step 6: BasicCoin 模块泛型化(Making my BasicCoin module generic)
In Move, we can use generics to define functions and structs over different input data types. Generics are a great building block for library code. In this section, we are going to make our simple BasicCoin module generic so that it can serve as a library module that can be used by other user modules.
在 Move 语言中,我们可以使用泛型来定义不同输入数据类型的函数和结构体。泛型是库代码的重要组成部分。在本节中,我们将使我们的简单 BasicCoin 模块泛型化,以便它可以用作其他用户模块可以使用的模块库。
First, we add type parameters to our data structs:
首先,我们将类型参数添加到我们的数据结构中:
struct Coin<phantom CoinType> has store {
    value: u64
}

struct Balance<phantom CoinType> has key {
    coin: Coin<CoinType>
}
We also add type parameters to our methods in the same manner. For example, withdraw becomes the following:
我们还以相同的方式将类型参数添加到我们的方法中。例如,withdraw 变成如下:
fun withdraw<CoinType>(addr: address, amount: u64) : Coin<CoinType> acquires Balance {
    let balance = balance_of<CoinType>(addr);
    assert!(balance >= amount, EINSUFFICIENT_BALANCE);
    let balance_ref = &mut borrow_global_mut<Balance<CoinType>>(addr).coin.value;
    *balance_ref = balance - amount;
    Coin<CoinType> { value: amount }
}
Take a look at step_6/BasicCoin/sources/BasicCoin.move to see the full implementation.
查看step_6/BasicCoin/sources/BasicCoin.move完整的实现。
At this point, readers who are familiar with Ethereum might notice that this module serves a similar purpose as the ERC20 token standard, which provides an interface for implementing fungible tokens in smart contracts. One key advantage of using generics is the ability to reuse code since the generic library module already provides a standard implementation and the instantiating module can provide customizations by wrapping the standard implementation.
此时,熟悉以太坊的读者可能会注意到,该模块的用途与ERC20 token standard类似,后者提供了在智能合约中实现可替代代币的接口。使用泛型的一个关键优势是能够重用代码,因为泛型模块库已经提供了标准实现,并且实例化模块可以通过包装标准实现提供定制化功能。
We provide a little module called MyOddCoin that instantiates the Coin type and customizes its transfer policy: only odd number of coins can be transferred. We also include two tests to test this behavior. You can use the commands you learned in step 2 and step 5 to run the tests.
我们提供了一个称为MyOddCoin并实例化 Coin 类型并自定义其转移策略的小模块:只能转移奇数个代币。其还包括两个 tests来测试这种行为。您可以使用在第 2 步和第 5 步中学到的命令来运行测试。
进阶主题 (Advanced topics):
phantom 类型参数 (phantom type parameters)
In definitions of both Coin and Balance, we declare the type parameter CoinType to be phantom because CoinType is not used in the struct definition or is only used as a phantom type parameter.
在 Coin 和 Balance 的定义中,我们将类型参数 CoinType 声明为phantom,因为 CoinType 没有在结构体定义中使用或仅用作 phantom 类型参数。
Read more about phantom type parameters here.
阅读更多有关 phantom 类型参数 信息.
进阶步骤 (Advanced steps)
Before moving on to the next steps, let's make sure you have all the prover dependencies installed.
在继续下一步之前,确保您已安装所有的验证器依赖项。
Try running boogie /version . If an error message shows up saying "command not found: boogie", you will have to run the setup script and source your profile:
尝试运行 boogie /version 。如果出现错误消息“找不到命令:boogie”,您将必须运行安装脚本并更新环境配置(source ~/.profile):
# run the following in move repo root directory
./scripts/dev_setup.sh -yp
source ~/.profile
Step 7: 使用Move验证器(Use the Move prover)
Smart contracts deployed on the blockchain may manipulate high-value assets. As a technique that uses strict mathematical methods to describe behavior and reason correctness of computer systems, formal verification has been used in blockchains to prevent bugs in smart contracts. The Move prover is an evolving formal verification tool for smart contracts written in the Move language. The user can specify functional properties of smart contracts using the Move Specification Language (MSL) and then use the prover to automatically check them statically. To illustrate how the prover is used, we have added the following code snippet to the BasicCoin.move:
部署在区块链上的智能合约可能会操纵高价值资产。作为一种使用严格的数学方式来描述计算机系统的行为和推理正确性的技术,形式化验证已被用于区块链,以防止智能合约中错误的产生。 Move验证器是一种在进化中、用Move 语言编写的智能合约形式化验证工具。用户可以使用Move语言规范(Move Specification Language (MSL))指定智能合约的功能属性,然后使用验证器自动静态检查它们。 为了说明如何使用验证器,我们在BasicCoin.move中添加了以下代码片段:
    spec balance_of {
        pragma aborts_if_is_strict;
    }
Informally speaking, the block spec balance_of {...} contains the property specification of the method balance_of.
通俗地说,代码块 spec balance_of {...} 包含 balance_of 方法的属性规范说明。
Let's first run the prover using the following command inside BasicCoin directory:
首先在BasicCoin directory目录中使用以下命令运行验证器。
move prove
which outputs the following error information:
它输出以下错误信息:
error: abort not covered by any of the `aborts_if` clauses
   ┌─ ./sources/BasicCoin.move:38:5
   │
35 │           borrow_global<Balance<CoinType>>(owner).coin.value
   │           ------------- 由于执行失败这里发生中止
   ·
38 │ ╭     spec balance_of {
39 │ │         pragma aborts_if_is_strict;
40 │ │     }
   │ ╰─────^
   │
   =     at ./sources/BasicCoin.move:34: balance_of
   =         owner = 0x29
   =     at ./sources/BasicCoin.move:35: balance_of
   =         中止

Error: exiting with verification errors
The prover basically tells us that we need to explicitly specify the condition under which the function balance_of will abort, which is caused by calling the function borrow_global when owner does not own the resource Balance<CoinType>. To remove this error information, we add an aborts_if condition as follows:
验证器大体上告诉我们,我们需要明确指定函数 balance_of 中止的条件,中止原因是 owner(函数调用者)在没有资源 Balance<CoinType> 的情况下调用 borrow_global 函数导致的。要去掉此错误信息,我们添加如下 aborts_if 条件:
    spec balance_of {
        pragma aborts_if_is_strict;
        aborts_if !exists<Balance<CoinType>>(owner);
    }
After adding this condition, try running the prove command again to confirm that there are no verification errors:
添加此条件后,再次尝试运行prove命令,确认没有验证错误:
move prove
Apart from the abort condition, we also want to define the functional properties. In Step 8, we will give more detailed introduction to the prover by specifying properties for the methods defined the BasicCoin module.
除了中止条件,我们还想定义功能属性。在第 8 步中,我们将通过为定义 BasicCoin 模块的方法指定属性来更详细地介绍验证器。
第 8 步:为 BasicCoin 模块编写正式规范(Write formal specifications for the BasicCoin module)
取款方法 (Method withdraw)
The signature of the method withdraw is given below:
取款(withdraw) 方法的签名如下:
fun withdraw<CoinType>(addr: address, amount: u64) : Coin<CoinType> acquires Balance
The method withdraws tokens with value amount from the address addr and returns a created Coin of value amount. The method withdraw aborts when 1) addr does not have the resource Balance<CoinType> or 2) the number of tokens in addr is smaller than amount. We can define conditions like this:
该方法从地址 addr 中提取数量为 amount 的代币,然后创建数量为 amount 的代币并将其返回。当出现如下情况会中止:
- 地址
addr没有资源Balance<CoinType>,或 - 地址
addr中的代币数量小于amount时,withdraw。
我们可以这样定义条件:
    spec withdraw {
        let balance = global<Balance<CoinType>>(addr).coin.value;
        aborts_if !exists<Balance<CoinType>>(addr);
        aborts_if balance < amount;
    }
As we can see here, a spec block can contain let bindings which introduce names for expressions. global<T>(address): T is a built-in function that returns the resource value at addr. balance is the number of tokens owned by addr. exists<T>(address): bool is a built-in function that returns true if the resource T exists at address. Two aborts_if clauses correspond to the two conditions mentioned above. In general, if a function has more than one aborts_if condition, those conditions are or-ed with each other. By default, if a user wants to specify aborts conditions, all possible conditions need to be listed. Otherwise, the prover will generate a verification error. However, if pragma aborts_if_is_partial is defined in the spec block, the combined aborts condition (the or-ed individual conditions) only imply that the function aborts. The reader can refer to the MSL document for more information.
正如我们在这里看到的,一个 spec 块可以包含 let 绑定,它为表达式引入名称。
global<T>(address): T 是一个返回 addr 资源值的内置函数。balance 是 addr 拥有的代币数量。
exists<T>(address): bool 是一个内置函数,如果指定的地址(address)在(全局存储中)有资源 T 则返回 true 。
两个 aborts_if 子句对应上述两个条件。通常,如果一个函数有多个 aborts_if 条件,这些条件之间是相互对等的。默认情况下,如果用户想要指定中止条件,则需要列出所有可能的条件。否则验证器将产生验证错误。
但是,如果在 spec 代码块中定义了 pragma aborts_if_is_partial,则组合中止条件(或对等的单个条件)仅 暗示 函数中止。
读者可以参考 MSL 文档了解更多信息。
The next step is to define functional properties, which are described in the two ensures clauses below. First, by using the let post binding, balance_post represents the balance of addr after the execution, which should be equal to balance - amount. Then, the return value (denoted as result) should be a coin with value amount.
下一步是定义功能属性,这些属性在下面的两个 ensures 子句中进行了描述。首先,通过使用 let post 绑定,balance_post 表示地址 addr 执行后的余额,应该等于 balance - amount。那么,返回值(表示为 result )应该是一个价值为 amount 的代币。
    spec withdraw {
        let balance = global<Balance<CoinType>>(addr).coin.value;
        aborts_if !exists<Balance<CoinType>>(addr);
        aborts_if balance < amount;

        let post balance_post = global<Balance<CoinType>>(addr).coin.value;
        ensures balance_post == balance - amount;
        ensures result == Coin<CoinType> { value: amount };
    }
存款方法 (Method deposit)
The signature of the method deposit is given below:
存款(deposit)方法的签名如下:
fun deposit<CoinType>(addr: address, check: Coin<CoinType>) acquires Balance
The method deposits the check into addr. The specification is defined below:
该方法将代币 check 存入地址 addr. 规范定义如下:
    spec deposit {
        let balance = global<Balance<CoinType>>(addr).coin.value;
        let check_value = check.value;

        aborts_if !exists<Balance<CoinType>>(addr);
        aborts_if balance + check_value > MAX_U64;

        let post balance_post = global<Balance<CoinType>>(addr).coin.value;
        ensures balance_post == balance + check_value;
    }
balance represents the number of tokens in addr before execution and check_value represents the number of tokens to be deposited. The method would abort if 1) addr does not have the resource Balance<CoinType> or 2) the sum of balance and check_value is greater than the maxium value of the type u64. The functional property checks that the balance is correctly updated after the execution.
balance 表示 addr 执行前的代币数量,check_value 表示要存入的代币数量。方法出现如下情况将会中止:
1) 地址 addr 没有 Balance<CoinType> 资源, 或
2) balance 与 check_value 之和大于 u64 的最大值。
该功能属性检查执行后余额是否正确更新。
转账方法 (Method transfer)
The signature of the method transfer is given below:
转账(transfer)方法的签名如下:
public fun transfer<CoinType: drop>(from: &signer, to: address, amount: u64, _witness: CoinType) acquires Balance
The method transfers the amount of coin from the account of from to the address to. The specification is given below:
该方法将数量为 amount 的代币从帐户 from 转账给地址 to。规范如下:
    spec transfer {
        let addr_from = signer::address_of(from);

        let balance_from = global<Balance<CoinType>>(addr_from).coin.value;
        let balance_to = global<Balance<CoinType>>(to).coin.value;
        let post balance_from_post = global<Balance<CoinType>>(addr_from).coin.value;
        let post balance_to_post = global<Balance<CoinType>>(to).coin.value;

        ensures balance_from_post == balance_from - amount;
        ensures balance_to_post == balance_to + amount;
    }
addr_from is the address of from. Then the balances of addr_from and to before and after the execution are obtained.
The ensures clauses specify that the amount number of tokens is deducted from addr_from and added to to. However, the prover will generate the error information as below:
addr_from 是账户 from 的地址,然后获取执行前两个地址 addr_from 和 to 的余额。
ensures 子句指定从 addr_from 减去 amount 数量的代币,添加到 to。然而,验证器会生成以下错误:
error: post-condition does not hold
   ┌─ ./sources/BasicCoin.move:57:9
   │
62 │         ensures balance_from_post == balance_from - amount;
   │         ^^^^^^^^^^^^^^^^^^^^^^^^^^^^^^^^^^^^^^^^^^^^^^^^^^^
   │
   ...
The property is not held when addr_from is equal to to. As a result, we could add an assertion assert!(from_addr != to) in the method to make sure that addr_from is not equal to to.
当 addr_from 等于 to 时,这个属性无效。因此,我们可以在方法中添加一个断言,assert!(from_addr != to) 来确保 addr_from 不等于 to。
练习 (Exercises)
- Implement the
aborts_ifconditions for thetransfermethod. - 为
transfer方法实现aborts_if条件。 - Implement the specification for the
mintandpublish_balancemethod. - 为
mint和publish_balance方法实现规范。
The solution to this exercise can be found in step_8_sol.
练习的解答可以在 step_8_sol中找到。