引言 (Introduction)
Welcome to Move, a next generation language for secure, sandboxed, and formally verified programming. Its first use case is for the Diem blockchain, where Move provides the foundation for its implementation. Move allows developers to write programs that flexibly manage and transfer assets, while providing the security and protections against attacks on those assets. However, Move has been developed with use cases in mind outside a blockchain context as well.
欢迎来到Move的世界,Move是一种安全、沙盒式和形式化验证的下一代编程语言,它的第一个用例是 Diem 区块链(当时名字叫Libra, 脸书团队开发的项目, 译者注), Move 为其实现提供了基础。 Move 允许开发人员编写灵活管理和转移数字资产的程序,同时提供安全保护,防止对那些链上资产的攻击。不仅如此,Move 也可用于区块链世界之外的开发场景。
Move takes its cue from Rust by using resource types with move (hence the name) semantics as an explicit representation of digital assets, such as currency.
Move 的诞生从Rust中吸取了灵感,Move也是因为使用具有移动(move)语义的资源类型作为数字资产(例如货币)的显式表示而得名。
Move是为谁准备的?(Who is Move for?)
Move was designed and created as a secure, verified, yet flexible programming language. The first use of Move is for the implementation of the Diem blockchain. That said, the language is still evolving. Move has the potential to be a language for other blockchains, and even non-blockchain use cases as well.
Move语言被设计和创建为安全、可验证, 同时兼顾灵活性的编程语言。Move的第一个应用场景是用于Diem区块链的开发。现在,Move语言仍在不断发展中。Move 还有成为其他区块链,甚至非区块链用例开发语言的潜质。
Given custom Move modules will not be supported at the launch of the Diem Payment Network (DPN), we are targeting an early Move Developer persona.
鉴于在 Diem 支付网络 (DPN) 启动时将不支持自定义 Move 模块(custom Move modules),我们的目标是早期的 Move 开发人员。
The early Move Developer is one with some programming experience, who wants to begin understanding the core programming language and see examples of its usage.
早期的 Move 开发人员应该是具有一定编程经验的程序员,他们愿意了解编程语言核心,并探索它的用法。
爱好者 (Hobbyists)
Understanding that the capability to create custom modules on the Diem Payment Network will not be available at launch, the hobbyist Move Developer is interested in learning the intricacies of the language. She will understand the basic syntax, the standard libraries available, and write example code that can be executed using the Move CLI. The Move Developer may even want to dig into understanding how the Move Virtual Machine executes the code she writes.
作为(Move语言)爱好者角色,首先需要明白在Diem支付网络上创建自定义模块(custom modules)是不可能的,其次,你还要对探索这门语言的复杂性保持兴趣。你将了解基本语法、可用的标准库,并编写可以用的Move CLI执行的示例代码。如果可能,你甚至可以去尝试体验Move虚拟机如何执行你自己编写的代码。
核心贡献者 (Core Contributor)
Beyond a hobbyist wanting to stay ahead of the curve for the core programming language is someone who may want to contribute directly to Move. Whether this includes submitting language improvements or even, in the future, adding core modules available on the Diem Payment Network, the core contributor will understand Move at a deep level.
核心贡献者指那些超越爱好者并想在核心编程语言方面保持领先,还直接为 Move 做出贡献的人。无论是提交语言改进,甚至未来添加 Diem 支付网络上可用的核心模块等,核心贡献者都将深入了解Move。
Move不适用于哪些人?(Who Move is currently not targeting)
Currently, Move is not targeting developers who wish to create custom modules and contracts for use on the Diem Payment Network. We are also not targeting novice developers who expect a completely polished developer experience even in testing the language.
目前,Move 并不适用那些希望在在 Diem 支付网络上创建自定义模块和合约的开发人员。我们也不针对期望在测试语言时就能获得完美开发体验的初学开发者。
从哪里开始?(Where Do I Start?)
Begin with understanding modules and scripts and then work through the Move Tutorial.
你可以从了解模块和脚本(modules and scripts)开始,然后跟随Move教程(Move Tutorial)进行练习。
模块和脚本 (Modules and Scripts)
Move has two different types of programs: Modules and Scripts. Modules are libraries that define struct types along with functions that operate on these types. Struct types define the schema of Move's global storage, and module functions define the rules for updating storage. Modules themselves are also stored in global storage. Scripts are executable entrypoints similar to a main function in a conventional language. A script typically calls functions of a published module that perform updates to global storage. Scripts are ephemeral code snippets that are not published in global storage.
A Move source file (or compilation unit) may contain multiple modules and scripts. However, publishing a module or executing a script are separate VM operations.
Move有两种不同类型的程序: Modules和 Scripts。模块(Modules, 相当于智能合约,译者注)是定义结构类型以及对这些类型进行操作的函数的库。结构类型定义Move的全局存储的模式,模块函数定义更新存储的规则。模块本身也存储在全局存储中。脚本(Scripts)是可执行的入口点,类似于传统语言中的主函数 main。脚本通常调用已发布模块的函数来更新全局存储。Scripts是暂时的代码片段,没有发布到全局存储中。
一个Move源文件(或编译单元)可能包含多个模块和脚本。然而,发布模块或执行脚本都是独立的VM操作。
语法(Syntax)
脚本(Scripts)
A script has the following structure: script具有以下结构:
script {
    <use>*
    <constants>*
    fun <identifier><[type parameters: constraint]*>([identifier: type]*) <function_body>
}
A script block must start with all of its use declarations, followed by any constants and (finally) the main function declaration. The main function can have any name (i.e., it need not be called main), is the only function in a script block, can have any number of arguments, and must not return a value. Here is an example with each of these components:
一个 script 块必须在开头声明use,然后是constants的内容,最后声明主函数 function。主函数的名称可以是任意的(也就是说,它不一定命名为 main),是script block中唯一的函数,可以有任意数量的参数,并且不能有返回值。下面是示例:
script {
    // Import the Debug module published at the named account address std.
    use std::debug;

    const ONE: u64 = 1;

    fun main(x: u64) {
        let sum = x + ONE;
        debug::print(&sum)
    }
}
Scripts have very limited power—they cannot declare friends, struct types or access global storage. Their primary purpose is to invoke module functions.
脚本(Scripts) 的功能非常有限—它们不能声明友元、结构类型或访问全局存储, 他们的主要作用主要是调用模块函数.
模块(Modules)
Module 具有以下结构:
module <address>::<identifier> {
    (<use> | <friend> | <type> | <function> | <constant>)*
}
where <address> is a valid named or literal address.
其中 <address> 是一个有效的 命名或字面量地址.
例子:
module 0x42::Test {
    struct Example has copy, drop { i: u64 }

    use std::debug;
    friend 0x42::AnotherTest;

    const ONE: u64 = 1;

    public fun print(x: u64) {
        let sum = x + ONE;
        let example = Example { i: sum };
        debug::print(&sum)
    }
}
The module 0x42::Test part specifies that the module Test will be published under the account address 0x42 in global storage.
module 0x42::Test 这部分指定模块 Test 会被发布到全局存储中账户地址为 0x42 之下.
Modules can also be declared using named addresses. For example:
模块也可以用 命名地址 来声明,例如:
module test_addr::test {
    struct Example has copy, drop { a: address}

    use std::debug;
    friend test_addr::another_test;

    public fun print() {
        let example = Example { a: @test_addr};
        debug::print(&example)
    }
}
Because named addresses only exist at the source language level and during compilation, named addresses will be fully substituted for their value at the bytecode level. For example if we had the following code:
因为命名地址只存在于源码级别,并且在编译期间,命名地址会被转换成字节码。例如,如果我们有下面的代码:
script {
    fun example() {
        my_addr::m::foo(@my_addr);
    }
}
and we compiled it with my_addr set to 0xC0FFEE, then it would be equivalent to the following operationally:
我们会将 my_addr 编译为0xC0FFEE,将和下面的代码是等价的:
script {
    fun example() {
        0xC0FFEE::m::foo(@0xC0FFEE);
    }
}
However at the source level, these are not equivalent—the function M::foo must be accessed through the MyAddr named address, and not through the numerical value assigned to that address.
但是在源码级别,这两个并不等价 - 函数 M::foo 必须通过 MyAddr命名地址访问,而不是通过分配给该地址的数值访问。
Module names can start with letters a to z or letters A to Z. After the first character, module names can contain underscores _, letters a to z, letters A to Z, or digits 0 to 9.
模块名称可以以字母 a 到 z 或字母 A 到 Z开头。在第一个字符之后,模块名可以包含下划线_、字母 a 到 z 、字母 A 到 Z 或数字 0 到 9。
module my_module {}
module foo_bar_42 {}
Typically, module names start with an uppercase letter. A module named my_module should be stored in a source file named my_module.move.
通常,模块名称以大写字母开头。名为 my_module 的模块应该存储在名为 my_module.move 的源文件中。
All elements inside a module block can appear in any order. Fundamentally, a module is a collection of types and functions. Uses import types from other modules. Friends specify a list of trusted modules. Constants define private constants that can be used in the functions of a module.
module 块中的所有元素都可以以任何顺序出现。从根本上说,模块是types和functions的集合。Uses从其他模块导入类型。Friends指定一个可信模块列表。Constants定义可以在模块函数中使用的私有常量。
Move 教程(Move Tutorial)
Welcome to the Move Tutorial! In this tutorial, we are going to go through some steps of developing Move code including design, implementation, unit testing and formal verification of Move modules.
欢迎来到 Move 语言教程,在本教程中,我们通过一些具体的步骤进行 Move 语言代码的开发,包括 Move 模块的设计、实现、单元测试和形式化验证。
There are nine steps in total:
- Step 0: Installation
- Step 1: Writing my first Move module
- Step 2: Adding unit tests to my first Move module
- Step 3: Designing my
BasicCoinmodule - Step 4: Implementing my
BasicCoinmodule - Step 5: Adding and using unit tests with the
BasicCoinmodule - Step 6: Making my
BasicCoinmodule generic - Step 7: Use the Move prover
- Step 8: Writing formal specifications for the
BasicCoinmodule
整个过程共包含9个步骤:
- Step 0: 安装 Move 开发环境
- Step 1: 编写第一个 Move 模块(Move Module)
- Step 2: 给模块(Module)添加单元测试
- Step 3: 设计自己的
BasicCoin模块(Module) - Step 4:
BasicCoin模块(Module)的实现 - Step 5: 给
BasicCoin模块添加单元测试 - Step 6: 使用泛型(generic)编写
BasicCoin模块 - Step 7: 使用
Move prover - Step 8: 为
BasicCoin模块编写形式化规范(formal specifications)
Each step is designed to be self-contained in the corresponding step_x folder. For example, if you would
like to skip the contents in step 1 through 4, feel free to jump to step 5 since all the code we have written
before step 5 will be in step_5 folder. At the end of some steps, we also include
additional material on more advanced topics.
其中每一步都被设计为自包含的文件夹, 相应名字为 step_x。 例如,如果您愿意跳过 step 1 到 step 4 的内容,可直接跳到 step 5,因为所有在 step 5 之前的代码均在在step_5 文件夹之下。在部分步骤结束时,我们还引入有关更高级主题的附加资料。
Now let's get started!
好了,我们现在开始!
Step 0: 安装 Move 开发环境 (Step 0: Installation)
If you haven't already, open your terminal and clone the Move repository:
如果您还没有安装过 Move,首先打开命令终端(terminal) 并clone Move代码库:
git clone https://github.com/move-language/move.git
Go to the move directory and run the dev_setup.sh script:
进入到 move 文件夹下,执行 dev_setup.sh 脚本:
cd move
./scripts/dev_setup.sh -ypt
Follow the script's prompts in order to install all of Move's dependencies.
The script adds environment variable definitions to your ~/.profile file.
Include them by running this command:
根据脚本命令的提示,按顺序安装 Move 的所有依赖项。
脚本将会将(move命令所在路径)环境变量写入到 ~/.profile 文件中。
执行如下命令使环境变量生效:
source ~/.profile
Next, install Move's command-line tool by running this commands:
然后执行如下命令来安装 Move 命令行工具:
cargo install --path language/tools/move-cli
You can check that it is working by running the following command:
通过如下运行命令可以检查 move 命令是否可正常:
move --help
You should see something like this along with a list and description of a number of commands:
您应该会看到类似这样的内容以及许多命令的列表和描述:
move-package
Execute a package command. Executed in the current directory or the closest containing Move package

USAGE:
    move [OPTIONS] <SUBCOMMAND>

OPTIONS:
        --abi                          Generate ABIs for packages
...
If you want to find what commands are available and what they do, running
a command or subcommand with the --help flag will print documentation.
如果想了解有支持哪引命令及其作用, 执行命令或子命令时添加 --help 标记,此时会打印帮助文档。
Before running the next steps, cd to the tutorial directory:
在执行下一步骤之前,请先执行 cd 命令进入到教程对应目录下:
cd <path_to_move>/language/documentation/tutorial
Visual Studio Code Move 支持 (Visual Studio Code Move Support)
There is official Move support for Visual Studio Code. You need to install the move analyzer first:
Visual Studio Code 有正式的 Move 语言支持, 您需要先安装 move analyzer :
cargo install --path language/move-analyzer
Now you can install the VS extension by opening VS Code, searching for the "move-analyzer" in the Extension Pane, and installing it. More detailed instructions can be found in the extension's README.
现在您可以打开 VS Code 并安装 Move 扩展插件了,在扩展页面下找到 move-analyzer 并安装即可。关于扩展的详细信息可以查看扩展的README。
Step 1: 编写第一个Move模块 (Writing my first Move module)
Change directory into the step_1/BasicCoin directory.
You should see a directory called sources -- this is the place where all
the Move code for this package lives. You should also see a
Move.toml file as well. This file specifies dependencies and other information about
the package; if you're familiar with Rust and Cargo, the Move.toml file
is similar to the Cargo.toml file, and the sources directory similar to
the src directory.
切换当前目录到step_1/BasicCoin下,您将看到 sources 子目录 -- 这个包(package)下所有的 Move 代码都在此目录中,同时您还会看到一个 Move.toml 文件。该文件指定当前包的依赖列表和其他信息。
如果您熟悉 Rust 和 Cargo,那 Move.toml 文件类似 Cargo.toml 文件, sources 目录类似 src 目录(它们的作用是一样的)
Let's take a look at some Move code! Open up
sources/FirstModule.move in
your editor of choice. The first thing you'll see is this:
来一起看看 Move 语言代码内容! 用你的编辑器打开sources/FirstModule.move文件,会看到如下内容:
// sources/FirstModule.move
module 0xCAFE::BasicCoin {
    ...
}
This is defining a Move
module. Modules are the
building block of Move code, and are defined with a specific address -- the address that the module can be published under.
In this case, the BasicCoin module can only be published under 0xCAFE.
这是一个 Move module(模块)的定义。
模块是 Move 语言的代码块, 并且它使用指定的地址(address)进行定义 -- 模块只能在该地址下发布。
当前 BasicCoin 模块只能被发布在 0xCAFE 地址下。
Let's now take a look at the next part of this file where we define a struct to represent a Coin with a given value:
再看这个文件的下一部分,这里定义了一个具有字段 value 的结构体 Coin:
module 0xCAFE::BasicCoin {
    struct Coin has key {
        value: u64,
    }
    ...
}
Looking at the rest of the file, we see a function definition that creates a Coin struct and stores it under an account:
再看文件剩余部分,我们会看到一个函数,它会创建一个 Coin 结构体,并将其保存在某个账号(account)下:
module 0xCAFE::BasicCoin {
    struct Coin has key {
        value: u64,
    }

    public fun mint(account: signer, value: u64) {
        move_to(&account, Coin { value })
    }
}
Let's take a look at this function and what it's saying:
- It takes a
signer-- an unforgeable token that represents control over a particular address, and avalueto mint. - It creates a
Coinwith the given value and stores it under theaccountusing themove_tooperator.
Let's make sure it builds! This can be done with the build command from within the package folder (step_1/BasicCoin):
让我们来看看这个函数和它的含义:
- 此函数需要一个
signer参数 -- 表示不可伪造的 token 受此特定地址的控制; 和一个需要铸造的数量参数value。 - 此函数使用给定的参数值铸造一个
Coin,然后通过move_to操作将其保存在(全局存储中)给定的account账户下。
我们需要确保它真的执行,这可以通过在包文件夹(step_1/BasicCoin)下的运行 build 命令来完成:
move build
进阶概念及参考引用 (Advanced concepts and references)
-
You can create an empty Move package by calling:
move new <pkg_name> -
Move code can also live a number of other places. More information on the Move package system can be found in the Move book
-
More information on the
Move.tomlfile can be found in the package section of the Move book. -
Move also supports the idea of named addresses, Named addresses are a way to parametrize Move source code so that you can compile the module using different values for
NamedAddrto get different bytecode that you can deploy, depending on what address(es) you control. They are used quite frequently, and can be defined in theMove.tomlfile in the[addresses]section, e.g.,[addresses] SomeNamedAddress = "0xC0FFEE" -
你可以通过以下命令创建一个空的 Move 包(move package):
move new <pkg_name> -
Move 代码也可以放在其他很多地方, 更多关于 Move 包系统的信息请参阅Move book
-
更多关于
Move.toml文件的信息可以参阅package section of the Move book. -
Move语言也支持命名地址的概念(named addresses), 命名地址是一种参数化 Move 源代码的方法, 就是如果对
NamedAddr使用的不同赋值编译,编译后会获得部署到你控制地址的不同字节码. 这种用法很常见,一般都将地址变量其定义在Move.toml文件 的[addresses]部分. 例如:[addresses] SomeNamedAddress = "0xC0FFEE" -
Structures in Move can be given different abilities that describe what can be done with that type. There are four different abilities:
copy: Allows values of types with this ability to be copied.drop: Allows values of types with this ability to be popped/dropped.store: Allows values of types with this ability to exist inside a struct in global storage.key: Allows the type to serve as a key for global storage operations.
So in the
BasicCoinmodule we are saying that theCoinstruct can be used as a key in global storage and, because it has no other abilities, it cannot be copied, dropped, or stored as a non-key value in storage. So you can't copy coins, and you also can't lose coins by accident! -
Functions are default private, and can also be
public,public(friend), orpublic(script). The last of these states that this function can be called from a transaction script.public(script)functions can also be called by otherpublic(script)functions. -
move_tois one of the five different global storage operators. -
Move 结构体可以通过给类型设定不同的能力abilities让类型下支持对应的行为. 有四种能力:
copy: 允许此类型的值被复制drop: 允许此类型的值被弹出/丢弃store: 允许此类型的值存在于全局存储的某个结构体中key: 允许此类型作为全局存储中的键(具有key能力的类型才能保存到全局存储中)
所以
BasicCoin模块下的Coin结构体可以用作全局存储(global storage)的键(key), 因为它又不具备其他能力,它不能 被拷贝,不能被丢弃, 也不能作为非key来保存在(全局)存储里. 你无法复制Coin,也不会意外弄丢它. -
函数Functions默认是私有的(private), 也可以声明为
publicpublic(friend),public(script). 最后一个声明(指public(script))的函数可以被事务脚本调用。public(script)函数也可以被其他public(script)函数调用。(注意:在最新版本的 Move中,public(script)已经被废弃,被public entry取代,下同,译者注) -
move_to是五种不同的全局存储操作之一
Step 2: 给模块(Module)添加单元测试 (Adding unit tests to my first Move module)
Now that we've taken a look at our first Move module, we'll take a look at a test to make sure minting works the way we expect it to by changing directory to step_2/BasicCoin. Unit tests in Move are similar to unit tests in Rust if you're familiar with them -- tests are annotated with #[test] and written like normal Move functions.
You can run the tests with the move test command: (原文是 package test,应该有误)
现在我们已经完成了我们的第一个 Move 模块,我们将切换到目录step_2/BasicCoin下并完成一个测试,确保铸币按我们预期的方式工作。
如果你熟悉它们(Move 和 Rust)的话,Move 中的单元测试类似于 Rust 中的单元测试 —— 测试代码使用 #[test] 注解,并像编写普通的 Move 函数一样。
可以通过 move test 命令来执行测试:
move test
Let's now take a look at the contents of the FirstModule.movefile. The first new thing you'll
see is this test:
现在我们来完成文件FirstModule.move的具体内容,你将看到的第一个新事项是这个测试:
module 0xCAFE::BasicCoin {
    ...
    // Declare a unit test. It takes a signer called `account` with an
    // address value of `0xC0FFEE`.
    #[test(account = @0xC0FFEE)]
    fun test_mint_10(account: signer) acquires Coin {
        let addr = signer::address_of(&account);
        mint(account, 10);
        // Make sure there is a `Coin` resource under `addr` with a value of `10`.
        // We can access this resource and its value since we are in the
        // same module that defined the `Coin` resource.
        assert!(borrow_global<Coin>(addr).value == 10, 0);
    }
}
This is declaring a unit test called test_mint_10 that mints a Coin struct under the account with a value of 10. It is then checking that the minted
coin in storage has the value that is expected with the assert! call. If the assertion fails the unit test will fail.
这里声明了一个命名为 test_mint_10 的单元测试,它在 account 账户地址下铸造了一个包含 value 为 10的 Coin,然后通过 assert! 断言检查已经铸造成功并保存在(全局)存储中的 Coin 的值是否与期望值一致。如果断言 assert 执行失败,则单元测试失败。
进阶概念及参考练习 (Advanced concepts and exercises)
-
There are a number of test-related annotations that are worth exploring, they can be found here. You'll see some of these used in Step 5.
-
Before running unit tests, you'll always need to add a dependency on the Move standard library. This can be done by adding an entry to the
[dependencies]section of theMove.toml, e.g.,[dependencies] MoveStdlib = { local = "../../../../move-stdlib/", addr_subst = { "Std" = "0x1" } }Note that you may need to alter the path to point to the
move-stdlibdirectory under<path_to_move>/language. You can also specify git dependencies. You can read more on Move package dependencies here. -
很多测试相关的注解(annotations)都值得仔细探索, 参阅用法。 在
Step 5中会看到更多用法. -
执行测试之前,需要设定Move标准库依赖关系,找到
Move.toml并在[dependencies]段内进行设定, 例如[dependencies] MoveStdlib = { local = "../../../../move-stdlib/", addr_subst = { "Std" = "0x1" } }
注意, 需要修改 <path_to_move>/language 中的内容来匹配实际 move-stdlib 所在的目录路径. 也可以用 git 方式指定依赖, 关于 Move 包依赖(package denpendices)信息可参阅package文档
练习 (Exercises)
-
Change the assertion to
11so that the test fails. Find a flag that you can pass to themove testcommand that will show you the global state when the test fails. It should look something like this: -
将断言值改为
11将导致断言执行失败, 找一个可以传递给move test命令的标志,当测试失败时它会显示全局状态。看起来像这样:┌── test_mint_10 ────── │ error[E11001]: test failure │ ┌─ ./sources/FirstModule.move:24:9 │ │ │ 18 │ fun test_mint_10(account: signer) acquires Coin { │ │ ------------ In this function in 0xcafe::BasicCoin │ · │ 24 │ assert!(borrow_global<Coin>(addr).value == 11, 0); │ │ ^^^^^^^^^^^^^^^^^^^^^^^^^^^^^^^^^^^^^^^^^^^^^^^^^ Test was not expected to abort but it aborted with 0 here │ │ │ ────── Storage state at point of failure ────── │ 0xc0ffee: │ => key 0xcafe::BasicCoin::Coin { │ value: 10 │ } │ └────────────────── -
Find a flag that allows you to gather test coverage information, and then play around with using the
move coveragecommand to look at coverage statistics and source coverage. -
找一个允许您收集测试覆盖率信息的标志,然后使用
move coverage命令查看覆盖率统计信息和源码覆盖率。
Step 3: 设计 BasicCoin 模块(Module) (Designing my BasicCoin module)
In this section, we are going to design a module implementing a basic coin and balance interface, where coins can be minted and transferred between balances held under different addresses.
在本节中,我们将设计一个具有基本代币和余额(balance)接口功能的模块,通过他们来实现币的挖矿铸造,不同地址之下钱包的转账。
The signatures of the public Move function are the following:
Move 语言的 public function 签名如下:
/// Publish an empty balance resource under `account`'s address. This function must be called before
/// minting or transferring to the account.
public fun publish_balance(account: &signer) { ... }

/// Mint `amount` tokens to `mint_addr`. Mint must be approved by the module owner.
public fun mint(module_owner: &signer, mint_addr: address, amount: u64) acquires Balance { ... }

/// Returns the balance of `owner`.
public fun balance_of(owner: address): u64 acquires Balance { ... }

/// Transfers `amount` of tokens from `from` to `to`.
public fun transfer(from: &signer, to: address, amount: u64) acquires Balance { ... }
Next we look at the data structs we need for this module.
接下来再看本模块所需要各数据结构.
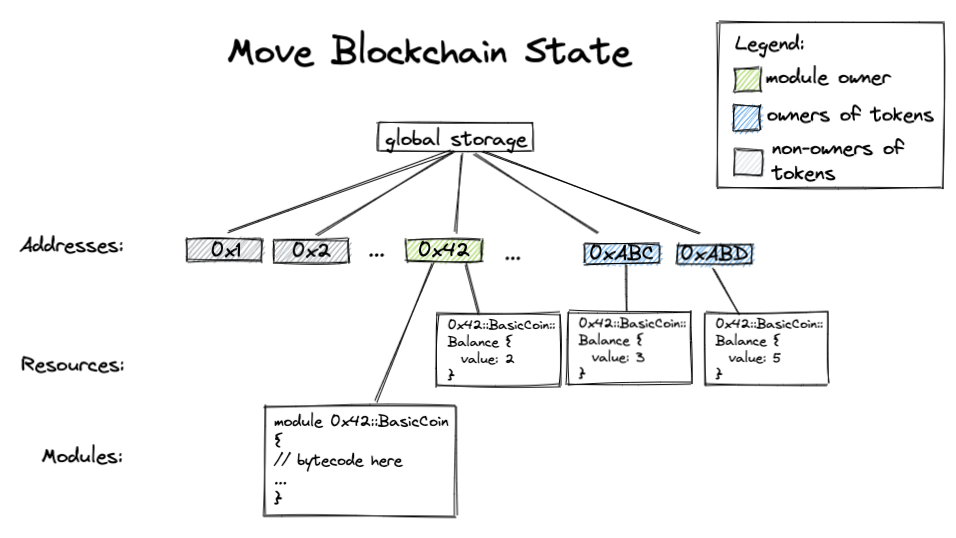
A Move module doesn't have its own storage. Instead, Move "global storage" (what we call our blockchain state) is indexed by addresses. Under each address there are Move modules (code) and Move resources (values).
Move 语言的模块没有自己的数据存储,相反的是 Move 语言提供按地址(addresses) 索引的 全局存储 (也是就是我们所说的区块链状态(blockchain state)). 每个地址之下包含有 Move 模块(代码)和 Move 资源 (数据)。
The global storage looks roughly like this in Rust syntax:
在 Rust 语法中,全局存储看起来有点像这样:
#![allow(unused)]
fn main() {
struct GlobalStorage {
    resources: Map<address, Map<ResourceType, ResourceValue>>
    modules: Map<address, Map<ModuleName, ModuleBytecode>>
}
}
The Move resource storage under each address is a map from types to values. (An observant reader might observe that this means each address can only have one value of each type.) This conveniently provides us a native mapping indexed by addresses.
In our BasicCoin module, we define the following Balance resource representing the number of coins each address holds:
每个地址下的 Move 资源存储是一个类型到数值的映射。(细心的读者也许已经注意到每个地址, 每个类型下只能对应一个具体值)。这方便地为我们提供了一个按地址索引的本地映射。
在 BasicCoin 模块中,定义了每个 Balance (钱包,余额)资源表示每个地址下持有的币的数量:
/// Struct representing the balance of each address.
struct Balance has key {
    coin: Coin // same Coin from Step 1
}
Roughly the Move blockchain state should look like this:
区块链状态(Move blockchain state)看起来大致如下:
进阶主题 (Advanced topics) :
public(script) functionsOnly functions with public(script) visibility can be invoked directly in transactions. So if you would like to call the transfer method directly from a transaction, you'll want to change its signature to:
只有public(script)可见行的函数才能直接被交易调用,所以如果你要直接在交易内调用transfer方法,那么需要将函数签改成如下格式:
public(script) fun transfer(from: signer, to: address, amount: u64) acquires Balance { ... }
Read more on Move function visibilities here.
关于函数可见性的更多信息,请参阅Move function visibilities。
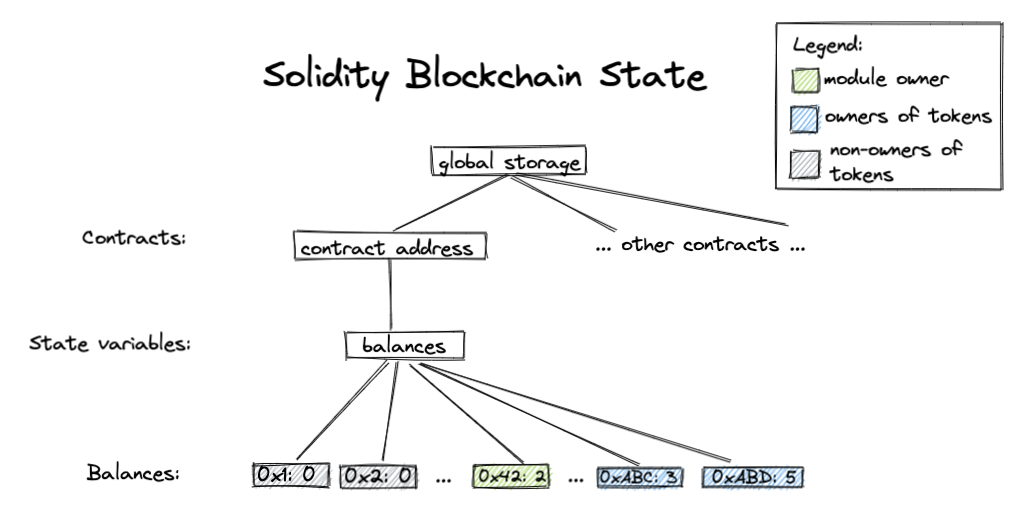
与 Ethereum/Solidity 的比较 (Comparison with Ethereum/Solidity)
In most Ethereum ERC-20 contracts, the balance of each address is stored in a state variable of type mapping(address => uint256). This state variable is stored in the storage of a particular smart contract.
在大多数以太坊ERC-20智能合约中,各个账户地址下的余额保存在类型为 mapping(address => uint256)的 状态变量 中,此状态变量存储在具体的智能合约内部存储中。
The Ethereum blockchain state might look like this:
以太坊区块链的状态看起来大致如下:
Step 4: 实现 BasicCoin 模块span id="Step4"> (Implementing my BasicCoin module)
We have created a Move package for you in folder step_4 called BasicCoin. The sources folder contains source code for all your Move modules in the package, including BasicCoin.move. In this section, we will take a closer look at the implementation of the methods inside BasicCoin.move.
我们已经在 step_4 文件夹上创建了名叫 BasicCoin 的 Move 包。sources 文件夹包含所有的 Move 包(package)的模块源码,包括 BasicCoin.move。 在本节中,我们将仔细研究BasicCoin.move内部方法的实现。
编译代码 (Compiling our code)
Let's first try building the code using Move package by running the following command in step_4/BasicCoin folder:
首先尝试在文件夹step_4/BasicCoin中运行以下命令,使用 Move 包构建代码:
move build
方法的实现 (Implementation of methods)
Now let's take a closer look at the implementation of the methods inside BasicCoin.move.
现在仔细看看BasicCoin.move中内部方法的实现。
publish_balance方法 (Method publish_balance)
This method publishes a Balance resource to a given address. Since this resource is needed to receive coins through minting or transferring, publish_balance method must be called by a user before they can receive money, including the module owner.
此方法将 Balance 资源发布到指定地址名下。由于此资源需要通过铸造或转账来接收代币,必须由用户先调用方法 publish_balance 才能接收钱,包括模块所有者。
This method uses a move_to operation to publish the resource:
此方法使用 move_to 操作来发布资源:
let empty_coin = Coin { value: 0 };
move_to(account, Balance { coin:  empty_coin });
mint方法 (Method mint)
)
Here we require that mint must be approved by the module owner. We enforce this using the assert statement:
mint method mints coins to a given account.
mint 方法将代币铸造到指定的帐户。在此我们要求 mint 必须得到模块所有者的批准。我们使用 assert 语句强制执行此操作:
assert!(signer::address_of(&module_owner) == MODULE_OWNER, errors::requires_address(ENOT_MODULE_OWNER));
Assert statements in Move can be used in this way: assert!(<predicate>, <abort_code>);. This means that if the <predicate> is false, then abort the transaction with <abort_code>. Here MODULE_OWNER and ENOT_MODULE_OWNER are both constants defined at the beginning of the module. And errors module defines common error categories we can use.
It is important to note that Move is transactional in its execution -- so if an abort is raised no unwinding of state needs to be performed, as no changes from that transaction will be persisted to the blockchain.
Move 中的 assert 语句可以这样使用:assert!(<predicate>, <abort_code>);。这意味着如果 <predicate> 为假,则使用中止错误码 <abort_code> 来终止交易。此处的 MODULE_OWNER 和 ENOT_MODULE_OWNER 都是在模块开头定义的常量。errors 模块定义了我们可以使用的常见错误种类。重点是我们需要注意 Move 在其执行过程中是事务性的-- 因此,如果触发中止(abort),并不用回退已执行状态的,因为该事务的任何更改都不会持久保存到区块链。
We then deposit a coin with value amount to the balance of mint_addr.
然后将数量为 amount 的代币存入 mint_addr 的余额中。
deposit(mint_addr, Coin { value: amount });
balance_of方法 (Method balance_of)
We use borrow_global, one of the global storage operators, to read from the global storage.
我们使用全局存储操作之一的 borrow_global 从全局存储中读取资源(数据)。
borrow_global<Balance>(owner).coin.value
                 |       |       \    /
        resource type  address  field names
transfer方法 (Method transfer)
This function withdraws tokens from from's balance and deposits the tokens into tos balance. We take a closer look at withdraw helper function:
该函数从 from 的余额中提取代币并将代币存入 to 的余额中。我们仔细研究帮助函数 withdraw:
fun withdraw(addr: address, amount: u64) : Coin acquires Balance {
    let balance = balance_of(addr);
    assert!(balance >= amount, EINSUFFICIENT_BALANCE);
    let balance_ref = &mut borrow_global_mut<Balance>(addr).coin.value;
    *balance_ref = balance - amount;
    Coin { value: amount }
}
At the beginning of the method, we assert that the withdrawing account has enough balance. We then use borrow_global_mut to get a mutable reference to the global storage, and &mut is used to create a mutable reference to a field of a struct. We then modify the balance through this mutable reference and return a new coin with the withdrawn amount.
在方法开始,我们断言提款账户有足够的余额。然后我们使用 borrow_global_mut 来获得全局存储的可变引用,并用 &mut 创建结构体字段的可变引用。然后我们通过这个可变引用修改余额并返回一个带有提取金额的新代币。
练习 (Exercises)
There are two TODOs in our module, left as exercises for the reader:
- Finish implementing the
publish_balancemethod. - Implement the
depositmethod.
在模块中有两个 TODOs,留给读者练习:
- 完成
publish_balance方法的实现。 - 实现
deposit方法。
The solution to this exercise can be found in step_4_sol folder.
此练习的解决方案可以在step_4_sol文件夹中找到。
额外练习 (Bonus exercise)
- What would happen if we deposit too many tokens to a balance?
- 如果我们在余额中存入太多会发生什么?
Step 5: 在模块 BasicCoin 中添加和使用单元测试 (Adding and using unit tests with the BasicCoin module)
In this step we're going to take a look at all the different unit tests we've written to cover the code we wrote in step 4. We're also going to take a look at some tools we can use to help us write tests.
在这一步中,来看看我们为覆盖在 step 4 中编写的代码而编写的所有不同的单元测试。还将看看我们可以用来帮助我们编写测试用例的一些工具。
To get started, run the move test command in the step_5/BasicCoin folder
首先,请在文件夹 step_5/BasicCoin中 运行 move test 命令。
move test
You should see something like this:
您应该看到如下内容:
INCLUDING DEPENDENCY MoveStdlib
BUILDING BasicCoin
Running Move unit tests
[ PASS    ] 0xcafe::BasicCoin::can_withdraw_amount
[ PASS    ] 0xcafe::BasicCoin::init_check_balance
[ PASS    ] 0xcafe::BasicCoin::init_non_owner
[ PASS    ] 0xcafe::BasicCoin::publish_balance_already_exists
[ PASS    ] 0xcafe::BasicCoin::publish_balance_has_zero
[ PASS    ] 0xcafe::BasicCoin::withdraw_dne
[ PASS    ] 0xcafe::BasicCoin::withdraw_too_much
Test result: OK. Total tests: 7; passed: 7; failed: 0
Taking a look at the tests in the BasicCoin module we've tried to keep each unit test to testing one particular behavior.
看看 BasicCoin 模块中的测试,我们试图让每个单元测试都测试一个具体的行为。
Exercise (练习)
After taking a look at the tests, try and write a unit test called balance_of_dne in the BasicCoin module that tests the case where a Balance resource doesn't exist under the address that balance_of is being called on. It should only be a couple lines!
在查看测试之后,尝试在 BasicCoin 模块中编写一个单元测试 balance_of_dne,测试地址没有 Balance 资源的情况,调用 balance_of 方法的执行结果。它应该只有几行代码。
The solution to this exercise can be found in step_5_sol.
练习的答案可以在step_5_sol中找到。
Step 6: BasicCoin 模块泛型化(Making my BasicCoin module generic)
In Move, we can use generics to define functions and structs over different input data types. Generics are a great building block for library code. In this section, we are going to make our simple BasicCoin module generic so that it can serve as a library module that can be used by other user modules.
在 Move 语言中,我们可以使用泛型来定义不同输入数据类型的函数和结构体。泛型是库代码的重要组成部分。在本节中,我们将使我们的简单 BasicCoin 模块泛型化,以便它可以用作其他用户模块可以使用的模块库。
First, we add type parameters to our data structs:
首先,我们将类型参数添加到我们的数据结构中:
struct Coin<phantom CoinType> has store {
    value: u64
}

struct Balance<phantom CoinType> has key {
    coin: Coin<CoinType>
}
We also add type parameters to our methods in the same manner. For example, withdraw becomes the following:
我们还以相同的方式将类型参数添加到我们的方法中。例如,withdraw 变成如下:
fun withdraw<CoinType>(addr: address, amount: u64) : Coin<CoinType> acquires Balance {
    let balance = balance_of<CoinType>(addr);
    assert!(balance >= amount, EINSUFFICIENT_BALANCE);
    let balance_ref = &mut borrow_global_mut<Balance<CoinType>>(addr).coin.value;
    *balance_ref = balance - amount;
    Coin<CoinType> { value: amount }
}
Take a look at step_6/BasicCoin/sources/BasicCoin.move to see the full implementation.
查看step_6/BasicCoin/sources/BasicCoin.move完整的实现。
At this point, readers who are familiar with Ethereum might notice that this module serves a similar purpose as the ERC20 token standard, which provides an interface for implementing fungible tokens in smart contracts. One key advantage of using generics is the ability to reuse code since the generic library module already provides a standard implementation and the instantiating module can provide customizations by wrapping the standard implementation.
此时,熟悉以太坊的读者可能会注意到,该模块的用途与ERC20 token standard类似,后者提供了在智能合约中实现可替代代币的接口。使用泛型的一个关键优势是能够重用代码,因为泛型模块库已经提供了标准实现,并且实例化模块可以通过包装标准实现提供定制化功能。
We provide a little module called MyOddCoin that instantiates the Coin type and customizes its transfer policy: only odd number of coins can be transferred. We also include two tests to test this behavior. You can use the commands you learned in step 2 and step 5 to run the tests.
我们提供了一个称为MyOddCoin并实例化 Coin 类型并自定义其转移策略的小模块:只能转移奇数个代币。其还包括两个 tests来测试这种行为。您可以使用在第 2 步和第 5 步中学到的命令来运行测试。
进阶主题 (Advanced topics):
phantom 类型参数 (phantom type parameters)
In definitions of both Coin and Balance, we declare the type parameter CoinType to be phantom because CoinType is not used in the struct definition or is only used as a phantom type parameter.
在 Coin 和 Balance 的定义中,我们将类型参数 CoinType 声明为phantom,因为 CoinType 没有在结构体定义中使用或仅用作 phantom 类型参数。
Read more about phantom type parameters here.
阅读更多有关 phantom 类型参数 信息.
进阶步骤 (Advanced steps)
Before moving on to the next steps, let's make sure you have all the prover dependencies installed.
在继续下一步之前,确保您已安装所有的验证器依赖项。
Try running boogie /version . If an error message shows up saying "command not found: boogie", you will have to run the setup script and source your profile:
尝试运行 boogie /version 。如果出现错误消息“找不到命令:boogie”,您将必须运行安装脚本并更新环境配置(source ~/.profile):
# run the following in move repo root directory
./scripts/dev_setup.sh -yp
source ~/.profile
Step 7: 使用Move验证器(Use the Move prover)
Smart contracts deployed on the blockchain may manipulate high-value assets. As a technique that uses strict mathematical methods to describe behavior and reason correctness of computer systems, formal verification has been used in blockchains to prevent bugs in smart contracts. The Move prover is an evolving formal verification tool for smart contracts written in the Move language. The user can specify functional properties of smart contracts using the Move Specification Language (MSL) and then use the prover to automatically check them statically. To illustrate how the prover is used, we have added the following code snippet to the BasicCoin.move:
部署在区块链上的智能合约可能会操纵高价值资产。作为一种使用严格的数学方式来描述计算机系统的行为和推理正确性的技术,形式化验证已被用于区块链,以防止智能合约中错误的产生。 Move验证器是一种在进化中、用Move 语言编写的智能合约形式化验证工具。用户可以使用Move语言规范(Move Specification Language (MSL))指定智能合约的功能属性,然后使用验证器自动静态检查它们。 为了说明如何使用验证器,我们在BasicCoin.move中添加了以下代码片段:
    spec balance_of {
        pragma aborts_if_is_strict;
    }
Informally speaking, the block spec balance_of {...} contains the property specification of the method balance_of.
通俗地说,代码块 spec balance_of {...} 包含 balance_of 方法的属性规范说明。
Let's first run the prover using the following command inside BasicCoin directory:
首先在BasicCoin directory目录中使用以下命令运行验证器。
move prove
which outputs the following error information:
它输出以下错误信息:
error: abort not covered by any of the `aborts_if` clauses
   ┌─ ./sources/BasicCoin.move:38:5
   │
35 │           borrow_global<Balance<CoinType>>(owner).coin.value
   │           ------------- 由于执行失败这里发生中止
   ·
38 │ ╭     spec balance_of {
39 │ │         pragma aborts_if_is_strict;
40 │ │     }
   │ ╰─────^
   │
   =     at ./sources/BasicCoin.move:34: balance_of
   =         owner = 0x29
   =     at ./sources/BasicCoin.move:35: balance_of
   =         中止

Error: exiting with verification errors
The prover basically tells us that we need to explicitly specify the condition under which the function balance_of will abort, which is caused by calling the function borrow_global when owner does not own the resource Balance<CoinType>. To remove this error information, we add an aborts_if condition as follows:
验证器大体上告诉我们,我们需要明确指定函数 balance_of 中止的条件,中止原因是 owner(函数调用者)在没有资源 Balance<CoinType> 的情况下调用 borrow_global 函数导致的。要去掉此错误信息,我们添加如下 aborts_if 条件:
    spec balance_of {
        pragma aborts_if_is_strict;
        aborts_if !exists<Balance<CoinType>>(owner);
    }
After adding this condition, try running the prove command again to confirm that there are no verification errors:
添加此条件后,再次尝试运行prove命令,确认没有验证错误:
move prove
Apart from the abort condition, we also want to define the functional properties. In Step 8, we will give more detailed introduction to the prover by specifying properties for the methods defined the BasicCoin module.
除了中止条件,我们还想定义功能属性。在第 8 步中,我们将通过为定义 BasicCoin 模块的方法指定属性来更详细地介绍验证器。
第 8 步:为 BasicCoin 模块编写正式规范(Write formal specifications for the BasicCoin module)
取款方法 (Method withdraw)
The signature of the method withdraw is given below:
取款(withdraw) 方法的签名如下:
fun withdraw<CoinType>(addr: address, amount: u64) : Coin<CoinType> acquires Balance
The method withdraws tokens with value amount from the address addr and returns a created Coin of value amount. The method withdraw aborts when 1) addr does not have the resource Balance<CoinType> or 2) the number of tokens in addr is smaller than amount. We can define conditions like this:
该方法从地址 addr 中提取数量为 amount 的代币,然后创建数量为 amount 的代币并将其返回。当出现如下情况会中止:
- 地址
addr没有资源Balance<CoinType>,或 - 地址
addr中的代币数量小于amount时,withdraw。
我们可以这样定义条件:
    spec withdraw {
        let balance = global<Balance<CoinType>>(addr).coin.value;
        aborts_if !exists<Balance<CoinType>>(addr);
        aborts_if balance < amount;
    }
As we can see here, a spec block can contain let bindings which introduce names for expressions. global<T>(address): T is a built-in function that returns the resource value at addr. balance is the number of tokens owned by addr. exists<T>(address): bool is a built-in function that returns true if the resource T exists at address. Two aborts_if clauses correspond to the two conditions mentioned above. In general, if a function has more than one aborts_if condition, those conditions are or-ed with each other. By default, if a user wants to specify aborts conditions, all possible conditions need to be listed. Otherwise, the prover will generate a verification error. However, if pragma aborts_if_is_partial is defined in the spec block, the combined aborts condition (the or-ed individual conditions) only imply that the function aborts. The reader can refer to the MSL document for more information.
正如我们在这里看到的,一个 spec 块可以包含 let 绑定,它为表达式引入名称。
global<T>(address): T 是一个返回 addr 资源值的内置函数。balance 是 addr 拥有的代币数量。
exists<T>(address): bool 是一个内置函数,如果指定的地址(address)在(全局存储中)有资源 T 则返回 true 。
两个 aborts_if 子句对应上述两个条件。通常,如果一个函数有多个 aborts_if 条件,这些条件之间是相互对等的。默认情况下,如果用户想要指定中止条件,则需要列出所有可能的条件。否则验证器将产生验证错误。
但是,如果在 spec 代码块中定义了 pragma aborts_if_is_partial,则组合中止条件(或对等的单个条件)仅 暗示 函数中止。
读者可以参考 MSL 文档了解更多信息。
The next step is to define functional properties, which are described in the two ensures clauses below. First, by using the let post binding, balance_post represents the balance of addr after the execution, which should be equal to balance - amount. Then, the return value (denoted as result) should be a coin with value amount.
下一步是定义功能属性,这些属性在下面的两个 ensures 子句中进行了描述。首先,通过使用 let post 绑定,balance_post 表示地址 addr 执行后的余额,应该等于 balance - amount。那么,返回值(表示为 result )应该是一个价值为 amount 的代币。
    spec withdraw {
        let balance = global<Balance<CoinType>>(addr).coin.value;
        aborts_if !exists<Balance<CoinType>>(addr);
        aborts_if balance < amount;

        let post balance_post = global<Balance<CoinType>>(addr).coin.value;
        ensures balance_post == balance - amount;
        ensures result == Coin<CoinType> { value: amount };
    }
存款方法 (Method deposit)
The signature of the method deposit is given below:
存款(deposit)方法的签名如下:
fun deposit<CoinType>(addr: address, check: Coin<CoinType>) acquires Balance
The method deposits the check into addr. The specification is defined below:
该方法将代币 check 存入地址 addr. 规范定义如下:
    spec deposit {
        let balance = global<Balance<CoinType>>(addr).coin.value;
        let check_value = check.value;

        aborts_if !exists<Balance<CoinType>>(addr);
        aborts_if balance + check_value > MAX_U64;

        let post balance_post = global<Balance<CoinType>>(addr).coin.value;
        ensures balance_post == balance + check_value;
    }
balance represents the number of tokens in addr before execution and check_value represents the number of tokens to be deposited. The method would abort if 1) addr does not have the resource Balance<CoinType> or 2) the sum of balance and check_value is greater than the maxium value of the type u64. The functional property checks that the balance is correctly updated after the execution.
balance 表示 addr 执行前的代币数量,check_value 表示要存入的代币数量。方法出现如下情况将会中止:
1) 地址 addr 没有 Balance<CoinType> 资源, 或
2) balance 与 check_value 之和大于 u64 的最大值。
该功能属性检查执行后余额是否正确更新。
转账方法 (Method transfer)
The signature of the method transfer is given below:
转账(transfer)方法的签名如下:
public fun transfer<CoinType: drop>(from: &signer, to: address, amount: u64, _witness: CoinType) acquires Balance
The method transfers the amount of coin from the account of from to the address to. The specification is given below:
该方法将数量为 amount 的代币从帐户 from 转账给地址 to。规范如下:
    spec transfer {
        let addr_from = signer::address_of(from);

        let balance_from = global<Balance<CoinType>>(addr_from).coin.value;
        let balance_to = global<Balance<CoinType>>(to).coin.value;
        let post balance_from_post = global<Balance<CoinType>>(addr_from).coin.value;
        let post balance_to_post = global<Balance<CoinType>>(to).coin.value;

        ensures balance_from_post == balance_from - amount;
        ensures balance_to_post == balance_to + amount;
    }
addr_from is the address of from. Then the balances of addr_from and to before and after the execution are obtained.
The ensures clauses specify that the amount number of tokens is deducted from addr_from and added to to. However, the prover will generate the error information as below:
addr_from 是账户 from 的地址,然后获取执行前两个地址 addr_from 和 to 的余额。
ensures 子句指定从 addr_from 减去 amount 数量的代币,添加到 to。然而,验证器会生成以下错误:
error: post-condition does not hold
   ┌─ ./sources/BasicCoin.move:57:9
   │
62 │         ensures balance_from_post == balance_from - amount;
   │         ^^^^^^^^^^^^^^^^^^^^^^^^^^^^^^^^^^^^^^^^^^^^^^^^^^^
   │
   ...
The property is not held when addr_from is equal to to. As a result, we could add an assertion assert!(from_addr != to) in the method to make sure that addr_from is not equal to to.
当 addr_from 等于 to 时,这个属性无效。因此,我们可以在方法中添加一个断言,assert!(from_addr != to) 来确保 addr_from 不等于 to。
练习 (Exercises)
- Implement the
aborts_ifconditions for thetransfermethod. - 为
transfer方法实现aborts_if条件。 - Implement the specification for the
mintandpublish_balancemethod. - 为
mint和publish_balance方法实现规范。
The solution to this exercise can be found in step_8_sol.
练习的解答可以在 step_8_sol中找到。
整数 (Integers)
Move supports three unsigned integer types: u8, u64, and u128. Values of these types range from 0 to a maximum that depends on the size of the type.
| Type | Value Range |
|---|---|
Unsigned 8-bit integer, u8 | 0 to 28 - 1 |
Unsigned 64-bit integer, u64 | 0 to 264 - 1 |
Unsigned 128-bit integer, u128 | 0 to 2128 - 1 |
Move 支持三种无符号整数类型:u8、u64 和 u128。这些类型的值范围从 0 到最大值,最大值的具体取值取决于整数类型。
| 类型 | 取值范围 |
|---|---|
无符号 8位 整数, u8 | 0 to 28 - 1 |
无符号 64位 整数, u64 | 0 to 264 - 1 |
无符号 128位 整数, u128 | 0 to 2128 - 1 |
字面值(Literal)
Literal values for these types are specified either as a sequence of digits (e.g.,112) or as hex literals, e.g., 0xFF. The type of the literal can optionally be added as a suffix, e.g., 112u8. If the type is not specified, the compiler will try to infer the type from the context where the literal is used. If the type cannot be inferred, it is assumed to be u64.
If a literal is too large for its specified (or inferred) size range, an error is reported.
(在Move中)这些类型的字面值指定为数字序列(例如:112)或十六进制文字(例如:0xFF), 可以选择将字面值的类型定义为后缀, 例如 112u8。如果未指定类型,编译器将尝试从使用字面值的上下文推断类型。如果无法推断类型,则默认为 `u64。
如果字面值太大,超出其指定的(或推断的)大小范围,则会报错。
例如:
// literals with explicit annotations;
let explicit_u8 = 1u8;
let explicit_u64 = 2u64;
let explicit_u128 = 3u128;

// literals with simple inference
let simple_u8: u8 = 1;
let simple_u64: u64 = 2;
let simple_u128: u128 = 3;

// literals with more complex inference
let complex_u8 = 1; // inferred: u8
// right hand argument to shift must be u8
let _unused = 10 << complex_u8;

let x: u8 = 0;
let complex_u8 = 2; // inferred: u8
// arguments to `+` must have the same type
let _unused = x + complex_u8;

let complex_u128 = 3; // inferred: u128
// inferred from function argument type
function_that_takes_u128(complex_u128);

// literals can be written in hex
let hex_u8: u8 = 0x1;
let hex_u64: u64 = 0xCAFE;
let hex_u128: u128 = 0xDEADBEEF;
运算集 (Operations)
算术运算 (Arithmetic)
Each of these types supports the same set of checked arithmetic operations. For all of these operations, both arguments (the left and right side operands) must be of the same type. If you need to operate over values of different types, you will need to first perform a cast. Similarly, if you expect the result of the operation to be too large for the integer type, perform a cast to a larger size before performing the operation.
每一种(无符号整数)类型都支持相同算术运算集。对于所有这些运算,两个参数(左侧和右侧操作数)必须是同一类型。如果您需要对不同类型的值进行运算,则需要首先执行强制转换。同样,如果您预计运算结果对于当下整数类型来说太大,请在执行运算之前将之转换为更大的整数类型。
All arithmetic operations abort instead of behaving in a way that mathematical integers would not (e.g., overflow, underflow, divide-by-zero).
| Syntax | Operation | Aborts If |
|---|---|---|
+ | addition | Result is too large for the integer type |
- | subtraction | Result is less than zero |
* | multiplication | Result is too large for the integer type |
% | modular division | The divisor is 0 |
/ | truncating division | The divisor is 0 |
Bitwise
算术运算在遇到异常时将会中止,而不是以上溢、下溢、被零除等数学整数未定义的的方式输出结果。
| 句法 | 操作 | 中止条件 |
|---|---|---|
+ | 加法 | 结果对于整数类型来说太大了 |
- | 减法 | 结果小于零 |
* | 乘法 | 结果对于整数类型来说太大了 |
% | 取余运算 | 除数为 0 |
/ | 截断除法 | 除数为 0 |
位运算 (Bitwise)
The integer types support the following bitwise operations that treat each number as a series of individual bits, either 0 or 1, instead of as numerical integer values.
Bitwise operations do not abort.
| Syntax | Operation | Description |
|---|---|---|
& | bitwise and | Performs a boolean and for each bit pairwise |
| ` | ` | bitwise or |
^ | bitwise xor | Performs a boolean exclusive or for each bit pairwise |
整数类型支持下列位运算,即将每个数字视为一系列单独的位:0 或 1,而不是整型数值。
位运算不会中止。
| 句法 | 操作 | 描述 |
|---|---|---|
& | 按位 和 | 对每个位成对执行布尔值和 |
| ` | ` | 按位或 |
^ | 按位 异与 | 对每个位成对执行布尔异或 |
位移 (Bit shift)
Similar to the bitwise operations, each integer type supports bit shifts. But unlike the other operations, the righthand side operand (how many bits to shift by) must always be a u8 and need not match the left side operand (the number you are shifting).
Bit shifts can abort if the number of bits to shift by is greater than or equal to 8, 64, or 128 for u8, u64, and u128 respectively.
| Syntax | Operation | Aborts if |
|---|---|---|
<< | shift left | Number of bits to shift by is greater than the size of the integer type |
>> | shift right | Number of bits to shift by is greater than the size of the integer type |
与按位运算类似,每种整数类型都支持位移(bit shifts)。但与其他运算不同的是,右侧操作数(要移位多少位)必须始终是 u8 并且不需要与左侧操作数类型(您要移位的数字)匹配。
如果要移位的位数分别大于或等于 8、64, u128 或 128 的 u8, u64, 则移位可以中止。
| 句法 | 操作 | 中止条件 |
|---|---|---|
<< | 左移 | 要移位的位数大于整数类型的大小 |
>> | 右移 | 要移位的位数大于整数类型的大小 |
比较运算 (Comparisons)
Integer types are the only types in Move that can use the comparison operators. Both arguments need to be of the same type. If you need to compare integers of different types, you will need to cast one of them first.
Comparison operations do not abort.
| Syntax | Operation |
|---|---|
< | less than |
> | greater than |
<= | less than or equal to |
>= | greater than or equal to |
整数类型是 Move 中唯一可以使用比较(Comparisons)运算符的类型。两个参数必须是同一类型。如果您需要比较不同类型的整数,则需要先转换其中一个。
比较操作不会中止。
| 句法 | 操作 |
|---|---|
< | 小于 |
> | 大于 |
<= | 小于等于 |
>= | 大于等于 |
相等 (Equality)
Like all types with drop in Move, all integer types support the "equal" and "not equal" operations. Both arguments need to be of the same type. If you need to compare integers of different types, you will need to cast one of them first.
Equality operations do not abort.
| Syntax | Operation |
|---|---|
== | equal |
!= | not equal |
For more details see the section on equality
与 Move 中的所有具有drop能力的类型一样,所有整数类型都支持 "equal(等于)" 和 "not equal(不等于)运算。两个参数必须是同一类型。如果您需要比较不同类型的整数,则需要先转换其中一个。
相等(Equality)运算不会中止。
| 句法 | 操作 |
|---|---|
== | 等于 |
!= | 不等于 |
更多细节可以参考相等章节。
转换 (Casting)
Integer types of one size can be cast to integer types of another size. Integers are the only types in Move that support casting.
Casts do not truncate. Casting will abort if the result is too large for the specified type
| Syntax | Operation | Aborts if |
|---|---|---|
(e as T) | Cast integer expression e into an integer type T | e is too large to represent as a T |
Here, the type of e must be u8, u64, or u128 and T must be u8, u64, or u128.
For example:
(x as u8)(2u8 as u64)(1 + 3 as u128)
一种大小的整数类型可以转换为另一种大小的整数类型。整数是 Move 中唯一支持强制转换的类型。
强制转换不会截断。如果结果对于指定类型来说太大,则转换将中止。
| Syntax | 操作 | 中止条件 |
|---|---|---|
(e as T) | 将整数表达式 e 转换为整数类型 T | e 太大而不能表示为 T |
所有权 (Ownership)
As with the other scalar values built-in to the language, integer values are implicitly copyable, meaning they can be copied without an explicit instruction such as copy.
与语言内置的其他标量值一样,整数值是隐式可复制的,这意味着它们可以在没有明确指令如copy的情况下复制。
布尔类型 (Bool)
boolis Move's primitive type for boolean true and falsevalues.
bool 是 Move 布尔基本类型,有 true 和 false 两个值。
字面量 (Literals)
Literals for bool are either true or false .
布尔类型字面值只能是 true 或者 false中的一个 。
操作 (Operations)
逻辑运算 (Logical)
boolsupports three logical operations:
| Syntax | Description | Equivalent Expression |
|---|---|---|
&& | short-circuiting logical and | p && q is equivalent to if (p) q else false |
|| | short-circuiting logical or | p || q is equivalent to if (p) true else q |
! | logical negation | !p is equivalent to if (p) false else true |
bool 支持三种逻辑运算:
| 句法 | 描述 | Equivalent Expression |
|---|---|---|
&& | 短路逻辑与(short-circuiting logical and) | p && q 等价于 if (p) q else false |
|| | 短路逻辑或(short-circuiting logical or) | `p |
! | 逻辑非(logical negation) | !p 等价于 if (p) false else true |
控制流 (Control Flow)
boolvalues are used in several of Move's control-flow constructs:
布尔值用于 Move 的多个控制流结构中:
所有权 (Ownership)
As with the other scalar values built-in to the language, boolean values are implicitly copyable, meaning they can be copied without an explicit instruction such as [copy](<https://move-language.github.io/move/variables.html#move-and-copy>).
与语言内置的其他标量值一样,布尔值是隐式可复制的,这意味着它们可以在没有明确指令如copy的情况下复制。
地址(Address)
address is a built-in type in Move that is used to represent locations (sometimes called accounts) in global storage. An address value is a 128-bit (16 byte) identifier. At a given address, two things can be stored: Modules and Resources.
Although an address is a 128 bit integer under the hood, Move addresses are intentionally opaque---they cannot be created from integers, they do not support arithmetic operations, and they cannot be modified. Even though there might be interesting programs that would use such a feature (e.g., pointer arithmetic in C fills a similar niche), Move does not allow this dynamic behavior because it has been designed from the ground up to support static verification.
You can use runtime address values (values of type address) to access resources at that address. You cannot access modules at runtime via address values.
地址(address)是 Move 中的内置类型,用于表示全局存储中的的位置(有时称为账户)。地址(address) 值是一个 128 位(16 字节)标识符。在一个给定的地址,可以存储两样东西:模块(Module)和资源(Resources)。
虽然地址(address)在底层是一个 128 位整数,但 Move 语言有意让其不透明 —— 它们不能从整数创建,不支持算术运算,也不能修改。即使可能有一些有趣的程序会使用这种特性(例如,C 中的指针算法实现了类似壁龛(niche)的功能),但 Move 语言不允许这种动态行为,因为它从头开始就被设计为支持静态验证。(壁龛指安装在墙壁上的小格子或在墙身上留出的作为贮藏设施的空间,最早在宗教上是指排放佛像的小空间,现在多用在家庭装修上,因其不占建筑面积,使用比较方便,深受大家喜爱,Joe 注)
你可以通过运行时地址值(address 类型的值)来访问该地址处的资源。但无法在运行时通过地址值访问模块。
地址及其语法(Addresses and Their Syntax)
Addresses come in two flavors, named or numerical. The syntax for a named address follows the
same rules for any named identifier in Move. The syntax of a numerical address is not restricted
to hex-encoded values, and any valid u128 numerical value can be used as an
address value, e.g., 42, 0xCAFE, and 2021 are all valid numerical address
literals.
地址有两种形式:命名的或数值的。命名地址的语法遵循 Move 命名标识符的规则。数值地址的语法不受十六进制编码值的限制,任何有效的 u128 数值都可以用作地址值。例如,42,0xCFAE 和 2021 都是合法有效的数值地址字面量(literal)。
To distinguish when an address is being used in an expression context or not, the syntax when using an address differs depending on the context where it's used:
- When an address is used as an expression the address must be prefixed by the
@character, i.e.,@<numerical_value>or@<named_address_identifier>. - Outside of expression contexts, the address may be written without the leading
@character, i.e.,<numerical_value>or<named_address_identifier>.
为了区分何时在表达式上下文中使用地址,使用地址时的语法根据使用地址的上下文而有所不同:
- 当地址被用作表达式时,地址必须以
@字符为前缀,例如:@<numerical_value>或@<named_address_identifier>。 - 在表达式上下文之外,地址可以不带前缀字符
@。例如:<numerical_value>或<named_address_identifier>。
In general, you can think of @ as an operator that takes an address from being a namespace item to being an expression item.
通常,可以将 @ 视为将地址从命名空间项变为表达式项的运算符。
命名地址(Named Addresses)
Named addresses are a feature that allow identifiers to be used in place of numerical values in any spot where addresses are used, and not just at the value level. Named addresses are declared and bound as top level elements (outside of modules and scripts) in Move Packages, or passed as arguments to the Move compiler.
命名地址是一项特性,它允许在使用地址的任何地方使用标识符代替数值,而不仅仅是在值级别。命名地址被声明并绑定为 Move 包中的顶级元素(模块和脚本之外)或作为参数传递给 Move 编译器。
Named addresses only exist at the source language level and will be fully
substituted for their value at the bytecode level. Because of this, modules
and module members must be accessed through the module's named address
and not through the numerical value assigned to the named address during
compilation, e.g., use my_addr::foo is not equivalent to use 0x2::foo
even if the Move program is compiled with my_addr set to 0x2. This
distinction is discussed in more detail in the section on Modules and
Scripts.
命名地址仅存在于源语言级别,并将在字节码级别完全替代它们的值。因此,模块和模块成员必须通过模块的命名地址而不是编译期间分配给命名地址的数值来访问,例如:use my_addr::foo 不等于 use 0x2::foo,即使 Move 程序编译时将 my_addr 设置成 0x2。这个区别在模块和脚本一节中有更详细的讨论。
例子(Examples)
let a1: address = @0x1; // 0x00000000000000000000000000000001 的缩写
let a2: address = @0x42; // 0x00000000000000000000000000000042 的缩写
let a3: address = @0xDEADBEEF; // 0x000000000000000000000000DEADBEEF 的缩写
let a4: address = @0x0000000000000000000000000000000A;
let a5: address = @std; // 将命名地址 `std` 的值赋给 `a5`
let a6: address = @66;
let a7: address = @0x42;

module 66::some_module {   // 不在表达式上下文中,所以不需要 @
    use 0x1::other_module; // 不在表达式上下文中,所以不需要 @
    use std::vector;       // 使用其他模块时,可以使用命名地址作为命名空间项
    ...
}

module std::other_module {  // 可以使用命名地址作为命名空间项来声明模块
    ...
}
全局存储操作(Global Storage Operations)
The primary purpose of address values are to interact with the global storage operations.
address values are used with the exists, borrow_global, borrow_global_mut, and move_from operations.
The only global storage operation that does not use address is move_to, which uses signer.
address 值主要用来与全局存储操作进行交互。
address 值与 exists、borrow_global、borrow_global_mut 和 move_from 操作(operation)一起使用。
唯一不使用 address 的全局存储操作是 move_to,它使用了 signer。
所有权(Ownership)
As with the other scalar values built-in to the language, address values are implicitly copyable, meaning they can be copied without an explicit instruction such as copy.
与 Move 语言内置的其他标量值一样,address 值是隐式可复制的,这意味着它们可以在没有显式指令(例如 copy)的情况下复制。
向量(Vector)
vector<T> is the only primitive collection type provided by Move. A vector<T> is a homogenous
collection of T's that can grow or shrink by pushing/popping values off the "end".
A vector<T> can be instantiated with any type T. For example, vector<u64>, vector<address>,
vector<0x42::MyModule::MyResource>, and vector<vector<u8>> are all valid vector types.
vector<T> 是 Move 提供的唯一原始集合类型。vector<T> 是类型为 T 的同构集合,可以通过从"末端"推入/弹出(出栈/入栈,译者注)值来增长或缩小。
(与 Rust 一样,向量(vector)是一种可以存放任何类型的可变大小的容器,也可称为动态数组,与 Python 中的列表(list)不同,译者注)
vector<T> 可以用任何类型 T 实例化。例如,vector<u64>、vector<address>、vector<0x42::MyModuel::MyResource> 和 vector<vector<u8>> 都是有效的向量类型。
字面量(Literals)
通用 vector 字面量(General vector Literals)
Vectors of any type can be created with vector literals.
任何类型的向量都可以通过 vector 字面量创建。
| 语法 | 类型 | 描述 |
|---|---|---|
vector[] | vector[]: vector<T> 其中 T 是任何单一的非引用类型 | 一个空向量 |
vector[e1, ..., en] | vector[e1, ..., en]: vector<T> where e_i: T 满足 0 < i <= n and n > 0 | 带有 n 个元素(长度为 n)的向量 |
In these cases, the type of the vector is inferred, either from the element type or from the
vector's usage. If the type cannot be inferred, or simply for added clarity, the type can be
specified explicitly:
在这些情况下,vector 的类型是从元素类型或从向量的使用上推断出来的。如果无法推断类型或者只是为了更清楚地表示,则可以显式指定类型:
vector<T>[]: vector<T>
vector<T>[e1, ..., en]: vector<T>
向量字面量示例(Example Vector Literals)
(vector[]: vector<bool>);
(vector[0u8, 1u8, 2u8]: vector<u8>);
(vector<u128>[]: vector<u128>);
(vector<address>[@0x42, @0x100]: vector<address>);
vector<u8> 字面量(vector<u8> literals)
A common use-case for vectors in Move is to represent "byte arrays", which are represented with
vector<u8>. These values are often used for cryptographic purposes, such as a public key or a hash
result. These values are so common that specific syntax is provided to make the values more
readable, as opposed to having to use vector[] where each individual u8 value is specified in
numeric form.
There are currently two supported types of vector<u8> literals, byte strings and hex strings.
Move 中向量的一个常见用例是表示“字节数组”,用 vector<u8> 表示。这些值通常用于加密目的,例如公钥或哈希结果。这些值非常常见,以至于提供了特定的语法以使值更具可读性,而不是必须使用 vector[],其中每个单独的 u8 值都以数字形式指定。
目前支持两种类型的 vector<u8> 字面量,字节字符串和十六进制字符串。
字节字符串(Byte Strings)
Byte strings are quoted string literals prefixed by a b, e.g. b"Hello!\n".
These are ASCII encoded strings that allow for escape sequences. Currently, the supported escape sequences are
字节字符串是带引号的字符串字面量,以 b 为前缀,例如,b"Hello!\n"。
这些是允许转义序列的 ASCII 编码字符串。目前,支持的转义序列如下:
| 转义序列 | 描述 |
|---|---|
\n | 换行 |
\r | 回车 |
\t | 制表符 |
\\ | 反斜杠 |
\0 | Null |
\" | 引号 |
\xHH | 十六进制进制转义,插入十六进制字节序列 HH |
十六进制字符串(Hex Strings)
Hex strings are quoted string literals prefixed by a x, e.g. x"48656C6C6F210A"
Each byte pair, ranging from 00 to FF, is interpreted as hex encoded u8 value. So each byte
pair corresponds to a single entry in the resulting vector<u8>
十六进制字符串是以 x 为前缀的带引号的字符串字面量,例如,x"48656C6C6F210A"。
每个字节对,范围从 00 到 FF 都被解析为十六进制编码的 u8 值。所以每个字节对对应于结果 vector<u8> 的单个条目。
字符串字面量示例(Example String Literals)
script {
    fun byte_and_hex_strings() {
        assert!(b"" == x"", 0);
        assert!(b"Hello!\n" == x"48656C6C6F210A", 1);
        assert!(b"\x48\x65\x6C\x6C\x6F\x21\x0A" == x"48656C6C6F210A", 2);
        assert!(
            b"\"Hello\tworld!\"\n \r \\Null=\0" ==
                x"2248656C6C6F09776F726C6421220A200D205C4E756C6C3D00",
            3
        );
    }
}
操作 (Operations)
vector supports the following operations via the std::vector module in the Move standard
library:
vector 通过 Move 标准库里的 std::vector 模块支持以下操作:
| 函数 | 描述 | 中止条件 |
|---|---|---|
vector::empty<T>(): vector<T> | 创建一个可以存储 T 类型值的空向量 | 永不中止 |
vector::singleton<T>(t: T): vector<T> | 创建一个包含 t 的大小为 1 的向量 | 永不中止 |
vector::push_back<T>(v: &mut vector<T>, t: T) | 将 t 添加到 v 的尾部 | 永不中止 |
vector::pop_back<T>(v: &mut vector<T>): T | 移除并返回 v 中的最后一个元素 | 如果 v 是空向量 |
vector::borrow<T>(v: &vector<T>, i: u64): &T | 返回在索引 i 处对 T 的不可变引用 | 如果 i 越界 |
vector::borrow_mut<T>(v: &mut vector<T>, i: u64): &mut T | 返回在索引 i 处对 T 的可变引用 | 如果 i 越界 |
vector::destroy_empty<T>(v: vector<T>) | 销毁 v 向量 | 如果 v 不是空向量 |
vector::append<T>(v1: &mut vector<T>, v2: vector<T>) | 将 v2 中的元素添加到 v1 的末尾 | 永不中止 |
vector::contains<T>(v: &vector<T>, e: &T): bool | 如果 e 在向量 v 里返回 true,否则返回 false | 永不中止 |
vector::swap<T>(v: &mut vector<T>, i: u64, j: u64) | 交换向量 v 中第 i 个和第 j 个索引处的元素 | 如果 i 或 j 越界 |
vector::reverse<T>(v: &mut vector<T>) | 反转向量 v 中元素的顺序 | 永不中止 |
vector::index_of<T>(v: &vector<T>, e: &T): (bool, u64) | 如果 e 在索引 i 处的向量中,则返回 (true, i)。否则返回(false, 0) | 永不中止 |
vector::remove<T>(v: &mut vector<T>, i: u64): T | 移除向量 v 中的第 i 个元素,移动所有后续元素。这里的时间复杂度是 O(n),并且保留了向量中元素的顺序 | 如果 i 越界 |
vector::swap_remove<T>(v: &mut vector<T>, i: u64): T | 将向量中的第 i 个元素与最后一个元素交换,然后弹出该元素。这里的时间复杂度是 O(1),但是不保留向量中的元素顺序 | 如果 i 越界 |
More operations may be added over time.
随着时间的推移可能会增加更多操作。
示例
use std::vector;

let v = vector::empty<u64>();
vector::push_back(&mut v, 5);
vector::push_back(&mut v, 6);

assert!(*vector::borrow(&v, 0) == 5, 42);
assert!(*vector::borrow(&v, 1) == 6, 42);
assert!(vector::pop_back(&mut v) == 6, 42);
assert!(vector::pop_back(&mut v) == 5, 42);
销毁和复制 vector(Destroying and copying vector)
Some behaviors of vector<T> depend on the abilities of the element type, T. For example, vectors
containing elements that do not have drop cannot be implicitly discarded like v in the example
above--they must be explicitly destroyed with vector::destroy_empty.
Note that vector::destroy_empty will abort at runtime unless vec contains zero elements:
vector<T> 的某些行为取决于元素类型 T 的能力(ability),例如:如果向量中包含不具有 drop 能力的元素,那么不能像上面例子中的 v 一样隐式丢弃 —— 它们必须用 vector::destroy_empty 显式销毁。
请注意,除非向量 vec 包含零个元素,否则 vector::destroy_empty 将在运行时中止:
fun destroy_any_vector<T>(vec: vector<T>) {
    vector::destroy_empty(vec) // 删除此行将导致编译器错误
}
但是删除包含带有 drop 能力的元素的向量不会发生错误:
fun destroy_droppable_vector<T: drop>(vec: vector<T>) {
    // 有效!
    // 不需要明确地做任何事情来销毁向量
}
Similarly, vectors cannot be copied unless the element type has copy. In other words, a
vector<T> has copy if and only if T has copy. However, even copyable vectors are never
implicitly copied:
同样,除非元素类型具有 copy 能力,否则无法复制向量。换句话说,当且仅当 T 具有 copy 能力时,vector<T> 才具有 copy 能力。然而,即使是可复制的向量也永远不会被隐式复制:
换句话说,vector<T> 有 copy 能力当且仅当 T 有 copy 能力。然而,即使是可复制的向量也永远不会被隐式复制:
let x = vector::singleton<u64>(10);
let y = copy x; // 没有 copy 将导致编译器错误!
Copies of large vectors can be expensive, so the compiler requires explicit copy's to make it
easier to see where they are happening.
For more details see the sections on type abilities and generics.
大向量的复制可能很昂贵,因此编译器需要显式 copy 以便更容易查看它们发生的位置。
所有权(Ownership)
如上所述,vector 值只有在元素值可以复制的时候才能复制。在这种情况下,复制必须通过显式 copy 或者解引用 *。
签名者(Signer)
signer is a built-in Move resource type. A signer is a capability that allows the holder to act on behalf of a particular address.
You can think of the native implementation as being:
签名者(signer)是 Move 内置的资源类型。签名者(signer)是一种允许持有者代表特定地址(address)行使权力的能力(capability)。你可以将原生实现(native implementation)视为:
struct signer has drop { a: address }
A signer is somewhat similar to a Unix UID in
that it represents a user authenticated by code outside of Move (e.g., by checking a cryptographic
signature or password).
signer 有点像 Unix UID,因为它表示一个通过 Move 之外的代码(例如,通过检查加密签名或密码)进行身份验证的用户。
与 address 的比较(Comparison to address)
A Move program can create any address value without special permission using address literals:
Move 程序可以使用地址字面量(literal)创建任何地址(address)值,而无需特殊许可:
let a1 = @0x1;
let a2 = @0x2;
// ... 等等,所有其他可能的地址
However, signer values are special because they cannot be created via literals or
instructions--only by the Move VM. Before the VM runs a script with parameters of type signer, it
will automatically create signer values and pass them into the script:
但是,signer 值是特殊的,因为它们不能通过字面量或者指令创建 —— 只能通过 Move 虚拟机(VM)创建。在虚拟机运行带有 signer 类型参数的脚本之前,它会自动创建 signer 值并将它们传递给脚本:
script {
    use std::signer;
    fun main(s: signer) {
        assert!(signer::address_of(&s) == @0x42, 0);
    }
}
This script will abort with code 0 if the script is sent from any address other than 0x42.
A transaction script can have an arbitrary number of signers as long as the signers are a prefix
to any other arguments. In other words, all of the signer arguments must come first:
如果脚本是从 0x42 以外的任何地址发送的,则此脚本将中止并返回代码 0。
交易脚本可以有任意数量的 signer,只要 signer 参数排在其他参数前面。换句话说,所有 signer 参数都必须放在第一位。
script {
    use std::signer;
    fun main(s1: signer, s2: signer, x: u64, y: u8) {
        // ...
    }
}
This is useful for implementing multi-signer scripts that atomically act with the authority of
multiple parties. For example, an extension of the script above could perform an atomic currency
swap between s1 and s2.
这对于实现具有多方权限原子行为的*多重签名脚本(multi-signer scripts)*很有用。例如,上述脚本的扩展可以在 s1 和 s2 之间执行原子货币交换。
signer 操作符(signer Operators)
The std::signer standard library module provides two utility functions over signer values:
std::signer 标准库模块为 signer 提供了两个实用函数:
| 函数 | 描述 |
|---|---|
signer::address_of(&signer): address | 返回由 &signer 包装的地址值。 |
signer::borrow_address(&signer): &address | 返回由 &signer 包装的地址的引用。 |
In addition, the move_to<T>(&signer, T) global storage operator
requires a &signer argument to publish a resource T under signer.address's account. This
ensures that only an authenticated user can elect to publish a resource under their address.
此外,move_to<T>(&signer, T) 全局存储操作符需要一个 &signer 参数在 signer.address 的帐户下发布资源 T。这确保了只有经过身份验证的用户才能在其地址下发布资源。
所有权(Ownership)
Unlike simple scalar values, signer values are not copyable, meaning they cannot be copied (from
any operation whether it be through an explicit copy instruction
or through a dereference *).
与简单的标量值不同,signer 值是不可复制的,这意味着他们不能被复制(通过任何操作,无论是通过显式 copy指令还是通过解引用(dereference)*)。
引用(references)
Move has two types of references: immutable & and mutable &mut. Immutable references are read
only, and cannot modify the underlying value (or any of its fields). Mutable references allow for
modifications via a write through that reference. Move's type system enforces an ownership
discipline that prevents reference errors.
Move 支持两种类型的引用:不可变引用 & 和可变引用 &mut。不可变引用是只读的,不能修改相关值(或其任何字段)。可变引用通过写入该引用进行修改。Move的类型系统强制执行所有权规则,以避免引用错误。
For more details on the rules of references, see Structs and Resources
更多有关引用规则的详细信息,请参阅:结构和资源.
引用运算符 (Reference Operators)
Move provides operators for creating and extending references as well as converting a mutable
reference to an immutable one. Here and elsewhere, we use the notation e: T for "expression e
has type T".
Move 提供了用于创建和扩展引用以及将可变引用转换为不可变引用的运算符。在这里和其他地方,我们使用符号 e: T 来表示“表达式 e 的类型是 T ”
| Syntax | Type | Description |
|---|---|---|
&e | &T where e: T and T is a non-reference type | Create an immutable reference to e |
&mut e | &mut T where e: T and T is a non-reference type | Create a mutable reference to e. |
&e.f | &T where e.f: T | Create an immutable reference to field f of struct e. |
&mut e.f | &mut T where e.f: T | Create a mutable reference to field f of structe. |
freeze(e) | &T where e: &mut T | Convert the mutable reference e into an immutable reference. |
| 语法 | 类型 | 描述 |
|---|---|---|
&e | &T 其中 e: T 和 T 是非引用类型 | 创建一个不可变的引用 e |
&mut e | &mut T 其中 e: T 和 T 是非引用类型 | 创建一个可变的引用 e |
&e.f | &T 其中 e.f: T | 创建结构 e 的字段 f 的不可变引用 |
&mut e.f | &mut T 其中e.f: T | 创建结构 e 的字段 f 的可变引用 |
freeze(e) | &T 其中e: &mut T | 将可变引用 e 转换为不可变引用 |
The &e.f and &mut e.f operators can be used both to create a new reference into a struct or to extend an existing reference:
&e.f和&mut e.f运算符既可以用于在结构中创建新引用,也可以用于扩展现有引用:
let s = S { f: 10 };
let f_ref1: &u64 = &s.f; // works
let s_ref: &S = &s;
let f_ref2: &u64 = &s_ref.f // also works
A reference expression with multiple fields works as long as both structs are in the same module:
只要两个结构都在同一个模块中,具有多个字段的引用表达式就可以工作:
struct A { b: B }
struct B { c : u64 }
fun f(a: &A): &u64 {
  &a.b.c
}
Finally, note that references to references are not allowed:
最后,请注意,不允许引用"引用"(Move不支持多重引用, 但Rust可以,译者注):
let x = 7;
let y: &u64 = &x;
let z: &&u64 = &y; // will not compile
通过引用进行读写操作 (Reading and Writing Through Reference)
Both mutable and immutable references can be read to produce a copy of the referenced value.
Only mutable references can be written. A write *x = v discards the value previously stored in x
and updates it with v.
可以读取可变和不可变引用以生成引用值的副本。
只能写入可变引用。写入表达式 *x = v 会丢弃先前存储在x中的值,并用 v 更新。
Both operations use the C-like * syntax. However, note that a read is an expression, whereas a
write is a mutation that must occur on the left hand side of an equals.
两种操作都使用类 C * 语法。但是请注意,读取是一个表达式,而写入是一个必须发生在等号左侧的改动。
| Syntax | Type | Description |
|---|---|---|
*e | T where e is &T or &mut T | Read the value pointed to by e |
*e1 = e2 | () where e1: &mut T and e2: T | Update the value in e1 with e2. |
| 语法 | 类型 | 描述 |
|---|---|---|
&e | T 其中 e 为 &T 或 &mut T | 读取 e 所指向的值 |
*e1 = e2 | () 其中 e1: &mut T 和 e2: T | 用 e2 更新 e1 中的值 |
In order for a reference to be read, the underlying type must have the
copy ability as reading the reference creates a new copy of the value. This rule
prevents the copying of resource values:
为了读取引用,相关类型必须具备copy 能力,因为读取引用会创建值的新副本。此规则防止复制资源值:
fun copy_resource_via_ref_bad(c: Coin) {
    let c_ref = &c;
    let counterfeit: Coin = *c_ref; // not allowed!
    pay(c);
    pay(counterfeit);
}
Dually: in order for a reference to be written to, the underlying type must have the
drop ability as writing to the reference will discard (or "drop") the old value.
This rule prevents the destruction of resource values:
双重性:为了写入引用,相关类型必须具备drop 能力,因为写入引用将丢弃(或“删除”)旧值。此规则可防止破坏资源值:
fun destroy_resource_via_ref_bad(ten_coins: Coin, c: Coin) {
    let ref = &mut ten_coins;
    *ref = c; // not allowed--would destroy 10 coins!
}
freeze 推断 (freeze inference)
A mutable reference can be used in a context where an immutable reference is expected:
可变引用可以在预期不可变引用的上下文中使用:
let x = 7;
let y: &mut u64 = &mut x;
This works because the under the hood, the compiler inserts freeze instructions where they are
needed. Here are a few more examples of freeze inference in action:
这是因为编译器会在底层需要的地方插入 freeze 指令。以下是更多 freeze 实际推断行为的示例:
fun takes_immut_returns_immut(x: &u64): &u64 { x }

// freeze inference on return value
fun takes_mut_returns_immut(x: &mut u64): &u64 { x }

fun expression_examples() {
    let x = 0;
    let y = 0;
    takes_immut_returns_immut(&x); // no inference
    takes_immut_returns_immut(&mut x); // inferred freeze(&mut x)
    takes_mut_returns_immut(&mut x); // no inference

    assert!(&x == &mut y, 42); // inferred freeze(&mut y)
}

fun assignment_examples() {
    let x = 0;
    let y = 0;
    let imm_ref: &u64 = &x;

    imm_ref = &x; // no inference
    imm_ref = &mut y; // inferred freeze(&mut y)
}
子类型化 (Subtyping)
With this freeze inference, the Move type checker can view &mut T as a subtype of &T. As shown
above, this means that anywhere for any expression where a &T value is used, a &mut T value can
also be used. This terminology is used in error messages to concisely indicate that a &mut T was
needed where a &T was supplied. For example
通过freeze推断,Move 类型检查器可以将 &mut T 视为 &T 的子类型。 如上所示,这意味着对于使用 &T 值的任何表达式,也可以使用 &mut T 值。此术语用于错误消息中,以简明扼要地表明在提供 &T 的地方需要 &mut T 。例如:
address 0x42 {
    module example {
        fun read_and_assign(store: &mut u64, new_value: &u64) {
            *store = *new_value
        }

        fun subtype_examples() {
            let x: &u64 = &0;
            let y: &mut u64 = &mut 1;

            x = &mut 1; // valid
            y = &2; // invalid!

            read_and_assign(y, x); // valid
            read_and_assign(x, y); // invalid!
        }
    }
}
will yield the following error messages
将产生以下错误消息
error:
    ┌── example.move:12:9 ───
    │
 12 │         y = &2; // invalid!
    │         ^ Invalid assignment to local 'y'
    ·
 12 │         y = &2; // invalid!
    │             -- The type: '&{integer}'
    ·
  9 │         let y: &mut u64 = &mut 1;
    │                -------- Is not a subtype of: '&mut u64'
    │

error:
    ┌── example.move:15:9 ───
    │
 15 │         read_and_assign(x, y); // invalid!
    │         ^^^^^^^^^^^^^^^^^^^^^ Invalid call of '0x42::example::read_and_assign'. Invalid argument for parameter 'store'
    ·
  8 │         let x: &u64 = &0;
    │                ---- The type: '&u64'
    ·
  3 │     fun read_and_assign(store: &mut u64, new_value: &u64) {
    │                                -------- Is not a subtype of: '&mut u64'
    │
The only other types currently that has subtyping are tuples
当前唯一具有子类型的其他类型是tuple(元组)
所有权 (Ownership)
Both mutable and immutable references can always be copied and extended even if there are existing copies or extensions of the same reference:
即使同一引用存在现有副本或扩展,可变引用和不可变引用始终可以被复制和扩展:
fun reference_copies(s: &mut S) {
  let s_copy1 = s; // ok
  let s_extension = &mut s.f; // also ok
  let s_copy2 = s; // still ok
  ...
}
This might be surprising for programmers familiar with Rust's ownership system, which would reject the code above. Move's type system is more permissive in its treatment of copies, but equally strict in ensuring unique ownership of mutable references before writes.
对于熟悉 Rust 所有权系统的程序员来说,这可能会令人惊讶,因为他们会拒绝上面的代码。Move 的类型系统在处理副本方面更加宽松 ,但在写入前确保可变引用的唯一所有权方面同样严格。
无法存储引用 (References Cannot Be Stored)
References and tuples are the only types that cannot be stored as a field value of structs, which
also means that they cannot exist in global storage. All references created during program execution
will be destroyed when a Move program terminates; they are entirely ephemeral. This invariant is
also true for values of types without the store ability, but note that
references and tuples go a step further by never being allowed in structs in the first place.
This is another difference between Move and Rust, which allows references to be stored inside of structs.
引用和元组是唯一不能存储为结构的字段值的类型,这也意味着它们不能存在于全局存储中。当 Move 程序终止时,程序执行期间创建的所有引用都将被销毁;它们完全是短暂的。这种不变式也适用于没有store 能力的类型的值,但请注意,引用和元组更进一步,从一开始就不允许出现在结构中。
这是 Move 和 Rust 之间的另一个区别,后者允许将引用存储在结构内。
Currently, Move cannot support this because references cannot be serialized, but every Move value must be serializable. This requirement comes from Move's persistent global storage, which needs to serialize values to persist them across program executions. Structs can be written to global storage, and thus they must be serializable.
One could imagine a fancier, more expressive, type system that would allow references to be stored
in structs and ban those structs from existing in global storage. We could perhaps allow
references inside of structs that do not have the store ability, but that would
not completely solve the problem: Move has a fairly complex system for tracking static reference
safety, and this aspect of the type system would also have to be extended to support storing
references inside of structs. In short, Move's type system (particularly the aspects around
reference safety) would have to expand to support stored references. But it is something we are
keeping an eye on as the language evolves.
目前,Move 无法支持这一点,因为引用无法被序列化,但 每个 Move 值都必须是可序列化的。这个要求来自于 Move 的 持久化全局存储,它需要在程序执行期间序列化值以持久化它们。结构体可以写入全局存储,因此它们必须是可序列化的。
可以想象一种更奇特、更有表现力的类型系统,它允许将引用存储在结构中,并禁止这些结构存在于全局存储中。我们也许可以允许在没有store 能力的结构内部使用引用,但这并不能完全解决问题:Move 有一个相当复杂的系统来跟踪静态引用安全性,并且类型系统的这一方面也必须扩展以支持在结构内部存储引用。简而言之,Move 的类型系统(尤其是与引用安全相关的方面)需要扩展以支持存储的引用。随着语言的发展,我们正在关注这一点。
元组和Unit (Tuples and Unit)
Move does not fully support tuples as one might expect coming from another language with them as a first-class value. However, in order to support multiple return values, Move has tuple-like expressions. These expressions do not result in a concrete value at runtime (there are no tuples in the bytecode), and as a result they are very limited: they can only appear in expressions (usually in the return position for a function); they cannot be bound to local variables; they cannot be stored in structs; and tuple types cannot be used to instantiate generics.
Move并不完全支持元组,因为人们可能期望来自另一种语言的元组将它们作为一等值。然而,为了支持多个返回值,Move具有类似元组的表达式。这些表达式在运行时不会产生具体的值(字节码中没有元组),因此它们非常有限:它们只能出现在表达式中(通常在函数的返回位置);它们不能绑定到局部变量;它们不能存储在结构中;元组类型不能用于实例化泛型。
Similarly, unit () is a type created by the Move source language in order to be expression based.
The unit value () does not result in any runtime value. We can consider unit() to be an empty
tuple, and any restrictions that apply to tuples also apply to unit.
类似地,为了基于表达式,unit () 是由Move源语言创建的一种类型。unit的值 () 不会产生任何运行值。我们可以将 unit () 视为空元组,适用于元组的任何限制也适用于 unit 。
It might feel weird to have tuples in the language at all given these restrictions. But one of the most common use cases for tuples in other languages is for functions to allow functions to return multiple values. Some languages work around this by forcing the users to write structs that contain the multiple return values. However in Move, you cannot put references inside of structs. This required Move to support multiple return values. These multiple return values are all pushed on the stack at the bytecode level. At the source level, these multiple return values are represented using tuples.
考虑到这些限制,在语言中使用元组可能会感觉很奇怪。但在其他语言中,元组最常见的用例之一是允许函数返回多个值。一些语言通过强制用户编写包含多个返回值的结构来解决这个问题。然而,在Move中,不能将引用放在结构体内部。这需要Move支持多个返回值。这些多个返回值都在字节码级别压入到堆栈中。在源代码级别,这些多个返回值使用元组表示。
字面量 (Literals)
Tuples are created by a comma separated list of expressions inside of parentheses
| Syntax | Type | Description |
|---|---|---|
() | (): () | Unit, the empty tuple, or the tuple of arity 0 |
(e1, ..., en) | (e1, ..., en): (T1, ..., Tn) where e_i: Ti s.t. 0 < i <= n and n > 0 | A n-tuple, a tuple of arity n, a tuple with n elements |
元组是由括号内以逗号分隔的表达式列表创建的
| 语法 | 类型 | 描述 |
| ------ | ------ | ------ |
| () | (): () | Unit、空元组 或 0元素元组
| (e1, ..., en) | (e1, ..., en): (T1, ..., Tn) 其中 e_i: Ti s.t. 0 < i <= n and n > 0 |带有n个元素的元组
Note that (e) does not have type (e): (t), in other words there is no tuple with one element. If
there is only a single element inside of the parentheses, the parentheses are only used for
disambiguation and do not carry any other special meaning.
Sometimes, tuples with two elements are called "pairs" and tuples with three elements are called "triples."
请注意,(e)没有类型 (e): (t),换句话说,没有一个元素的元组。如果括号内只有一个元素,则括号仅用于消除歧义,不带有任何其他特殊意义。
有时,具有两个元素的元组称为 “对偶”,而具有三个元素的元组称为“三元组”。
例子
address 0x42 {
    module example {
        // all 3 of these functions are equivalent

        // when no return type is provided, it is assumed to be `()`
        fun returs_unit_1() { }

        // there is an implicit () value in empty expression blocks
        fun returs_unit_2(): () { }

        // explicit version of `returs_unit_1` and `returs_unit_2`
        fun returs_unit_3(): () { () }

        fun returns_3_values(): (u64, bool, address) {
            (0, false, @0x42)
        }
        fun returns_4_values(x: &u64): (&u64, u8, u128, vector<u8>) {
            (x, 0, 1, b"foobar")
        }
    }
}
操作 (Operations)
The only operation that can be done on tuples currently is destructuring.
目前唯一可以对元组执行的操作是解构。
解构 (Destructuring)
For tuples of any size, they can be destructured in either a let binding or in an assignment.
For example:
对于任何大小的元组,它们可以在 let 绑定或赋值中被解构。
例如:
address 0x42 {
    module example {
        // all 3 of these functions are equivalent
        fun returns_unit() {}
        fun returns_2_values(): (bool, bool) { (true, false) }
        fun returns_4_values(x: &u64): (&u64, u8, u128, vector<u8>) { (x, 0, 1, b"foobar") }

        fun examples(cond: bool) {
            let () = ();
            let (x, y): (u8, u64) = (0, 1);
            let (a, b, c, d) = (@0x0, 0, false, b"");

            () = ();
            (x, y) = if (cond) (1, 2) else (3, 4);
            (a, b, c, d) = (@0x1, 1, true, b"1");
        }

        fun examples_with_function_calls() {
            let () = returns_unit();
            let (x, y): (bool, bool) = returns_2_values();
            let (a, b, c, d) = returns_4_values(&0);

            () = returns_unit();
            (x, y) = returns_2_values();
            (a, b, c, d) = returns_4_values(&1);
        }
    }
}
For more details, see Move Variables.
详情可参阅 变量.
子类型化 (Subtyping)
Along with references, tuples are the only types that have subtyping in Move. Tuples do have subtyping only in the sense that subtype with references (in a covariant way).
除了引用之外,元组是唯一在Move中具有子类型的类型。元组只有在子类型具有引用的意义上才具有子类型(以协变方式)。
例如:
let x: &u64 = &0;
let y: &mut u64 = &mut 1;

// (&u64, &mut u64) is a subtype of (&u64, &u64)
//   since &mut u64 is a subtype of &u64
let (a, b): (&u64, &u64) = (x, y);
// (&mut u64, &mut u64) is a subtype of (&u64, &u64)
//   since &mut u64 is a subtype of &u64
let (c, d): (&u64, &u64) = (y, y);
// error! (&u64, &mut u64) is NOT a subtype of (&mut u64, &mut u64)
//   since &u64 is NOT a subtype of &mut u64
let (e, f): (&mut u64, &mut u64) = (x, y);
所有权 (Ownership)
As mentioned above, tuple values don't really exist at runtime. And currently they cannot be stored into local variables because of this (but it is likely that this feature will come soon). As such, tuples can only be moved currently, as copying them would require putting them into a local variable first.
如上所述,元组值在运行时并不真正存在。由于这个原因,目前它们不能存储到局部变量中(但这个功能很可能很快就会出现)。因此,元组目前只能移动,因为复制它们需要先将它们放入局部变量中。
局部变量和作用域(Local Variables and Scopes)
Local variables in Move are lexically (statically) scoped. New variables are introduced with the
keyword let, which will shadow any previous local with the same name. Locals are mutable and can
be updated both directly and via a mutable reference.
在Move语言中,局部变量的解析依赖于词法作用域(lexically scoped)或静态作用域(statically scoped)。新变量是通过关键字 let 引入的,它将遮蔽任何之前的局部同名变量。局部变量是可变的,可以直接更新,也可以通过可变引用更新。
声明局部变量 (Declaring Local Variables)
let bindings (let 绑定)
Move programs use let to bind variable names to values:
Move语言程序使用 let 来给变量名赋值:
let x = 1;
let y = x + x:
let can also be used without binding a value to the local.
let 使用时也可以不绑定任何数值。
let x;
The local can then be assigned a value later.
这些局部变量可以被稍后赋值。
let x;
if (cond) {
  x = 1
} else {
  x = 0
}
This can be very helpful when trying to extract a value from a loop when a default value cannot be provided.
当无法提供默认值时,且尝试从循环中提取值时非常有用。
let x;
let cond = true;
let i = 0;
loop {
    (x, cond) = foo(i);
    if (!cond) break;
    i = i + 1;
}
变量必须在使用前赋值 (Variables must be assigned before use)
Move's type system prevents a local variable from being used before it has been assigned.
Move的类型系统防止在赋值前使用局部变量。
let x;
x + x // ERROR!
let x;
if (cond) x = 0;
x + x // ERROR!
let x;
while (cond) x = 0;
x + x // ERROR!
有效的变量名 (Valid variable names)
Variable names can contain underscores _, letters a to z, letters A to Z, and digits 0
to 9. Variable names must start with either an underscore _ or a letter a through z. They
cannot start with uppercase letters.
变量名可以包含下划线 _,小写字母 a 到 z ,大写字母 A 到 Z, 和数字 0 到 9 。变量名必须以下划线_或者以小写字母a到z开头。它们 不可以 用大写字母开头。
// 正确写法
let x = e;
let _x = e;
let _A = e;
let x0 = e;
let xA = e;
let foobar_123 = e;

// 非正确写法
let X = e; // ERROR!
let Foo = e; // ERROR!
类型标注 (Type annotations)
The type of a local variable can almost always be inferred by Move's type system. However, Move allows explicit type annotations that can be useful for readability, clarity, or debuggability. The syntax for adding a type annotation is:
局部变量的类型几乎总是可以通过 Move 的类型系统推断出来。 但是,Move 允许显式标注类型,这对可读性、清晰性或可调试性很有用。 添加类型标注的语法如下:
let x: T = e; // "变量 x 的类型 T 被定义为表达式 e"
Some examples of explicit type annotations: 一些显式标注类型的例子:
address 0x42 {
    module example {

        struct S { f: u64, g: u64 }

        fun annotated() {
            let u: u8 = 0;
            let b: vector<u8> = b"hello";
            let a: address = @0x0;
            let (x, y): (&u64, &mut u64) = (&0, &mut 1);
            let S { f, g: f2 }: S = S { f: 0, g: 1 };
        }
    }
}
Note that the type annotations must always be to the right of the pattern:
值得注意的是,类型标注必须总是位于变量右边的模式:
let (x: &u64, y: &mut u64) = (&0, &mut 1); // 错误! 正确写法是 let (x, y): ... =
何时需要(类型)标注 (When annotations are necessary)
In some cases, a local type annotation is required if the type system cannot infer the type. This commonly occurs when the type argument for a generic type cannot be inferred. For example:
在某些情况下,如果类型系统无法推断类型,则需要局部类型标注。这常常发生于无法推断某个泛型(generic type)的类型参数时。比如:
let _v1 = vector::empty(); // 错误!
//        ^^^^^^^^^^^^^^^ 无法推断它的类型。 请加上注解
let v2: vector<u64> = vector::empty(); // 正确
In a rarer case, the type system might not be able to infer a type for divergent code (where all the
following code is unreachable). Both return and abort are expressions
and can have any type. A loop has type () if it has a break, but if there is no
break out of the loop, it could have any type. If these types cannot be inferred, a type
annotation is required. For example, this code:
在极少数情况下,Move的类型系统并不能推断出一段发散式代码(divergent code)的类型(后面所有代码无法访问)。在Move语言中,return 和 abort都属于表达式,它们可以返回任何类型。如果一段 loop 有 break 语句,那么它的返回类型是(), 然而如果它不包含break语句,它的返回类型可以是任何类型。如果这些类型无法推断,类型标注是必须的。比如:
let a: u8 = return ();
let b: bool = abort 0;
let c: signer = loop ();

let x = return (); // ERROR!
//  ^ Could not infer this type. Try adding an annotation
let y = abort 0; // ERROR!
//  ^ Could not infer this type. Try adding an annotation
let z = loop (); // ERROR!
//  ^ Could not infer this type. Try adding an annotation
Adding type annotations to this code will expose other errors about dead code or unused local variables, but the example is still helpful for understanding this problem.
在这段代码中添加类型标注会暴露其他关于死代码或未使用的局部变量的错误,无论如何这示例仍然有助于理解这个问题。
元组式的多个(变量)声明 (Multiple declarations with tuples)
let can introduce more than one local at a time using tuples. The locals declared inside the
parenthesis are initialized to the corresponding values from the tuple.
let 可以使用元组一次引入多个局部变量。在括号里面声明的局部变量会被初始化为元组中的对应值。
let () = ();
let (x0, x1) = (0, 1);
let (y0, y1, y2) = (0, 1, 2);
let (z0, z1, z2, z3) = (0, 1, 2, 3);
The type of the expression must match the arity of the tuple pattern exactly.
表达式的类型必须与元组模式的数量完全匹配。
let (x, y) = (0, 1, 2); // 错误!
let (x, y, z, q) = (0, 1, 2); // 错误!
You cannot declare more than one local with the same name in a single let.
您不能在单个 let 中声明多个具有相同名称的局部变量。
let (x, x) = 0; // 错误!
结构体式的多个(变量)声明(Multiple declarations with structs)
let can also introduce more than one local at a time when destructuring (or matching against) a
struct. In this form, the let creates a set of local variables that are initialized to the values
of the fields from a struct. The syntax looks like this:
let 也可以在解构(或匹配)结构时一次引入多个局部变量。在这种形式中,let 创建了一组局部变量,这些变量被初始化为结构中的字段的值。语法如下所示:
struct T { f1: u64, f2: u64 }
let T { f1: local1, f2: local2 } = T { f1: 1, f2: 2 };
// local1: u64
// local2: u64
Here is a more complicated example:
这是一个更复杂的示例:
address 0x42 {
    module example {
        struct X { f: u64 }
        struct Y { x1: X, x2: X }

        fun new_x(): X {
            X { f: 1 }
        }

        fun example() {
            let Y { x1: X { f }, x2 } = Y { x1: new_x(), x2: new_x() };
            assert!(f + x2.f == 2, 42);

            let Y { x1: X { f: f1 }, x2: X { f: f2 } } = Y { x1: new_x(), x2: new_x() };
            assert!(f1 + f2 == 2, 42);
        }
    }
}
Fields of structs can serve double duty, identifying the field to bind and the name of the variable. This is sometimes referred to as punning.
结构体的字段可以起到双重作用:识别要绑定的字段 和 命名变量。这有时被称为双关语。
let X { f } = e;
is equivalent to:
等价于:
let X { f: f } = e;
As shown with tuples, you cannot declare more than one local with the same name in a single let.
如元组所示,您不能在单个 let 中声明多个具有相同名称的局部变量。
let Y { x1: x, x2: x } = e; // 错误!(两个x同名了,注者注)
针对引用进行解构(Destructuring against references)
In the examples above for structs, the bound value in the let was moved, destroying the struct value and binding its fields.
在上面的结构体示例中,let 中绑定的值被移动了,这销毁了结构体的值并同时绑定了它的字段(到变量)。
struct T { f1: u64, f2: u64 }
let T { f1: local1, f2: local2 } = T { f1: 1, f2: 2 };
// local1: u64
// local2: u64
In this scenario the struct value T { f1: 1, f2: 2 } no longer exists after the let.
If you wish instead to not move and destroy the struct value, you can borrow each of its fields. For example:
在这种场景下结构体的值 T { f1: 1, f2: 2 } 会在 let 后消失.
如果您希望不移动和销毁结构体的值,则可以借用其中的每个字段。比如说:
let t = T { f1: 1, f2: 2 };
let T { f1: local1, f2: local2 } = &t;
// local1: &u64
// local2: &u64
And similarly with mutable references:
与可变引用类似:
let t = T { f1: 1, f2: 2 };
let T { f1: local1, f2: local2 } = &mut t;
// local1: &mut u64
// local2: &mut u64
This behavior can also work with nested structs.
此行为也适用于嵌套结构体。
address 0x42 {
    module example {
        struct X { f: u64 }
        struct Y { x1: X, x2: X }

        fun new_x(): X {
            X { f: 1 }
        }

        fun example() {
            let y = Y { x1: new_x(), x2: new_x() };

            let Y { x1: X { f }, x2 } = &y;
            assert!(*f + x2.f == 2, 42);

            let Y { x1: X { f: f1 }, x2: X { f: f2 } } = &mut y;
            *f1 = *f1 + 1;
            *f2 = *f2 + 1;
            assert!(*f1 + *f2 == 4, 42);
        }
    }
}
忽略值(Ignoring Values)
In let bindings, it is often helpful to ignore some values. Local variables that start with _
will be ignored and not introduce a new variable
在 let 绑定中,忽略某些值通常很有帮助。以 _ 开头的局部变量将被忽略并且不会引入新变量。
fun three(): (u64, u64, u64) {
    (0, 1, 2)
}
let (x1, _, z1) = three();
let (x2, _y, z2) = three();
assert!(x1 + z1 == x2 + z2)
This can be necessary at times as the compiler will error on unused local variables。
这有时是必要的,因为编译器会在检测到未使用的局部变量时报错。
let (x1, y, z1) = three(); // 错误!
//       ^ 未被使用的局部变量 'y'
通用的 let 语法 (General let grammar)
All of the different structures in let can be combined! With that we arrive at this general
grammar for let statements:
let 中的所有不同结构都可以组合!有了这个,我们撰写了let语句的通用语法:
let-binding → let pattern-or-list type-annotationopt initializeropt > pattern-or-list → pattern | ( pattern-list ) > pattern-list → pattern ,opt | pattern , pattern-list > type-annotation → : type initializer → = expression
The general term for the item that introduces the bindings is a pattern. The pattern serves to both destructure data (possibly recursively) and introduce the bindings. The pattern grammar is as follows:
引入绑定(binding)的项(item)的通用术语是 模式。这种模式(pattern)用于解构数据(可能递归)并引入绑定。模式语法如下:
pattern → local-variable | struct-type { field-binding-list } > field-binding-list → field-binding ,opt | field-binding , field-binding-list > field-binding → field | field : pattern
A few concrete examples with this grammar applied:
应用此语法的一些具体示例:
    let (x, y): (u64, u64) = (0, 1);
//       ^                           局部变量
//       ^                           模式
//          ^                        局部变量
//          ^                        模式
//          ^                        模式列表
//       ^^^^                        模式列表
//      ^^^^^^                       模式或列表
//            ^^^^^^^^^^^^           类型注解
//                         ^^^^^^^^  初始化的值
//  ^^^^^^^^^^^^^^^^^^^^^^^^^^^^^^^^ let-绑定

    let Foo { f, g: x } = Foo { f: 0, g: 1 };
//      ^^^                                    结构类型
//            ^                                字段
//            ^                                字段绑定
//               ^                             字段
//                  ^                          局部变量
//                  ^                          模式
//               ^^^^                          字段绑定
//            ^^^^^^^                          字段绑定列表
//      ^^^^^^^^^^^^^^^                        模式
//      ^^^^^^^^^^^^^^^                        模式或列表
//                      ^^^^^^^^^^^^^^^^^^^^   初始化的值
//  ^^^^^^^^^^^^^^^^^^^^^^^^^^^^^^^^^^^^^^^^^^ let-绑定
变更(mutations)
赋值(Assignments)
After the local is introduced (either by let or as a function parameter), the local can be
modified via an assignment:
在引入一个局部变量后(使用let或是用作一个函数参数(function parameter)),局部(变量)可以通过赋值进行修改:
x = e
Unlike let bindings, assignments are expressions. In some languages, assignments return the value
that was assigned, but in Move, the type of any assignment is always ().
不同于 let 的绑定,赋值属于表达式。在一些编程语言中,赋值表达式会返回被赋予的值,但是在move语言中,任何赋值返回的类型永远都是()。
(x = e: ())
Practically, assignments being expressions means that they can be used without adding a new
expression block with braces ({...}).
实际应用中,赋值属于表达式意味着使用它们时不用添加额外表达块(expression block)的括号。({...})
let x = 0;
if (cond) x = 1 else x = 2;
The assignment uses the same pattern syntax scheme as let bindings:
赋值使用与 let 绑定相同的模式语法方案::
address 0x42 {
    module example {
        struct X { f: u64 }

        fun new_x(): X {
            X { f: 1 }
        }

        // 以下的例子会因为未使用的变量和赋值报错。
        fun example() {
        let (x, _, z) = (0, 1, 3);
        let (x, y, f, g);

        (X { f }, X { f: x }) = (new_x(), new_x());
        assert!(f + x == 2, 42);

        (x, y, z, f, _, g) = (0, 0, 0, 0, 0, 0);
        }
    }
}
Note that a local variable can only have one type, so the type of the local cannot change between assignments.
值得注意的是一个局部变量只能有一种类型,所以局部变量不能在赋值之间(多次赋值)改变类型。
let x;
x = 0;
x = false; // 错误!
通过引用进行变更 (Mutating through a reference)
In addition to directly modifying a local with assignment, a local can be modified via a mutable
reference &mut.
除了通过赋值直接修改局部变量外,还可以通过可变引用 &mut 的方式修改局部变量。
let x = 0;
let r = &mut x;
*r = 1;
assert!(x == 1, 42)
}
This is particularly useful if either:
(1) You want to modify different variables depending on some condition.
这在以下情况下特别有用:
(1) 您想根据某些条件修改不同的变量。
let x = 0;
let y = 1;
let r = if (cond) &mut x else &mut y;
*r = *r + 1;
(2) You want another function to modify your local value.
(2) 您想要另一个函数来修改您的局部(变量)值。
let x = 0;
modify_ref(&mut x);
This sort of modification is how you modify structs and vectors!
这种修改就是你更改结构体和数组的方式!
let v = vector::empty();
vector::push_back(&mut v, 100);
assert!(*vector::borrow(&v, 0) == 100, 42)
For more details, see Move references.
关于更多细节可以参考 Move 引用.
作用域 (Scopes)
Any local declared with let is available for any subsequent expression, within that scope.
Scopes are declared with expression blocks, {...}.
Locals cannot be used outside of the declared scope.
使用 let 声明的任何局部变量都可用于任何后续表达式,在该范围内。作用域用表达式块(expression blocks)声明,{...}。
局部变量不能在声明的作用域之外使用。
let x = 0;
{
    let y = 1;
};
x + y // 错误!
//  ^ 未绑定的局部变量“y”
But, locals from an outer scope can be used in a nested scope.
但是,来自作用域外部的部变量 可以 在嵌套作用域中使用。
{
    let x = 0;
    {
        let y = x + 1; // 合规范的
    }
}
Locals can be mutated in any scope where they are accessible. That mutation survives with the local, regardless of the scope that performed the mutation.
局部变量可以在允许访问的任何作用域内进行变更(mutation)。与进行变更的作用域无关,这种变更会跟随局部变量的生命周期。
let x = 0;
x = x + 1;
assert!(x == 1, 42);
{
    x = x + 1;
    assert!(x == 2, 42);
};
assert!(x == 2, 42);
表达式块(Expression Blocks)
An expression block is a series of statements separated by semicolons (;). The resulting value of
an expression block is the value of the last expression in the block.
表达式块是由分号 (;) 分隔的一系列语句。结果值为表达式块是块中最后一个表达式的值。
{ let x = 1; let y = 1; x + y }
In this example, the result of the block is x + y.
A statement can be either a let declaration or an expression. Remember that assignments (x = e)
are expressions of type ().
在此示例中, 此区块的结果是 x + y.
语句可以是 let 声明或表达式。请记住赋值(x = e)是 () 类型的表达式。
{ let x; let y = 1; x = 1; x + y }
Function calls are another common expression of type (). Function calls that modify data are
commonly used as statements.
函数调用是 () 类型的另一种常见表达方式。修改数据的函数调用通常被用作语句表达(statements)。
{ let v = vector::empty(); vector::push_back(&mut v, 1); v }
This is not just limited to () types---any expression can be used as a statement in a sequence!
这不仅限于 () 类型——任何表达式都可以用作序列中的语句!
{
    let x = 0;
    x + 1; // 值会被丢弃
    x + 2; // 值会被丢弃
    b"hello"; // 值会被丢弃
}
But! If the expression contains a resource (a value without the drop ability),
you will get an error. This is because Move's type system guarantees that any value that is dropped
has the drop ability. (Ownership must be transferred or the value must be
explicitly destroyed within its declaring module.)
但是!如果表达式包含一个没有 drop 能力 的值的资源,程序会返回错误。这是因为 Move 的类型系统保证任何被丢弃的值有 drop 能力。 (所有权必须被转让或一个值必须在其声明模块中被显式销毁。)
{
    let x = 0;
    Coin { value: x }; // ERROR!
//  ^^^^^^^^^^^^^^^^^ 没有 `drop` 能力的未使用值
    x
}
If a final expression is not present in a block---that is, if there is a trailing semicolon ;,
there is an implicit unit () value. Similarly, if the expression block is empty, there is an
implicit unit () value.
如果块中不存在最终表达式---也就是说,如果有一个尾随分号;,有一个隐含的 unit () 值。同样,如果表达式块为空,则存在隐式 unit () 值。
// 两者是相同的
{ x = x + 1; 1 / x; }
{ x = x + 1; 1 / x; () }
// 两者是相同的
{ }
{ () }
An expression block is itself an expression and can be used anyplace an expression is used. (Note: The body of a function is also an expression block, but the function body cannot be replaced by another expression.)
表达式块本身就是一个表达式,可以在任何使用表达式的地方使用。 (注意:函数体也是表达式块,但函数体不能被另一个表达式替换。)
let my_vector: vector<vector<u8>> = {
    let v = vector::empty();
    vector::push_back(&mut v, b"hello");
    vector::push_back(&mut v, b"goodbye");
    v
};
(The type annotation is not needed in this example and only added for clarity.)
(此示例中不需要类型标注,只是为了清晰而添加。)
遮蔽(shadowing)
If a let introduces a local variable with a name already in scope, that previous variable can no
longer be accessed for the rest of this scope. This is called shadowing.
如果一个 let 引入了一个已经在作用域内的同名局部变量,那么之前的变量不能继续在此作用域的其余部分访问。这称为 遮蔽 ( shadowing )。
let x = 0;
assert!(x == 0, 42);

let x = 1; // x被遮蔽了
assert!(x == 1, 42);
When a local is shadowed, it does not need to retain the same type as before.
当局部变量被遮蔽时,它不需要保留与以前相同的类型。
let x = 0;
assert!(x == 0, 42);

let x = b"hello"; // x被遮蔽了
assert!(x == b"hello", 42);
After a local is shadowed, the value stored in the local still exists, but will no longer be
accessible. This is important to keep in mind with values of types without the
drop ability, as ownership of the value must be transferred by the end of the
function.
一个局部变量被遮蔽后,存储在局部变量的值仍然存在,但将变得不再可访问。对于没有drop 能力的类型的值,请记住这一点很重要,因为值的所有权必须在函数结束时转移。
address 0x42 {
    module example {
        struct Coin has store { value: u64 }

        fun unused_resource(): Coin {
            let x = Coin { value: 0 }; // 错误!
//              ^ 这个局部变量仍然包含一个没有 `drop` 能力的值
            x.value = 1;
            let x = Coin { value: 10 };
            x
//          ^ 不合规范的返回
        }
    }
}
When a local is shadowed inside a scope, the shadowing only remains for that scope. The shadowing is gone once that scope ends.
当局部变量在作用域内被遮蔽时,该遮蔽作用仅保留在该作用域内。一旦该作用域结束,遮蔽就会自动消失。
let x = 0;
{
    let x = 1;
    assert!(x == 1, 42);
};
assert!(x == 0, 42);
Remember, locals can change type when they are shadowed.
注意,局部变量在被遮蔽时可以更改类型。
let x = 0;
{
    let x = b"hello";
    assert!(x = b"hello", 42);
};
assert!(x == 0, 42);
移动和复制(Move and Copy)
All local variables in Move can be used in two ways, either by move or copy. If one or the other
is not specified, the Move compiler is able to infer whether a copy or a move should be used.
This means that in all of the examples above, a move or a copy would be inserted by the
compiler. A local variable cannot be used without the use of move or copy.
copy will likely feel the most familiar coming from other programming languages, as it creates a
new copy of the value inside of the variable to use in that expression. With copy, the local
variable can be used more than once.
Move 中的所有局部变量都可以通过两种方式使用:通过 move 或 copy。如果其中一个未被指定时,Move 编译器能够推断应该使用 copy 或 move。这意味着在上述所有示例中,move 或 copy 将被编译器插入。不使用 move 或 copy 就不能使用局部变量。
copy 对来自其他编程语言(的开发者)来说可能会觉得最熟悉,因为它创建了一个要在该表达式中使用的变量内部值的新副本。使用 copy,本地变量可以多次使用。
let x = 0;
let y = copy x + 1;
let z = copy x + 2;
Any value with the copy ability can be copied in this way.
move takes the value out of the local variable without copying the data. After a move occurs,
the local variable is unavailable.
任何带有 copy 能力 的值都可以通过这种方式复制。
move 从局部变量中取走值 而不是 复制数据。发生移动后,局部变量会不可用。
let x = 1;
let y = move x + 1;
//      ------ 局部变量被移动到这里了
let z = move x + 2; // 错误!
//      ^^^^^^ 不合规范的'x'使用方式
y + z
安全性(Safety)
Move's type system will prevent a value from being used after it is moved. This is the same safety
check described in let declaration that prevents local variables from being used
before it is assigned a value.
Move 的类型系统会防止一个值在移动后被使用。这和 let 声明 中描述的防止在局部变量在赋值之前被使用是一样的安全检查。
推断(Inference)
As mentioned above, the Move compiler will infer a copy or move if one is not indicated. The
algorithm for doing so is quite simple:
- Any scalar value with the
copyability is given acopy. - Any reference (both mutable
&mutand immutable&) is given acopy.- Except under special circumstances where it is made a
movefor predictable borrow checker errors.
- Except under special circumstances where it is made a
- Any other value is given a
move.- This means that even though other values might be have the
copyability, it must be done explicitly by the programmer. - This is to prevent accidental copies of large data structures.
- This means that even though other values might be have the
如上所述,如果未指明,Move 编译器将推断出“复制”或“移动”。它的算法非常简单:
- 任何带有
copy能力 的标量值都被赋予了copy。 - 任何引用(可变
&mut和不可变&)都被赋予一个copy。- 除非在预估借用检查器出错的特殊情况下,会进行
move操作.
- 除非在预估借用检查器出错的特殊情况下,会进行
- 任何其他值都被赋予
Move。- 这意味着即使其他值可能具有
copy能力,它必须由程序员 显式 声明。 - 这是为了防止意外复制很大的数据结构。
- 这意味着即使其他值可能具有
例如:
let s = b"hello";
let foo = Foo { f: 0 };
let coin = Coin { value: 0 };

let s2 = s; // 移动
let foo2 = foo; // 移动
let coin2 = coin; // 移动

let x = 0;
let b = false;
let addr = @0x42;
let x_ref = &x;
let coin_ref = &mut coin2;

let x2 = x; // 复制
let b2 = b; // 复制
let addr2 = @0x42; // 复制
let x_ref2 = x_ref; // 复制
let coin_ref2 = coin_ref; // 复制
等式 (Equality)
Move supports two equality operations == and !=
Move 支持两种等式操作: == 和 !=
操作 (Operations)
| Syntax | Operation | Description |
|---|---|---|
== | equal | Returns true if the two operands have the same value, false otherwise |
!= | not equal | Returns true if the two operands have different values, false otherwise |
| 语法 | 操作 | 描述 |
|---|---|---|
== | 相等 | 如果两个操作数(operands)值相同,返回 true , 否则返回 false |
!= | 不相等 | 如果两个操作数(operands)值不相同,返回 true , 否则返回 false |
类型校验 (Typing)
Both the equal (==) and not-equal (!=) operations only work if both operands are the same type.
只有当左右两个操作数类型相同,相等操作 (==) 与不等操作 (!=) 才能正常使用。
0 == 0; // `true`
1u128 == 2u128; // `false`
b"hello" != x"00"; // `true`
Equality and non-equality also work over user defined types!
等式与不等式也可以在用户自定义的类型下使用!
address 0x42 {
    module example {
        struct S has copy, drop { f: u64, s: vector<u8> }

        fun always_true(): bool {
            let s = S { f: 0, s: b"" };
            // 括号不是必需的,但为了清楚起见在此示例中添加了括号
            (copy s) == s
        }

        fun always_false(): bool {
            let s = S { f: 0, s: b"" };
            // 括号不是必需的,但为了清楚起见在此示例中添加了括号
            (copy s) != s
        }
    }
}
If the operands have different types, there is a type checking error.
如果两边操作数的类型不同,则会出现类型检测错误。
1u8 == 1u128; // 错误!
//     ^^^^^ 期望此变量的类型是 'u8'
b"" != 0; // 错误!
//     ^ 期望此变量的类型是 'vector<u8>'
引用变量的类型校验 (Typing with references)
When comparing references, the type of the reference (immutable or mutable) does
not matter. This means that you can compare an immutable & reference with a mutable one &mut of
the same underlying type.
当比较引用变量时,引用的类别(不可变更的或可变更的(immutable or mutable))无关紧要。这意味着我们可以拿一个不可变更的 & 引用变量和另一个有相同相关类型的可变更的 &mut 引用变量进行比较。
let i = &0;
let m = &mut 1;

i == m; // `false`
m == i; // `false`
m == m; // `true`
i == i; // `true`
The above is equivalent to applying an explicit freeze to each mutable reference where needed
在需要时,对每个可变引用使用显式冻结(explicit freeze)的结果与上述情况一致。
let i = &0;
let m = &mut 1;

i == freeze(m); // `false`
freeze(m) == i; // `false`
m == m; // `true`
i == i; // `true`
But again, the underlying type must be the same type
但同样的,我们需要两边操作数的类型一致
let i = &0;
let s = &b"";

i == s; // 错误!
//   ^ 期望此变量的类型是 '&u64'
限制 (Restrictions)
Both == and != consume the value when comparing them. As a result, the type system enforces that
the type must have drop. Recall that without the drop ability,
ownership must be transferred by the end of the function, and such values can only be explicitly destroyed
within their declaring module. If these were used directly with either equality == or non-equality !=,
the value would be destroyed which would break drop ability safety guarantees!
== 和 != 会在比较不同变量的时候消耗 (consume)它们所包含的值,所以 Move 的类型系统会强制要求这些类型含有drop 能力。回想一下,变量在没有drop 能力时,所有权必须在函数结束前进行转移,而且这些值只能在其声明模块中被明确销毁(explicitly destroyed)。如果它们被直接使用于等式 == 或不等式 != ,其值会被销毁并且这会打破drop 能力的安全保证!
address 0x42 {
    module example {
        struct Coin has store { value: u64 }
        fun invalid(c1: Coin, c2: Coin) {
            c1 == c2 // 错误!
    //      ^^    ^^ 这些资源将会被销毁!
        }
    }
}
But, a programmer can always borrow the value first instead of directly comparing the value, and
reference types have the drop ability. For example
然而, 程序员 总是 可以优先借用变量的值,而不直接比较它们的值。这样一来,引用变量的类型将会拥有drop 能力。例如:
address 0x42 {
    module example {
        struct Coin as store { value: u64 }
        fun swap_if_equal(c1: Coin, c2: Coin): (Coin, Coin) {
            let are_equal = &c1 == &c2; // 合规范的
            if (are_equal) (c2, c1) else (c1, c2)
        }
    }
}
避免额外的复制 (Avoid Extra Copies)
While a programmer can compare any value whose type has drop, a programmer
should often compare by reference to avoid expensive copies.
当程序员 可以 比较其类型含有drop 能力的任意值时,他们应该尽可能多地使用引用变量来比较,以此来避免昂贵的复制。
let v1: vector<u8> = function_that_returns_vector();
let v2: vector<u8> = function_that_returns_vector();
assert!(copy v1 == copy v2, 42);
//     ^^^^       ^^^^
use_two_vectors(v1, v2);

let s1: Foo = function_that_returns_large_struct();
let s2: Foo = function_that_returns_large_struct();
assert!(copy s1 == copy s2, 42);
//     ^^^^       ^^^^
use_two_foos(s1, s2);
This code is perfectly acceptable (assuming Foo has drop), just not efficient.
The highlighted copies can be removed and replaced with borrows
以上代码是完全可以接受的(假设Foo具备drop能力),但它不是最有效的写法。突出显示的副本可以删除并替换为借用。
let v1: vector<u8> = function_that_returns_vector();
let v2: vector<u8> = function_that_returns_vector();
assert!(&v1 == &v2, 42);
//     ^      ^
use_two_vectors(v1, v2);

let s1: Foo = function_that_returns_large_struct();
let s2: Foo = function_that_returns_large_struct();
assert!(&s1 == &s2, 42);
//     ^      ^
use_two_foos(s1, s2);
The efficiency of the == itself remains the same, but the copys are removed and thus the program is more efficient.
== 本身的效率还是和之前一样,但是 copy 操作被移除后整个程序会比之前更有效率。
中止和断言 (Abort and Assert)
return and abort are two control flow constructs that end execution, one for
the current function and one for the entire transaction.
More information on return can be found in the linked section
return 和 abort 是两种结束程序执行的控制流结构。前者针对当前函数,后者针对整个事务。
return的更多信息可以参考链接中的文章。
abort 中止
abort is an expression that takes one argument: an abort code of type u64. For example:
abort 表达式只接受一个参数: 类型为 u64 的中止代码。例如:
abort 42
The abort expression halts execution the current function and reverts all changes made to global
state by the current transaction. There is no mechanism for "catching" or otherwise handling an abort.
abort 表达式会中止执行当前函数并恢复当前事务对全局状态所做的所有更改。Move语言没有“捉捕”或者额外处理abort的机制。
Luckily, in Move transactions are all or nothing, meaning any changes to global storage are made all at once only if the transaction succeeds. Because of this transactional commitment of changes, after an abort there is no need to worry about backing out changes. While this approach is lacking in flexibility, it is incredibly simple and predictable.
幸运的是,在Move里事务的计算要么完全执行要么完全不执行。这意味着只有在事务成功时,任何对全局存储状态的改变才会被一并执行。
由于这种对于所有更改的事务承诺,在 abort 之后我们不需要担心去回滚任何更改。尽管这种方法缺少灵活性,它还是非常简单和可预测的。
Similar to return, abort is useful for exiting control flow when some condition cannot be met.
In this example, the function will pop two items off of the vector, but will abort early if the vector does not have two items
与 return相似, 在一些条件无法被满足的时候,abort 可以被用于退出控制流(control flow)。
在以下示例中,目标函数会从vector里弹出两个元素,但是如果vector中并没有两个元素,函数会提前中止。
use std::vector;
fun pop_twice<T>(v: &mut vector<T>): (T, T) {
    if (vector::length(v) < 2) abort 42;

    (vector::pop_back(v), vector::pop_back(v))
}
This is even more useful deep inside a control-flow construct. For example, this function checks
that all numbers in the vector are less than the specified bound. And aborts otherwise
这在控制流结构的深处甚至会更有用。例如,此函数检查vector中是否所有数字都小于指定的边界(bound)。否则函数中止:
use std::vector;
fun check_vec(v: &vector<u64>, bound: u64) {
    let i = 0;
    let n = vector::length(v);
    while (i < n) {
        let cur = *vector::borrow(v, i);
        if (cur > bound) abort 42;
        i = i + 1;
    }
}
assert 断言
assert is a builtin, macro-like operation provided by the Move compiler. It takes two arguments, a condition of type bool and a code of type u64
assert 是 Move 编译器提供的内置的类宏(macro-like)操作。它需要两个参数:一个 bool 类型的条件和一个 u64 类型的错误状态码(类似HTTP中的StatusCode: 404, 500等,译者注)
assert!(condition: bool, code: u64)
Since the operation is a macro, it must be invoked with the !. This is to convey that the
arguments to assert are call-by-expression. In other words, assert is not a normal function and
does not exist at the bytecode level. It is replaced inside the compiler with
由于该操作是一个宏,因此必须使用 ! 调用它。这是为了表达 assert 的参数属于表达式调用(call-by-expression)。换句话说,assert 不是一个正常的函数,并且在字节码(bytecode)级别不存在。它在编译器内部被替换为以下代码:
if (condition) () else abort code
assert is more commonly used than just abort by itself. The abort examples above can be rewritten using assert
assert 比 abort 本身更常用。上面的 abort 示例可以使用 assert 重写
use std::vector;
fun pop_twice<T>(v: &mut vector<T>): (T, T) {
    assert!(vector::length(v) >= 2, 42); // 现在使用'assert'

    (vector::pop_back(v), vector::pop_back(v))
}
和
use std::vector;
fun check_vec(v: &vector<u64>, bound: u64) {
    let i = 0;
    let n = vector::length(v);
    while (i < n) {
        let cur = *vector::borrow(v, i);
        assert!(cur <= bound, 42); // 现在使用 'assert'
        i = i + 1;
    }
}
Note that because the operation is replaced with this if-else, the argument for the code is not
always evaluated. For example:
请注意,因为此操作被替换为 if-else,这段 代码 的参数不是总是被执行(evaluated)。例如:
assert!(true, 1 / 0)
Will not result in an arithmetic error, it is equivalent to
不会导致算术错误,因为它相当于:
if (true) () else (1 / 0)
So the arithmetic expression is never evaluated!
所以这个算术表达式永远不会被执行(evaluated)!
Abort codes in the Move VM (Move虚拟机中的中止代码)
When using abort, it is important to understand how the u64 code will be used by the VM.
Normally, after successful execution, the Move VM produces a change-set for the changes made to global storage (added/removed resources, updates to existing resources, etc).
当使用 abort 时,理解虚拟机将如何使用 u64 代码是非常重要的。
通常,在成功执行后,Move 虚拟机会为对全局存储(添加/删除资源、更新现有资源等)所做的更改生成一个更改集。
If an abort is reached, the VM will instead indicate an error. Included in that error will be two
pieces of information:
- The module that produced the abort (address and name)
- The abort code.
For example
如果执行到 abort 代码,虚拟机将指示错误。该错误中包含两块信息:
- 发生中止的模块(地址和名称)
- 错误状态码。
例如
address 0x2 {
    module example {
        public fun aborts() {
            abort 42
        }
    }
}

script {
    fun always_aborts() {
        0x2::example::aborts()
    }
}
If a transaction, such as the script always_aborts above, calls 0x2::example::aborts, the VM
would produce an error that indicated the module 0x2::example and the code 42.
This can be useful for having multiple aborts being grouped together inside a module.
In this example, the module has two separate error codes used in multiple functions
如果一个事务,例如上面的脚本 always_aborts 调用了 0x2::example::aborts,虚拟机将产生一个指示模块 0x2::example 和错误状态码 42 的错误。
这在一个模块内将多个中止功能组合起来会很有用。
在以下示例中,模块有两个单独的错误状态码,用于多个函数
address 0x42 {
    module example {

        use std::vector;

        const EMPTY_VECTOR: u64 = 0;
        const INDEX_OUT_OF_BOUNDS: u64 = 1;

        // 移动 i 到 j, 移动 j 到 k, 移动 k 到 i
        public fun rotate_three<T>(v: &mut vector<T>, i: u64, j: u64, k: u64) {
            let n = vector::length(v);
            assert!(n > 0, EMPTY_VECTOR);
            assert!(i < n, INDEX_OUT_OF_BOUNDS);
            assert!(j < n, INDEX_OUT_OF_BOUNDS);
            assert!(k < n, INDEX_OUT_OF_BOUNDS);

            vector::swap(v, i, k);
            vector::swap(v, j, k);
        }

        public fun remove_twice<T>(v: &mut vector<T>, i: u64, j: u64): (T, T) {
            let n = vector::length(v);
            assert!(n > 0, EMPTY_VECTOR);
            assert!(i < n, INDEX_OUT_OF_BOUNDS);
            assert!(j < n, INDEX_OUT_OF_BOUNDS);
            assert!(i > j, INDEX_OUT_OF_BOUNDS);

            (vector::remove<T>(v, i), vector::remove<T>(v, j))
        }
    }
}
The type of abort (abort 的类型)
The abort i expression can have any type! This is because both constructs break from the normal
control flow, so they never need to evaluate to the value of that type.
The following are not useful, but they will type check
abort i 表达式可以有任何类型!这是因为这两种构造都打破了正常控制流,因此他们永远不需要计算该类型的值。
以下的示例不是特别有用,但它们会做类型检查
let y: address = abort 0;
This behavior can be helpful in situations where you have a branching instruction that produces a value on some branches, but not all. For example:
在您有一个分支指令,并且这个指令会产生某些分支(不是全部)的值的时候,这种行为会非常有用。例如:
let b =
    if (x == 0) false
    else if (x == 1) true
    else abort 42;
//       ^^^^^^^^ `abort 42` 的类型是 `bool`
条件语句 (Conditionals)
An if expression specifies that some code should only be evaluated if a certain condition is true. For example:
if 语句可以用来指定一块代码块,但只在判断条件(condition)为true时才会被执行。例如:
if (x > 5) x = x - 5
The condition must be an expression of type bool.
An if expression can optionally include an else clause to specify another expression to evaluate when the condition is false.
条件语句(condition)必须是 bool 类型的表达式。
if 语句可选包含 else 子句,以指定当条件(condition)为 false 时要执行的另一个代码块。
if (y <= 10) y = y + 1 else y = 10
Either the "true" branch or the "false" branch will be evaluated, but not both. Either branch can be a single expression or an expression block.
The conditional expressions may produce values so that the if expression has a result.
无论是"true"分支还是"false"分支都会被执行,但不会同时执行.其中任何一个分支都可以是单行代码或代码块。条件表达式会产生值,所以 if 表达式会有一个结果。
let z = if (x < 100) x else 100;
The expressions in the true and false branches must have compatible types. For example:
true 和 false 分支的表达式类型必须是一致的,例如:
// x和y必须是u64整型
// x and y must be u64 integers
let maximum: u64 = if (x > y) x else y;

// 错误!分支的类型不一致
// (ERROR! branches different types)
let z = if (maximum < 10) 10u8 else 100u64;

// 错误!分支的类型不一致,false-branch默认是()不是u64
// ERROR! branches different types, as default false-branch is () not u64
if (maximum >= 10) maximum;
If the else clause is not specified, the false branch defaults to the unit value. The following are equivalent:
如果else子句未定义,false分支默认为 unit 。下面的例子是相等价的:
if (condition) true_branch // implied default: else ()
if (condition) true_branch else ()
Commonly, if expressions are used in conjunction with expression blocks.
一般来说, if 表达式与多个表达式块结合使用.
let maximum = if (x > y) x else y;
if (maximum < 10) {
    x = x + 10;
    y = y + 10;
} else if (x >= 10 && y >= 10) {
    x = x - 10;
    y = y - 10;
}
条件语句的语法 (Grammar for Conditionals)
if-expression → if ( expression ) expression else-clauseopt else-clause → else expression
While and Loop
Move offers two constructs for looping: while and loop.
Move 提供了两种循环结构: while and loop.
while 循环
The while construct repeats the body (an expression of type unit) until the condition (an expression of type bool) evaluates to false.
Here is an example of simple while loop that computes the sum of the numbers from 1 to n:
while 会重复执行结构(一个 unit 类型的表达式), 直到条件语句(bool 类型的表达式)运算结果为 false。
下面是一个简单的 while 循环的例子,计算从 1 到 n 数字之和:
fun sum(n: u64): u64 {
    let sum = 0;
    let i = 1;
    while (i <= n) {
        sum = sum + i;
        i = i + 1
    };

    sum
}
Infinite loops are allowed:
无限循环是被允许的:
fun foo() {
    while (true) { }
}
break
The break expression can be used to exit a loop before the condition evaluates to false. For example, this loop uses break to find the smallest factor of n that's greater than 1:
break 表达式可用于在条件计算结果为 false 之前退出循环。例如,这个循环使用 break 查找 n 大于1的最小因子:
fun smallest_factor(n: u64): u64 {
    // assuming the input is not 0 or 1
    let i = 2;
    while (i <= n) {
        if (n % i == 0) break;
        i = i + 1
    };

    i
}
The break expression cannot be used outside of a loop.
break 表达式不能在循环之外使用。
continue
The continue expression skips the rest of the loop and continues to the next iteration. This loop uses continue to compute the sum of 1, 2, ..., n, except when the number is divisible by 10:
continue 表达式跳过当前循环的剩余部分, 并继续下一轮迭代。下面的例子, 使用 continue 去计算 1, 2, ..., n 的总和,过滤掉不能被10整除的数:
fun sum_intermediate(n: u64): u64 {
    let sum = 0;
    let i = 0;
    while (i < n) {
        i = i + 1;
        if (i % 10 == 0) continue;
        sum = sum + i;
    };

    sum
}
The continue expression cannot be used outside of a loop.
continue 表达式不能在循环之外使用。
The type of break and continue
break and continue, much like return and abort, can have any type. The following examples illustrate where this flexible typing can be helpful:
break and continue, 和 return and abort 很相像, 可以是任何类型。下面的例子说明了这种灵活的类型在那些方面有帮助:
fun pop_smallest_while_not_equal(
    v1: vector<u64>,
    v2: vector<u64>,
): vector<u64> {
    let result = vector::empty();
    while (!vector::is_empty(&v1) && !vector::is_empty(&v2)) {
        let u1 = *vector::borrow(&v1, vector::length(&v1) - 1);
        let u2 = *vector::borrow(&v2, vector::length(&v2) - 1);
        let popped =
            if (u1 < u2) vector::pop_back(&mut v1)
            else if (u2 < u1) vector::pop_back(&mut v2)
            else break; // Here, `break` has type `u64`
        vector::push_back(&mut result, popped);
    };

    result
}

fun pick(
    indexes: vector<u64>,
    v1: &vector<address>,
    v2: &vector<address>
): vector<address> {
    let len1 = vector::length(v1);
    let len2 = vector::length(v2);
    let result = vector::empty();
    while (!vector::is_empty(&indexes)) {
        let index = vector::pop_back(&mut indexes);
        let chosen_vector =
            if (index < len1) v1
            else if (index < len2) v2
            else continue; // Here, `continue` has type `&vector<address>`
        vector::push_back(&mut result, *vector::borrow(chosen_vector, index))
    };

    result
}
loop表达式
The loop expression repeats the loop body (an expression with type ()) until it hits a break
Without a break, the loop will continue forever
loop 表达式重复循环体(类型为unit()的表达式) ,直到遇到 break 为止。
(下面的代码中)没有 break, 循环将一直执行。
fun foo() {
    let i = 0;
    loop { i = i + 1 }
}
Here is an example that uses loop to write the sum function:
这是一个使用 loop 编写 sum 函数的示例(可与 while 循环比较):
fun sum(n: u64): u64 {
    let sum = 0;
    let i = 0;
    loop {
        i = i + 1;
        if (i > n) break;
        sum = sum + i
    };

    sum
}
As you might expect, continue can also be used inside a loop. Here is sum_intermediate from above rewritten using loop instead of while
正如你所料, continue 也可以在 loop 中使用。这是上面的 sum_intermediate 使用 loop 代替 while 重写的:
fun sum_intermediate(n: u64): u64 {
    let sum = 0;
    let i = 0;
    loop {
        i = i + 1;
        if (i % 10 == 0) continue;
        if (i > n) break;
        sum = sum + i
    };

    sum
}
while and loop 的类型
Move loops are typed expressions. A while expression always has type ().
Move 循环是有类型化的表达式。 while 表达式始终具有 () 类型。
let () = while (i < 10) { i = i + 1 };
If a loop contains a break, the expression has type unit ()
如果 loop 中包含 break , 这个表达式的类型则为 unit ()
(loop { if (i < 10) i = i + 1 else break }: ());
let () = loop { if (i < 10) i = i + 1 else break };
If loop does not have a break, loop can have any type much like return, abort, break, and continue.
如果 loop 不包含 break, loop 可以是任何类型, 就像return, abort, break, 和 continue。
(loop (): u64);
(loop (): address);
(loop (): &vector<vector<u8>>);
函数 (Functions)
Function syntax in Move is shared between module functions and script functions. Functions inside of modules are reusable, whereas script functions are only used once to invoke a transaction.
Move中的函数语法在模块函数和脚本函数之间是一致的。模块内部的函数可重复使用,而脚本的函数只能被使用一次用来调用事务。
声明 (Declaration)
Functions are declared with the fun keyword followed by the function name, type parameters, parameters, a return type, acquires annotations, and finally the function body.
函数使用 fun 关键字声明,后跟函数名称、类型参数、参数、返回类型、获取标注(annotation),最后是函数体。
fun <identifier><[type_parameters: constraint],*>([identifier: type],*): <return_type> <acquires [identifier],*> <function_body>
例如
fun foo<T1, T2>(x: u64, y: T1, z: T2): (T2, T1, u64) { (z, y, x) }
可见性 (Visibility)
Module functions, by default, can only be called within the same module. These internal (sometimes called private) functions cannot be called from other modules or from scripts.
默认情况下,模块函数只能在同一个模块内调用。这些内部(有时称为私有)函数不能从其他模块或脚本中调用。
address 0x42 {
    module m {
        fun foo(): u64 { 0 }
        fun calls_foo(): u64 { foo() } // valid
    }

    module other {
        fun calls_m_foo(): u64 {
            0x42::m::foo() // ERROR!
    //      ^^^^^^^^^^^^ 'foo' is internal to '0x42::m'
        }
    }
}

script {
    fun calls_m_foo(): u64 {
        0x42::m::foo() // ERROR!
//      ^^^^^^^^^^^^ 'foo' is internal to '0x42::m'
    }
}
To allow access from other modules or from scripts, the function must be declared public or public(friend).
要允许从其他模块或脚本访问,该函数必须声明为 public 或 public(friend)。
public 可见性 (public visibility)
A public function can be called by any function defined in any module or script. As shown in the following example, a public function can be called by:
- other functions defined in the same module,
- functions defined in another module, or
- the function defined in a script.
public 函数可以被任何模块或脚本中定义的任何函数调用。如以下示例所示,可以通过以下方式调用 public 函数:
- 在同一模块中定义的其他函数
- 在另一个模块中定义的函数
- 在脚本中定义的函数
address 0x42 {
    module m {
        public fun foo(): u64 { 0 }
        fun calls_foo(): u64 { foo() } // valid
    }

    module other {
        fun calls_m_foo(): u64 {
            0x42::m::foo() // valid
        }
    }
}

script {
    fun calls_m_foo(): u64 {
        0x42::m::foo() // valid
    }
}
public(friend) 可见性 (public(friend) visibility)
The public(friend) visibility modifier is a more restricted form of the public modifier to give more control about where a function can be used. A public(friend) function can be called by:
- other functions defined in the same module, or
- functions defined in modules which are explicitly specified in the friend list (see Friends on how to specify the friend list).
Note that since we cannot declare a script to be a friend of a module, the functions defined in scripts can never call a public(friend) function.
public(friend) 可见性修饰符是一种比 public 修饰符限制更严格的形式,可以更好地控制函数的使用位置。 public(friend) 函数可以通过以下方式调用:
- 在同一模块中定义的其他函数,或者在 friend list 中明确指定的模块中定义的函数(请参阅 Friends 了解如何指定友元(friends)列表)。
请注意,由于我们不能将脚本声明为模块的友元关系,因此脚本中定义的函数永远不能调用 public(friend) 函数。
address 0x42 {
    module m {
        friend 0x42::n;  // friend declaration
        public(friend) fun foo(): u64 { 0 }
        fun calls_foo(): u64 { foo() } // valid
    }

    module n {
        fun calls_m_foo(): u64 {
            0x42::m::foo() // valid
        }
    }

    module other {
        fun calls_m_foo(): u64 {
            0x42::m::foo() // ERROR!
    //      ^^^^^^^^^^^^ 'foo' can only be called from a 'friend' of module '0x42::m'
        }
    }
}

script {
    fun calls_m_foo(): u64 {
        0x42::m::foo() // ERROR!
//      ^^^^^^^^^^^^ 'foo' can only be called from a 'friend' of module '0x42::m'
    }
}
entry 修饰符 (entry modifier)
The entry modifier is designed to allow module functions to be safely and directly invoked much like scripts. This allows module writers to specify which functions can be to begin execution. The module writer then knows that any non-entry function will be called from a Move program already in execution.
Essentially, entry functions are the "main" functions of a module, and they specify where Move programs start executing.
Note though, an entry function can still be called by other Move functions. So while they can serve as the start of a Move program, they aren't restricted to that case.
entry 修饰符旨在允许像脚本一样安全直接地调用模块函数。这允许模块编写者指定哪些函数可以成为开始执行的入口。这样模块编写者就知道任何非entry函数都是从已经在执行的 Move 程序中被调用的。
本质上,entry 函数是模块的“main”函数,它们指定 Move 程序开始执行的位置。
但请注意,entry 函数仍可被其他 Move 函数调用。因此,虽然它们 可以 作为 Move 程序的入口,但它们并不局限于这种用法。
例如:
address 0x42 {
    module m {
        public entry fun foo(): u64 { 0 }
        fun calls_foo(): u64 { foo() } // valid!
    }

    module n {
        fun calls_m_foo(): u64 {
            0x42::m::foo() // valid!
        }
    }

    module other {
        public entry fun calls_m_foo(): u64 {
            0x42::m::foo() // valid!
        }
    }
}

script {
    fun calls_m_foo(): u64 {
        0x42::m::foo() // valid!
    }
}
Even internal functions can be marked as entry! This lets you guarantee that the function is called only at the beginning of execution (assuming you do not call it elsewhere in your module)
甚至内部函数也可以标记为 entry!这使你可以保证仅在开始执行时调用该函数(假如你没有在模块中的其他地方调用它)
address 0x42 {
    module m {
        entry fun foo(): u64 { 0 } // valid! entry functions do not have to be public
    }

    module n {
        fun calls_m_foo(): u64 {
            0x42::m::foo() // ERROR!
    //      ^^^^^^^^^^^^ 'foo' is internal to '0x42::m'
        }
    }

    module other {
        public entry fun calls_m_foo(): u64 {
            0x42::m::foo() // ERROR!
    //      ^^^^^^^^^^^^ 'foo' is internal to '0x42::m'
        }
    }
}

script {
    fun calls_m_foo(): u64 {
        0x42::m::foo() // ERROR!
//      ^^^^^^^^^^^^ 'foo' is internal to '0x42::m'
    }
}
函数名 (Name)
Function names can start with letters a to z or letters A to Z. After the first character, function names can contain underscores _, letters a to z, letters A to Z, or digits 0 to 9.
函数名称可以以字母 a 到 z 或字母 A 到 Z 开头。在第一个字符之后,函数名称可以包含下划线 _、字母 a 到 z 、字母 A 到 Z 或数字 0 到 9。
fun FOO() {}
fun bar_42() {}
fun _bAZ19() {}
类型参数 (Type Parameters)
After the name, functions can have type parameters
函数名后可以有类型参数
fun id<T>(x: T): T { x }
fun example<T1: copy, T2>(x: T1, y: T2): (T1, T1, T2) { (copy x, x, y) }
For more details, see Move generics.
有关更多详细信息,请参阅 移动泛型。
参数 (Parameters)
Functions parameters are declared with a local variable name followed by a type annotation
函数参数使用局部变量名,后跟类型标注的方式进行声明。
fun add(x: u64, y: u64): u64 { x + y }
We read this as x has type u64
A function does not have to have any parameters at all.
(上面代码中的函数参数) 我们读为:x 参数的类型是 u64 。
函数可以没有任何参数。
fun useless() { }
This is very common for functions that create new or empty data structures
在函数中创建新或空的数据结构是常见的用法。
address 0x42 {
    module example {
        struct Counter { count: u64 }

        fun new_counter(): Counter {
            Counter { count: 0 }
        }

    }
}
Acquires
When a function accesses a resource using move_from, borrow_global, or borrow_global_mut, the function must indicate that it acquires that resource. This is then used by Move's type system to ensure the references into global storage are safe, specifically that there are no dangling references into global storage.
当一个函数使用 move_from、borrow_global 或 borrow_global_mut 访问资源时,则该函数必须表明它 获取(acquires) 该资源。然后 Move 的类型系统使用它来确保对全局存储的引用是安全的,特别是没有对全局存储的悬垂引用(dangling references)。
address 0x42 {
    module example {

        struct Balance has key { value: u64 }

        public fun add_balance(s: &signer, value: u64) {
            move_to(s, Balance { value })
        }

        public fun extract_balance(addr: address): u64 acquires Balance {
            let Balance { value } = move_from(addr); // acquires needed
            value
        }
    }
}
acquires annotations must also be added for transitive calls within the module. Calls to these functions from another module do not need to annotated with these acquires because one module cannot access resources declared in another module--so the annotation is not needed to ensure reference safety.
acquires 标注也必须为模块内有传递性的调用添加。从另一个模块对这些函数的调用不需要使用 acquires 进行注释,因为一个模块无法访问在另一个模块中声明的资源——因此不需要用标注来确保引用安全。
address 0x42 {
    module example {

        struct Balance has key { value: u64 }

        public fun add_balance(s: &signer, value: u64) {
            move_to(s, Balance { value })
        }

        public fun extract_balance(addr: address): u64 acquires Balance {
            let Balance { value } = move_from(addr); // acquires needed
            value
        }

        public fun extract_and_add(sender: address, receiver: &signer) acquires Balance {
            let value = extract_balance(sender); // acquires needed here
            add_balance(receiver, value)
        }
    }
}

address 0x42 {
    module other {
        fun extract_balance(addr: address): u64 {
            0x42::example::extract_balance(addr) // no acquires needed
        }
    }
}
A function can acquire as many resources as it needs to
函数可以根据需要 acquire 尽可能多的资源。
address 0x42 {
    module example {
        use std::vector;

        struct Balance has key { value: u64 }
        struct Box<T> has key { items: vector<T> }

        public fun store_two<Item1: store, Item2: store>(
            addr: address,
            item1: Item1,
            item2: Item2,
        ) acquires Balance, Box {
            let balance = borrow_global_mut<Balance>(addr); // acquires needed
            balance.value = balance.value - 2;
            let box1 = borrow_global_mut<Box<Item1>>(addr); // acquires needed
            vector::push_back(&mut box1.items, item1);
            let box2 = borrow_global_mut<Box<Item2>>(addr); // acquires needed
            vector::push_back(&mut box2.items, item2);
        }
    }
}
返回类型 (Return type)
After the parameters, a function specifies its return type.
函数在参数之后指定返回类型。
fun zero(): u64 { 0 }
Here : u64 indicates that the function's return type is u64.
Using tuples, a function can return multiple values
这里 : u64 表示函数的返回类型是 u64。
使用元组,一个函数可以返回多个值:
fun one_two_three(): (u64, u64, u64) { (0, 1, 2) }
If no return type is specified, the function has an implicit return type of unit (). These functions are equivalent
如果函数未指定返回类型,则该函数隐式返回unit () 类型 。以下这些函数是等价的
fun just_unit(): () { () }
fun just_unit() { () }
fun just_unit() { }
script functions must have a return type of unit ()
script 函数的返回类型必须为 unit () (不能是任何其他类型, 例如 bool, u64 等,注者注)。
script {
    fun do_nothing() {
    }
}
As mentioned in the tuples section, these tuple "values" are virtual and do not exist at runtime. So for a function that returns unit (), it will not be returning any value at all during execution.
如 元组部分 中所述,这些元组“值”是模拟(virtual)的,且在运行时不存在。所以对于返回 unit ()的函数,它在执行期间根本不会返回任何值。
Function body (函数体)
A function's body is an expression block. The return value of the function is the last value in the sequence
函数体是一个表达式块。函数的返回值是序列中最后一个表达式的值。
fun example(): u64 {
    let x = 0;
    x = x + 1;
    x // returns 'x'
}
See the section below for more information on returns
请参阅有关返回值的更多信息
For more information on expression blocks, see Move variables.
有关表达式块的更多信息,请参阅 Move variables。
Native Functions
Some functions do not have a body specified, and instead have the body provided by the VM. These functions are marked native.
Without modifying the VM source code, a programmer cannot add new native functions. Furthermore, it is the intent that native functions are used for either standard library code or for functionality needed for the given Move environment.
Most native functions you will likely see are in standard library code such as `vecto
有些函数没有函数体,而是由 Move VM 提供的函数体。这些函数被标记为 native。
如果不修改 Move VM 源代码,程序员就无法添加新的 native 函数。此外,native 函数的意图是用于标准库代码或 Move 环境所需的基础功能。
你看到的大多数 native 函数可能都在标准库代码中,例如 vector
module std::vector {
    native public fun empty<Element>(): vector<Element>;
    ...
}
调用 (Calling)
When calling a function, the name can be specified either through an alias or fully qualified
调用函数时,名称可以通过别名或完全限定名指定
address 0x42 {
    module example {
        public fun zero(): u64 { 0 }
    }
}

script {
    use 0x42::example::{Self, zero};
    fun call_zero() {
        // With the `use` above all of these calls are equivalent
        0x42::example::zero();
        example::zero();
        zero();
    }
}
When calling a function, an argument must be given for every parameter.
调用函数时,每个参数必须指定一个值。
address 0x42 {
    module example {
        public fun takes_none(): u64 { 0 }
        public fun takes_one(x: u64): u64 { x }
        public fun takes_two(x: u64, y: u64): u64 { x + y }
        public fun takes_three(x: u64, y: u64, z: u64): u64 { x + y + z }
    }
}

script {
    use 0x42::example;
    fun call_all() {
        example::takes_none();
        example::takes_one(0);
        example::takes_two(0, 1);
        example::takes_three(0, 1, 2);
    }
}
Type arguments can be either specified or inferred. Both calls are equivalent.
函数的类型参数可以被指定或推断出来。以下两个调用是等价的。
address 0x42 {
    module example {
        public fun id<T>(x: T): T { x }
    }
}

script {
    use 0x42::example;
    fun call_all() {
        example::id(0);
        example::id<u64>(0);
    }
}
For more details, see Move generics.
有关更多详细信息,请参阅 Move generics。
Returning values (返回值)
The result of a function, its "return value", is the final value of its function body. For example
一个函数的结果,也就是它的“返回值”,是函数体的最后一个值。例如:
fun add(x: u64, y: u64): u64 {
    x + y
}
As mentioned above, the function's body is an expression block. The expression block can sequence various statements, and the final expression in the block will be be the value of that block
如上所述,函数体是一个表达式块。表达式块中可以有各种各种语句,块中最后一个表达式将是该表达式块的值。
fun double_and_add(x: u64, y: u64): u64 {
    let double_x = x * 2;
    let double_y = y * 2;
    double_x + double_y
}
The return value here is double_x + double_y
这里的返回值是 double_x + double_y
return 表达式 (return expression)
A function implicitly returns the value that its body evaluates to. However, functions can also use the explicit return expression:
函数隐式返回其函数体计算的值。但是,函数也可以使用显式的 return 表达式:
fun f1(): u64 { return 0 }
fun f2(): u64 { 0 }
These two functions are equivalent. In this slightly more involved example, the function subtracts two u64 values, but returns early with 0 if the second value is too large:
这两个功能是等价的。在下面这个稍微复杂的示例中,该函数返回两个 u64 值相减的结果,但如果第二个值大于第一个值,则提前返回 0 :
fun safe_sub(x: u64, y: u64): u64 {
    if (y > x) return 0;
    x - y
}
Note that the body of this function could also have been written as if (y > x) 0 else x - y.
However return really shines is in exiting deep within other control flow constructs. In this example, the function iterates through a vector to find the index of a given value:
请注意,这个函数的函数体也可以写成 if (y > x) 0 else x - y。
然而,return 真正的亮点在于在其他控制流结构的深处退出。在此示例中,函数遍历数组以查找给定值的索引:
use std::vector;
use std::option::{Self, Option};
fun index_of<T>(v: &vector<T>, target: &T): Option<u64> {
    let i = 0;
    let n = vector::length(v);
    while (i < n) {
        if (vector::borrow(v, i) == target) return option::some(i);
        i = i + 1
    };

    option::none()
}
Using return without an argument is shorthand for return (). That is, the following two functions are equivalent:
使用不带参数的 return 是 return () 的简写。即以下两个函数是等价的:
fun foo() { return }
fun foo() { return () }
结构体和资源 (Structs and Resources)
A struct is a user-defined data structure containing typed fields. Structs can store any non-reference type, including other structs.
结构体是包含类型字段的用户自定义数据结构。结构体可以存储任何非引用类型,包括其他结构体。
We often refer to struct values as resources if they cannot be copied and cannot be dropped. In this case, resource values must have ownership transferred by the end of the function. This property makes resources particularly well served for defining global storage schemas or for representing important values (such as a token).
如果结构体不能复制也不能删除,我们经常将它们称为资源。在这种情况下,资源必须在函数结束时转让所有权。这个属性使资源特别适合定义全局存储模式或表示重要值(如token)。
By default, structs are linear and ephemeral. By this we mean that they: cannot be copied, cannot be dropped, and cannot be stored in global storage. This means that all values have to have ownership transferred (linear) and the values must be dealt with by the end of the program's execution (ephemeral). We can relax this behavior by giving the struct abilities which allow values to be copied or dropped and also to be stored in global storage or to define global storage schemas.
默认情况下,结构体是线性和短暂的。它们不能复制,不能丢弃,不能存储在全局存储中。这意味着所有值都必须拥有被转移(线性类型)的所有权,并且值必须在程序执行结束时处理(短暂的)。我们可以通过赋予结构体能力来简化这种行为,允许值被复制或删除,以及存储在全局存储中或定义全局存储的模式。
定义结构体 (Defining Structs)
Structs must be defined inside a module:
结构体必须在模块内定义:
address 0x2 {
module m {
    struct Foo { x: u64, y: bool }
    struct Bar {}
    struct Baz { foo: Foo, }
    //                   ^ note: it is fine to have a trailing comma
}
}
Structs cannot be recursive, so the following definition is invalid:
结构体不能递归,因此以下定义无效:
struct Foo { x: Foo }
//              ^ error! Foo cannot contain Foo
As mentioned above: by default, a struct declaration is linear and ephemeral. So to allow the value
to be used with certain operations (that copy it, drop it, store it in global storage, or use it as
a storage schema), structs can be granted abilities by annotating them with
has <ability>:
如上所述:默认情况下,结构体声明是线性和短暂的。因此,为了允许值用于某些操作(复制、删除、存储在全局存储中或用作存储模式),结构体可以通过 has <ability> 标注来授予它们能力。
address 0x2 {
    module m {
        struct Foo has copy, drop { x: u64, y: bool }
    }
}
For more details, see the annotating structs section.
有关更多详细信息,请参阅 注释结构体 部分。
命名 (Naming)
Structs must start with a capital letter A to Z. After the first letter, constant names can
contain underscores _, letters a to z, letters A to Z, or digits 0 to 9.
结构体必须以大写字母 A 到 Z 开头。在第一个字母之后,常量名称可以包含下划线 _、字母 a 到 z、字母 A 到 Z 或数字 0到 9。
struct Foo {}
struct BAR {}
struct B_a_z_4_2 {}
This naming restriction of starting with A to Z is in place to give room for future language
features. It may or may not be removed later.
这种从 A 到 Z 开头的命名限制已经生效,这是为未来的move语言特性留出空间。此限制未来可能会保留或删除。
使用结构体 (Using Structs)
创建结构体 (Creating Structs)
Values of a struct type can be created (or "packed") by indicating the struct name, followed by value for each field:
可以通过指示结构体名称来创建(或“打包”)结构体类型的值。
address 0x2 {
    module m {
        struct Foo has drop { x: u64, y: bool }
        struct Baz has drop { foo: Foo }

        fun example() {
            let foo = Foo { x: 0, y: false };
            let baz = Baz { foo: foo };
        }
    }
}
If you initialize a struct field with a local variable whose name is the same as the field, you can use the following shorthand:
如果你使用名称与字段相同的本地变量初始化结构字段,你可以使用以下简写:
let baz = Baz { foo: foo };
// is equivalent to
let baz = Baz { foo };
This is called sometimes called "field name punning".
这有时被称为“字段名双关语”。
通过模式匹配销毁结构体 (Destroying Structs via Pattern Matching)
Struct values can be destroyed by binding or assigning them patterns.
结构值可以通过绑定或分配模式来销毁。
address 0x2 {
    module m {
        struct Foo { x: u64, y: bool }
        struct Bar { foo: Foo }
        struct Baz {}

        fun example_destroy_foo() {
            let foo = Foo { x: 3, y: false };
            let Foo { x, y: foo_y } = foo;
            //        ^ shorthand for `x: x`

            // two new bindings
            //   x: u64 = 3
            //   foo_y: bool = false
        }

        fun example_destroy_foo_wildcard() {
            let foo = Foo { x: 3, y: false };
            let Foo { x, y: _ } = foo;
            // only one new binding since y was bound to a wildcard
            //   x: u64 = 3
        }

        fun example_destroy_foo_assignment() {
            let x: u64;
            let y: bool;
            Foo { x, y } = Foo { x: 3, y: false };
            // mutating existing variables x & y
            //   x = 3, y = false
        }

        fun example_foo_ref() {
            let foo = Foo { x: 3, y: false };
            let Foo { x, y } = &foo;
            // two new bindings
            //   x: &u64
            //   y: &bool
        }

        fun example_foo_ref_mut() {
            let foo = Foo { x: 3, y: false };
            let Foo { x, y } = &mut foo;
            // two new bindings
            //   x: &mut u64
            //   y: &mut bool
        }

        fun example_destroy_bar() {
            let bar = Bar { foo: Foo { x: 3, y: false } };
            let Bar { foo: Foo { x, y } } = bar;
            //             ^ nested pattern
            // two new bindings
            //   x: u64 = 3
            //   foo_y: bool = false
        }

        fun example_destroy_baz() {
            let baz = Baz {};
            let Baz {} = baz;
        }
    }
}
借用结构体和字段 (Borrowing Structs and Fields)
The & and &mut operator can be used to create references to structs or fields. These examples
include some optional type annotations (e.g., : &Foo) to demonstrate the type of operations.
& 和 &mut 运算符可用于创建对结构或字段的引用。这些例子包括一些可选的类型标注(例如:: &Foo)来演示操作的类型。
let foo = Foo { x: 3, y: true };
let foo_ref: &Foo = &foo;
let y: bool = foo_ref.y;          // 通过引用读取结构体的字段
let x_ref: &u64 = &foo.x;

let x_ref_mut: &mut u64 = &mut foo.x;
*x_ref_mut = 42;            // 通过可引用修改字段
It is possible to borrow inner fields of nested structs.
可以借用嵌套数据结构的内部字段
let foo = Foo { x: 3, y: true };
let bar = Bar { foo };

let x_ref = &bar.foo.x;
You can also borrow a field via a reference to a struct.
你还可以通过结构体引用来借用字段。
let foo = Foo { x: 3, y: true };
let foo_ref = &foo;
let x_ref = &foo_ref.x;
// this has the same effect as let x_ref = &foo.x
读写字段 (Reading and Writing Fields)
If you need to read and copy a field's value, you can then dereference the borrowed field
如果你需要读取和复制字段的值,则可以解引用借用的字段
let foo = Foo { x: 3, y: true };
let bar = Bar { foo: copy foo };
let x: u64 = *&foo.x;
let y: bool = *&foo.y;
let foo2: Foo = *&bar.foo;
If the field is implicitly copyable, the dot operator can be used to read fields of a struct without
any borrowing. (Only scalar values with the copy ability are implicitly copyable.)
如果该字段可以隐式复制,则可以使用点运算符读取结构的字段,而无需任何借用(只有具有 copy 能力的标量值才能隐式复制)。
let foo = Foo { x: 3, y: true };
let x = foo.x;  // x == 3
let y = foo.y;  // y == true
Dot operators can be chained to access nested fields.
点运算符可以链式访问嵌套字段。
let baz = Baz { foo: Foo { x: 3, y: true } };
let x = baz.foo.x; // x = 3;
However, this is not permitted for fields that contain non-primitive types, such a vector or another struct
但是,对于包含非原始类型(例如向量或其他结构体类型)的字段,这是不允许的
let foo = Foo { x: 3, y: true };
let bar = Bar { foo };
let foo2: Foo = *&bar.foo;
let foo3: Foo = bar.foo; // error! add an explicit copy with *&
The reason behind this design decision is that copying a vector or another struct might be an
expensive operation. It is important for a programmer to be aware of this copy and make others aware
with the explicit syntax *&
In addition reading from fields, the dot syntax can be used to modify fields, regardless of the field being a primitive type or some other struct
这个设计决定背后的原因是复制一个向量或另一个结构可能是一个昂贵的操作。对于程序员来说使用显式语法 *& 注意到这个复制很重要,同时引起其他人重视。
除了从字段中读取之外,点语法还可用于修改字段,不管字段是原始类型还是其他结构体
let foo = Foo { x: 3, y: true };
foo.x = 42;     // foo = Foo { x: 42, y: true }
foo.y = !foo.y; // foo = Foo { x: 42, y: false }
let bar = Bar { foo };            // bar = Bar { foo: Foo { x: 42, y: false } }
bar.foo.x = 52;                   // bar = Bar { foo: Foo { x: 52, y: false } }
bar.foo = Foo { x: 62, y: true }; // bar = Bar { foo: Foo { x: 62, y: true } }
The dot syntax also works via a reference to a struct
点语法对结构的引用也有适用
let foo = Foo { x: 3, y: true };
let foo_ref = &mut foo;
foo_ref.x = foo_ref.x + 1;
特权结构体操作 (Privileged Struct Operations)
Most struct operations on a struct type T can only be performed inside the module that declares
T:
- Struct types can only be created ("packed"), destroyed ("unpacked") inside the module that defines the struct.
- The fields of a struct are only accessible inside the module that defines the struct.
Following these rules, if you want to modify your struct outside the module, you will need to provide publis APIs for them. The end of the chapter contains some examples of this.
However, struct types are always visible to another module or script:
结构体类型 T 上的大多数结构操作只能在其声明的本模块内操作
- 结构类型只能在定义的模块内创建(“打包”)、销毁(“解包”)结构体。
- 结构的字段只能在定义结构的模块内访问。
按照这些规则,如果你想在模块外修改你的结构,你需要为他们提供公共 API。本章的最后包含了这方面的一些例子。
但是, 结构体类型始终对其他模块或脚本可见:
// m.move
address 0x2 {
    module m {
        struct Foo has drop { x: u64 }

        public fun new_foo(): Foo {
            Foo { x: 42 }
        }
    }
}
// n.move
address 0x2 {
    module n {
        use 0x2::m;

        struct Wrapper has drop {
            foo: m::Foo
        }

        fun f1(foo: m::Foo) {
            let x = foo.x;
            //      ^ error! cannot access fields of `foo` here
        }

        fun f2() {
            let foo_wrapper = Wrapper { foo: m::new_foo() };
        }
    }
}
Note that structs do not have visibility modifiers (e.g., public or private).
请注意,结构没有可见性修饰符(例如,public 或 private)。
所有权 (Ownership)
As mentioned above in Defining Structs, structs are by default linear and ephemeral. This means they cannot be copied or dropped. This property can be very useful when modeling real world resources like money, as you do not want money to be duplicated or get lost in circulation.
正如上面 Defining Structs 中提到的,结构体默认是线性的,并且短暂的。这意味着它们不能被复制或删除。此属性对于现实世界中的资源(例如货币(money))的建模非常有用,因为你不希望货币被复制或流通时丢失。
address 0x2 {
    module m {
        struct Foo { x: u64 }

        public fun copying_resource() {
            let foo = Foo { x: 100 };
            let foo_copy = copy foo; // error! 'copy'-ing requires the 'copy' ability
            let foo_ref = &foo;
            let another_copy = *foo_ref // error! dereference requires the 'copy' ability
        }

        public fun destroying_resource1() {
            let foo = Foo { x: 100 };

            // error! when the function returns, foo still contains a value.
            // This destruction requires the 'drop' ability
        }

        public fun destroying_resource2(f: &mut Foo) {
            *f = Foo { x: 100 } // error!
                                // destroying the old value via a write requires the 'drop' ability
        }
    }
}
To fix the second example (fun dropping_resource), you would need to manually "unpack" the resource:
要修复第二个示例(fun dropping_resource),您需要手动“解包”资源:
address 0x2 {
    module m {
        struct Foo { x: u64 }

        public fun destroying_resource1_fixed() {
            let foo = Foo { x: 100 };
            let Foo { x: _ } = foo;
        }
    }
}
Recall that you are only able to deconstruct a resource within the module in which it is defined. This can be leveraged to enforce certain invariants in a system, for example, conservation of money.
If on the other hand, your struct does not represent something valuable, you can add the abilities
copy and drop to get a struct value that might feel more familiar from other programming
languages:
回想一下,您只能在定义资源的模块中解构资源。这可以用来在系统中强制执行某些不变量,例如货币守恒。
另一方面,如果您的结构不代表有价值的东西,您可以添加功能 copy 和 drop 来获得一个结构体,这感觉可能会与其他编程语言更相似.
address 0x2 {
    module m {
        struct Foo has copy, drop { x: u64 }

        public fun run() {
            let foo = Foo { x: 100 };
            let foo_copy = copy foo;
            // ^ this code copies foo, whereas `let x = foo` or
            // `let x = move foo` both move foo

            let x = foo.x;            // x = 100
            let x_copy = foo_copy.x;  // x = 100

            // both foo and foo_copy are implicitly discarded when the function returns
        }
    }
}
在全局存储中存储资源 (Storing Resources in Global Storage)
Only structs with the key ability can be saved directly in
persistent global storage. All values stored within those key
structs must have the store abilities. See the [ability](./abilities] and
global storage chapters for more detail.
只有具有 key 能力的结构体才可以直接保存在全局存储。存储在这些 key 中的所有结构体的值必须具有 store 能力。请参阅 [能力(abilities)](./abilities] 和全局存储 章节了解更多详细信息
Examples
Here are two short examples of how you might use structs to represent valuable data (in the case of
Coin) or more classical data (in the case of Point and Circle)
以下是两个简短的示例,说明如何使用结构体来表示有价值的数据(例如 Coin(代币))或更经典的数据(例如:Point 和 Circle):
Example 1: Coin
Example 1: 代币上
address 0x2 {
    module m {
        // We do not want the Coin to be copied because that would be duplicating this "money",
        // so we do not give the struct the 'copy' ability.
        // Similarly, we do not want programmers to destroy coins, so we do not give the struct the
        // 'drop' ability.
        // However, we *want* users of the modules to be able to store this coin in persistent global
        // storage, so we grant the struct the 'store' ability. This struct will only be inside of
        // other resources inside of global storage, so we do not give the struct the 'key' ability.

        // 我们不希望代币被复制,因为这会复制这笔“钱”,
        // 因此,我们不赋予结构体 `copy` 能力。
        // 同样,我们不希望程序员销毁硬币,所以我们不给结构体 `drop` 能力,
        // 然而,我们*希望*模块的用户能够将此代币存储在持久的全局存储中,所以我们授予结构体 `store` 能力。
        // 此结构体仅位于全局存储内的其他资源中,因此我们不会赋予该结构体 `key` 能力。
        struct Coin has store {
            value: u64,
        }

        public fun mint(value: u64): Coin {
            // You would want to gate this function with some form of access control to prevent anyone using this module from minting an infinite amount of coins
            // 你可能希望通过某种形式的访问控制来关闭此功能,以防止使用此模块的任何人铸造无限数量的货币
            Coin { value }
        }

        public fun withdraw(coin: &mut Coin, amount: u64): Coin {
            assert!(coin.balance >= amount, 1000);
            coin.value = coin.value - amount;
            Coin { value: amount }
        }

        public fun deposit(coin: &mut Coin, other: Coin) {
            let Coin { value } = other;
            coin.value = coin.value + value;
        }

        public fun split(coin: Coin, amount: u64): (Coin, Coin) {
            let other = withdraw(&mut coin, amount);
            (coin, other)
        }

        public fun merge(coin1: Coin, coin2: Coin): Coin {
            deposit(&mut coin1, coin2);
            coin1
        }

        public fun destroy_zero(coin: Coin) {
            let Coin { value } = coin;
            assert!(value == 0, 1001);
        }
    }
}
Example 2: Geometry
Example 2: 几何上
address 0x2 {
    module point {
        struct Point has copy, drop, store {
            x: u64,
            y: u64,
        }

        public fun new(x: u64, y: u64): Point {
            Point {
                x, y
            }
        }

        public fun x(p: &Point): u64 {
            p.x
        }

        public fun y(p: &Point): u64 {
            p.y
        }

        fun abs_sub(a: u64, b: u64): u64 {
            if (a < b) {
                b - a
            }
            else {
                a - b
            }
        }

        public fun dist_squared(p1: &Point, p2: &Point): u64 {
            let dx = abs_sub(p1.x, p2.x);
            let dy = abs_sub(p1.y, p2.y);
            dx*dx + dy*dy
        }
    }
}
address 0x2 {
    module circle {
        use 0x2::Point::{Self, Point};

        struct Circle has copy, drop, store {
            center: Point,
            radius: u64,
        }

        public fun new(center: Point, radius: u64): Circle {
            Circle { center, radius }
        }

        public fun overlaps(c1: &Circle, c2: &Circle): bool {
            let d = Point::dist_squared(&c1.center, &c2.center);
            let r1 = c1.radius;
            let r2 = c2.radius;
            d*d <= r1*r1 + 2*r1*r2 + r2*r2
        }
    }
}
常量 (Constants)
Constants are a way of giving a name to shared, static values inside of a module or script.
The constant's must be known at compilation. The constant's value is stored in the compiled module or script. And each time the constant is used, a new copy of that value is made.
常量是一种对 module 或 script 内的共享静态值进行命名的方法(类似变量,但值不变,译者注)。
常量必须在编译时知道。常量的值存储在编译模块或脚本中。每次使用该常量时,都会生成该值的新副本。
声明 (Declaration)
Constant declarations begin with the const keyword, followed by a name, a type, and a value. They
can exist in either a script or module
常量声明以 const 关键字开头,后跟名称、类型和值。他们可以存在于脚本或模块中
const <name>: <type> = <expression>;
例如
script {

    const MY_ERROR_CODE: u64 = 0;

    fun main(input: u64) {
        assert!(input > 0, MY_ERROR_CODE);
    }

}

address 0x42 {
    module example {

        const MY_ADDRESS: address = @0x42;

        public fun permissioned(s: &signer) {
            assert!(std::signer::address_of(s) == MY_ADDRESS, 0);
        }

    }
}
命名 (Naming)
Constants must start with a capital letter A to Z. After the first letter, constant names can
contain underscores _, letters a to z, letters A to Z, or digits 0 to 9.
常量必须以大写字母 A 到 Z 开头。在第一个字母之后,常量名可以包含下划线 _、字母 a 到 z、字母 A 到 Z 或数字 0 到 9。
const FLAG: bool = false;
const MY_ERROR_CODE: u64 = 0;
const ADDRESS_42: address = @0x42;
Even though you can use letters a to z in a constant. The
general style guidelines are to use just uppercase letters A to Z,
with underscores _ between each word.
虽然你可以在常量中使用字母 a 到 z。但通用风格指南 只使用大写字母 A 到 Z,每个单词之间有下划线_。
This naming restriction of starting with A to Z is in place to give room for future language features. It may or may not be removed later.
这种以 A 到 Z 开头的命名限制是为了给未来的语言特性留出空间。此限制未来可能会保留或删除。
可见性 (Visibility)
public constants are not currently supported. const values can be used only in the declaring
module.
当前不支持 public 常量。 const 值只能在声明的模块中使用。
有效表达式 (Valid Expressions)
Currently, constants are limited to the primitive types bool, u8, u64, u128, address, and
vector<u8>. Future support for other vector values (besides the "string"-style literals) will come later.
目前,常量仅限于原始类型 bool、u8、u64、u128、address 和vector<u8>。其他 vector 值(除了“string”风格的字面量)将在不远的将来获得支持。
值 (Values)
Commonly, consts are assigned a simple value, or literal, of their type. For example
通常,const (常量)会被分配一个对应类型的简单值或字面量。例如
const MY_BOOL: bool = false;
const MY_ADDRESS: address = @0x70DD;
const BYTES: vector<u8> = b"hello world";
const HEX_BYTES: vector<u8> = x"DEADBEEF";
复杂表达式 (Complex Expressions)
In addition to literals, constants can include more complex expressions, as long as the compiler is able to reduce the expression to a value at compile time.
Currently, equality operations, all boolean operations, all bitwise operations, and all arithmetic operations can be used.
除了字面量,常量还可以包含更复杂的表达式,只要编译器能够在编译时将表达式归纳(reduce)为一个值。
目前,相等运算、所有布尔运算、所有按位运算和所有算术运算可以使用。
const RULE: bool = true && false;
const CAP: u64 = 10 * 100 + 1;
const SHIFTY: u8 = {
  (1 << 1) * (1 << 2) * (1 << 3) * (1 << 4)
};
const HALF_MAX: u128 = 340282366920938463463374607431768211455 / 2;
const EQUAL: bool = 1 == 1;
If the operation would result in a runtime exception, the compiler will give an error that it is unable to generate the constant's value
如果操作会导致运行时异常,编译器会给出无法生成常量值的错误。
const DIV_BY_ZERO: u64 = 1 / 0; // error!
const SHIFT_BY_A_LOT: u64 = 1 << 100; // error!
const NEGATIVE_U64: u64 = 0 - 1; // error!
Note that constants cannot currently refer to other constants. This feature, along with support for other expressions, will be added in the future.
请注意,常量当前不能引用其他常量。此功能会在将来和支持其他表达方式一起被补充。
泛型 (generics)
Generics can be used to define functions and structs over different input data types. This language feature is sometimes referred to as parametric polymorphism. In Move, we will often use the term generics interchangeably with type parameters and type arguments.
泛型可用于定义具有不同输入数据类型的函数和结构体。这种语言特性被称为参数多态。在 Move语言中,我们经常将交替使用术语泛型与类型参数和类型参数。
Generics are commonly used in library code, such as in vector, to declare code that works over any possible instantiation (that satisfies the specified constraints). In other frameworks, generic code can sometimes be used to interact with global storage many different ways that all still share the same implementation.
泛型通常用于库代码中,例如 vector,以声明适用于任何可实例化(满足指定约束)的代码。在其他框架中,泛型代码有时可用多种不同的方式与全局存储交互,这些方式有着相同的实现。
声明类型参数 (Declaring Type Parameters)
Both functions and structs can take a list of type parameters in their signatures, enclosed by a pair of angle brackets <...> .
函数和结构体都可以在其签名中采用类型参数列表,由一对尖括号括起来 <...> 。
泛型函数 (Generic Functions)
Type parameters for functions are placed after the function name and before the (value) parameter list. The following code defines a generic identity function that takes a value of any type and returns that value unchanged.
函数的类型参数放在函数名称之后和(值)参数列表之前。以下代码定义了一个名为id的泛型函数,该函数接受任何类型的值并返回原值。
fun id<T>(x: T): T {
    // this type annotation is unnecessary but valid
    (x: T)
}
Once defined, the type parameter T can be used in parameter types, return types, and inside the function body.
一旦定义,类型参数 T 就可以在参数类型、返回类型和函数体内使用。
泛型结构体 (Generic Structs)
Type parameters for structs are placed after the struct name, and can be used to name the types of the fields.
结构体的类型参数放在结构名称之后,并可用于命名字段的类型。
struct Foo<T> has copy, drop { x: T }

struct Bar<T1, T2> has copy, drop {
    x: T1,
    y: vector<T2>,
}
Note that type parameters do not have to be used
请注意,未使用的类型参数
类型参数 (Type Arguments)
调用泛型函数 (Calling Generic Functions)
When calling a generic function, one can specify the type arguments for the function's type parameters in a list enclosed by a pair of angle brackets.
调用泛型函数时,可以在由一对尖括号括起来的列表中指定函数类型参数。
fun foo() {
    let x = id<bool>(true);
}
If you do not specify the type arguments, Move's type inference will supply them for you.
如果您不指定类型参数,Move语言的类型推断功能将为您匹配正确的类型
使用泛型结构 (Using Generic Structs)
Similarly, one can attach a list of type arguments for the struct's type parameters when constructing or destructing values of generic types.
类似地,在构造或销毁泛型类型的值时,可以为结构体的类型参数附加一个参数列表。
fun foo() {
    let foo = Foo<bool> { x: true };
    let Foo<bool> { x } = foo;
}
If you do not specify the type arguments, Move's type inference will supply them for you.
如果您不指定类型参数,Move 语言的类型推断功能将为您自动补充(supply)。
类型参数不匹配 (Type Argument Mismatch)
If you specify the type arguments and they conflict with the actual values supplied, an error will be given
如果您指定类型参数与实际提供的值不匹配,则会报错
fun foo() {
    let x = id<u64>(true); // error! true is not a u64
}
同样地
fun foo() {
    let foo = Foo<bool> { x: 0 }; // error! 0 is not a bool
    let Foo<address> { x } = foo; // error! bool is incompatible with address
}
Type Inference (类型推断)
In most cases, the Move compiler will be able to infer the type arguments so you don't have to write them down explicitly. Here's what the examples above would look like if we omit the type arguments.
在大多数情况下,Move 编译器能够推断类型参数,因此您不必显式地写下它们。这是上面例子中省略类型参数写法的示例。
fun foo() {
    let x = id(true);
    //        ^ <bool> is inferred

    let foo = Foo { x: true };
    //           ^ <bool> is inferred

    let Foo { x } = foo;
    //     ^ <bool> is inferred
}
Note: when the compiler is unable to infer the types, you'll need annotate them manually. A common scenario is to call a function with type parameters appearing only at return positions.
注意:当编译器无法推断类型时,您需要手动标注它们(类型参数)。一个常见的场景是调用一个类型参数只出现在返回位置的函数。
address 0x2 {
    module m {
        using std::vector;

        fun foo() {
            // let v = vector::new();
            //                    ^ The compiler cannot figure out the element type.

            let v = vector::new<u64>();
            //                 ^~~~~ Must annotate manually.
        }
    }
}
However, the compiler will be able to infer the type if that return value is used later in that function
但是,如果稍后在该函数中使用该返回值,编译器将能够推断其类型。
address 0x2 {
    module m {
        using std::vector;

        fun foo() {
            let v = vector::new();
            //                 ^ <u64> is inferred
            vector::push_back(&mut v, 42);
        }
    }
}
Unused Type Parameters (未使用的类型参数)
For a struct definition, an unused type parameter is one that does not appear in any field defined in the struct, but is checked statically at compile time. Move allows unused type parameters so the following struct definition is valid:
对于结构体定义,未使用的类型参数是没有出现在结构体中定义的任何字段中,但在编译时会静态检查的类型参数。Move语言允许未使用的类型参数,因此以下结构定义是有效的:
struct Foo<T> {
    foo: u64
}
This can be convenient when modeling certain concepts. Here is an example:
这在对某些概念进行建模时会很方便。这是一个例子:
address 0x2 {
module m {
// Currency Specifiers
struct Currency1 {}
struct Currency2 {}
// A generic coin type that can be instantiated using a currency
// specifier type.
// e.g. Coin<Currency1>, Coin<Currency2> etc.
struct Coin<Currency> has store {
value: u64
}
// Write code generically about all currencies
public fun mint_generic<Currency>(value: u64): Coin<Currency> {
Coin { value }
}
// Write code concretely about one currency
public fun mint_concrete(value: u64): Coin<Currency1> {
Coin { value }
}
}
}
In this example, struct Coin<Currency> is generic on the Currency type parameter,
which specifies the currency of the coin and allows code to be written either generically on any currency or
concretely on a specific currency.
This genericity applies even when the Currency type parameter does not appear in any of the fields defined in Coin.
在此示例中, struct Coin<Currency> 是类型参数为 Currency 的泛型结构体,它指定 Coin 的类型参数是 Currency,这样就允许代码选择是使用任意类型 Currency 或者是指定的具体类型 Currency 。即使 Currency 类型参数没有出现在定义的任何字段中,这种泛型性也适用结构体 Coin。
Phantom Type Parameters
In the example above, although struct Coin asks for the store ability, neither Coin<Currency1> nor Coin<Currency2> will have the store ability.
This is because of the rules for Conditional Abilities and Generic Types and the fact that Currency1 and Currency2 don't have the store ability, despite the fact that they are not even used in the body of struct Coin.
This might cause some unpleasant consequences.
For example, we are unable to put Coin<Currency1> into a wallet in the global storage.
在上面的例子中,虽然 struct Coin 要求有 store 能力,但 Coin<Currency1> 和 Coin<Currency2> 都没有 store 能力。这是因为 条件能力与泛型类型的规则, 而实际上 Currency1和 Currency2 本身都没有 store 能力,尽管它们甚至没有在struct Coin 的主体中使用. 这可能会导致一些不好的后果。例如,我们无法将 Coin<Currency1> 放入全局存储的一个钱包中。
One possible solution would be to add spurious ability annotations to Currency1 and Currency2 (i.e., struct Currency1 has store {}).
But, this might lead to bugs or security vulnerabilities because it weakens the types with unnecessary ability declarations.
For example, we would never expect a resource in the global storage to have a field in type Currency1, but this would be possible with the spurious store ability.
Moreover, the spurious annotations would be infectious, requiring many functions generic on the unused type parameter to also include the necessary constraints.
一种可能的解决方案是向 Currency1 和 Currency2 添加虚假能力标注(例如:struct Currency1 has store {}) 。但是,这可能会导致 bugs 或安全漏洞,因为它削弱了类型安全,声明了不必要的能力。例如,我们永远不会期望全局存储中的资源具有 Currency1 类型的字段,但这对于虚假 store 能力是可能发生的。
此外,虚假标注具有传染性,需要在许多未使用类型参数的泛型函数上也引入必要的约束。
Phantom type parameters solve this problem. Unused type parameters can be marked as phantom type parameters, which do not participate in the ability derivation for structs. In this way, arguments to phantom type parameters are not considered when deriving the abilities for generic types, thus avoiding the need for spurious ability annotations. For this relaxed rule to be sound, Move's type system guarantees that a parameter declared as phantom is either not used at all in the struct definition, or it is only used as an argument to type parameters also declared as phantom.
Phantom 类型参数解决了这个问题。未使用的类型参数可以标记为 phantom 类型参数,不参与结构体的能力推导。这样,在派生泛型类型的能力时,不考虑 phantom type 的参数,从而避免了对虚假能力标注的需要。为了使这个宽松的规则合理,Move 的类型系统保证声明为 phantom 的参数要么不在结构定义中使用,要么仅用作声明为 phantom 的类型参数的参数。
声明 (Declaration)
In a struct definition a type parameter can be declared as phantom by adding the phantom keyword before its declaration.
If a type parameter is declared as phantom we say it is a phantom type parameter.
When defining a struct, Move's type checker ensures that every phantom type parameter is either not used inside the struct definition
or it is only used as an argument to a phantom type parameter.
phantom 在结构定义中,可以通过在声明之前添加关键字来将类型参数声明为幻影。如果一个类型参数被声明为 phantom,我们就说它是 phantom 类型参数。
定义结构体时,Move语言的类型检查器确保每个 phantom 类型参数要么不在结构定义中使用,要么仅用作 phantom 类型参数的参数。
More formally, if a type is used as an argument to a phantom type parameter we say the type appears in phantom position. With this definition in place, the rule for the correct use of phantom parameters can be specified as follows: A phantom type parameter can only appear in phantom position.
更正式地说,如果将类型用作 phantom 类型参数的输入参数,我们说该类型出现在 phantom 位置。有了这个定义,正确使用 phantom 参数的规则可以指定如下: ** phantom 类型参数只能出现在 phantom 位置**。
The following two examples show valid uses of phantom parameters.
In the first one, the parameter T1 is not used at all inside the struct definition.
In the second one, the parameter T1 is only used as an argument to a phantom type parameter.
以下两个示例显示了 phantom 参数的 合法用法。在第一个中,T1 在结构体定义中根本不使用参数。在第二种情况下,参数 T1 仅用作 phantom 类型参数的参数。
struct S1<phantom T1, T2> { f: u64 }
^^
Ok: T1 does not appear inside the struct definition
struct S2<phantom T1, T2> { f: S1<T1, T2> }
^^
Ok: T1 appears in phantom position
The following code shows examples of violations of the rule:
以下代码展示违反规则的示例:
struct S1<phantom T> { f: T }
^
Error: Not a phantom position
struct S2<T> { f: T }
struct S3<phantom T> { f: S2<T> }
^
Error: Not a phantom position
实例化 (Instantiation)
When instantiating a struct, the arguments to phantom parameters are excluded when deriving the struct abilities. For example, consider the following code:
实例化结构时,派生结构功能时会排除幻影参数的输入参数。例如,考虑以下代码:
struct S<T1, phantom T2> has copy { f: T1 }
struct NoCopy {}
struct HasCopy has copy {}
Consider now the type S<HasCopy, NoCopy>. Since S is defined with copy and all non-phantom arguments have copy then S<HasCopy, NoCopy> also has copy.
现在考虑类型 S<HasCopy, NoCopy>。由于 S 用 copy 定义,且所有非 phantom 参数 具有 copy 能力,所以 S<HasCopy, NoCopy> 也具有 copy 能力。
具有能力约束的 Phantom 类型参数 (Phantom Type Parameters with Ability Constraints)
Ability constraints and phantom type parameters are orthogonal features in the sense that phantom parameters can be declared with ability constraints. When instantiating a phantom type parameter with an ability constraint, the type argument has to satisfy that constraint, even though the parameter is phantom. For example, the following definition is perfectly valid:
能力约束和 phantom 类型参数是正交特征,因此 phantom 参数声明时可以用能力进行约束。当使用能力约束实例化一个 phantom 类型参数时,类型参数必须满足该约束,即使参数是。 例如,以下定义是完全有效的:
struct S<phantom T: copy> {}
The usual restrictions apply and T can only be instantiated with arguments having copy.
应用(phantom)通常的限制并且 T 只能用具有 copy 的参数实例化。
约束 (Constraints)
In the examples above, we have demonstrated how one can use type parameters to define "unknown" types that can be plugged in by callers at a later time. This however means the type system has little information about the type and has to perform checks in a very conservative way. In some sense, the type system must assume the worst case scenario for an unconstrained generic. Simply put, by default generic type parameters have no abilities.
This is where constraints come into play: they offer a way to specify what properties these unknown types have so the type system can allow operations that would otherwise be unsafe.
在上面的例子中,我们已经演示了如何使用类型参数来定义“未知”类型,这些类型可以在稍后被调用者插入。然而,这意味着类型系统几乎没有关于类型的信息,并且必须以非常保守的方式执行检查。从某种意义上说,类型系统必须假设不受约束的泛型时的最坏场景。简单地说,默认情况下泛型类型参数没有能力。
这就是约束发挥作用的地方:它们提供了一种方法来指定这些未知类型具有哪些属性,因此类型系统可以允许相应的操作,否则会不安全。
声明约束 (Declaring Constraints)
Constraints can be imposed on type parameters using the following syntax.
可以使用以下语法对类型参数施加约束。
// T is the name of the type parameter
T: <ability> (+ <ability>)*
The <ability> can be any of the four abilities, and a type parameter can be constrained with multiple abilities at once. So all of the following would be valid type parameter declarations
<ability> 可以是四种能力中的任何一种,一个类型参数可以同时被多个能力约束。因此,以下所有内容都是有效的类型参数声明
T: copy
T: copy + drop
T: copy + drop + store + key
验证约束 (Verifying Constraints)
Constraints are checked at call sites so the following code won't compile.
在调用的地方会检查约束,因此以下代码无法编译。
struct Foo<T: key> { x: T }
struct Bar { x: Foo<u8> }
// ^ error! u8 does not have 'key'
struct Baz<T> { x: Foo<T> }
// ^ error! T does not have 'key'
struct R {}
fun unsafe_consume<T>(x: T) {
// error! x does not have 'drop'
}
fun consume<T: drop>(x: T) {
// valid!
// x will be dropped automatically
}
fun foo() {
let r = R {};
consume<R>(r);
// ^ error! R does not have 'drop'
}
struct R {}
fun unsafe_double<T>(x: T) {
(copy x, x)
// error! x does not have 'copy'
}
fun double<T: copy>(x: T) {
(copy x, x) // valid!
}
fun foo(): (R, R) {
let r = R {};
double<R>(r)
// ^ error! R does not have copy
}
For more information, see the abilities section on conditional abilities and generic types
有关更多信息,请参阅有关条件能力与泛型类型
递归的限制 (Limitations on Recursions)
递归结构 (Recursive Structs)
Generic structs can not contain fields of the same type, either directly or indirectly, even with different type arguments. All of the following struct definitions are invalid:
泛型结构不能直接或间接包含相同类型的字段,即使使用不同的类型参数也是如此。以下所有结构定义均无效:
struct Foo<T> {
x: Foo<u64> // error! 'Foo' containing 'Foo'
}
struct Bar<T> {
x: Bar<T> // error! 'Bar' containing 'Bar'
}
// error! 'A' and 'B' forming a cycle, which is not allowed either.
struct A<T> {
x: B<T, u64>
}
struct B<T1, T2> {
x: A<T1>
y: A<T2>
}
高级主题:类型-级别递归 (Advanced Topic: Type-level Recursions)
Move allows generic functions to be called recursively. However, when used in combination with generic structs, this could create an infinite number of types in certain cases, and allowing this means adding unnecessary complexity to the compiler, vm and other language components. Therefore, such recursions are forbidden.
Move语言允许递归调用泛型函数。但是,当与泛型结构体结合使用时,在某些情况下可能会创建无限数量的类型,这意味着会给编译器、vm 和其他语言组件增加不必要的复杂性。因此,这种递归是被禁止的。
被允许的用法:
address 0x2 {
module m {
struct A<T> {}
// Finitely many types -- allowed.
// foo<T> -> foo<T> -> foo<T> -> ... is valid
fun foo<T>() {
foo<T>();
}
// Finitely many types -- allowed.
// foo<T> -> foo<A<u64>> -> foo<A<u64>> -> ... is valid
fun foo<T>() {
foo<A<u64>>();
}
}
}
不被允许的用法:
address 0x2 {
module m {
struct A<T> {}
// Infinitely many types -- NOT allowed.
// error!
// foo<T> -> foo<A<T>> -> foo<A<A<T>>> -> ...
fun foo<T>() {
foo<Foo<T>>();
}
}
}
address 0x2 {
module n {
struct A<T> {}
// Infinitely many types -- NOT allowed.
// error!
// foo<T1, T2> -> bar<T2, T1> -> foo<T2, A<T1>>
// -> bar<A<T1>, T2> -> foo<A<T1>, A<T2>>
// -> bar<A<T2>, A<T1>> -> foo<A<T2>, A<A<T1>>>
// -> ...
fun foo<T1, T2>() {
bar<T2, T1>();
}
fun bar<T1, T2> {
foo<T1, A<T2>>();
}
}
}
Note, the check for type level recursions is based on a conservative analysis on the call sites and does NOT take control flow or runtime values into account.
请注意,类型级别递归的检查是基于对调用现场的保守分析,并且不考虑控制流或运行时值。
address 0x2 {
module m {
struct A<T> {}
fun foo<T>(n: u64) {
if (n > 0) {
foo<A<T>>(n - 1);
};
}
}
}
The function in the example above will technically terminate for any given input and therefore only creating finitely many types, but it is still considered invalid by Move's type system.
上例中的函数将在技术上给定有限的输入,因此只会创建有限多的类型,但仍然会被 Move 语言的类型系统认为是无效的。
能力 (abilities)
Abilities are a typing feature in Move that control what actions are permissible for values of a given type. This system grants fine grained control over the "linear" typing behavior of values, as well as if and how values are used in global storage. This is implemented by gating access to certain bytecode instructions so that for a value to be used with the bytecode instruction, it must have the ability required (if one is required at all—not every instruction is gated by an ability).
能力是 Move 语言中的一种类型特性,用于控制对给定类型的值允许哪些操作。 该系统对值的“线性”类型行为以及值如何在全局存储中使用提供细粒度控制。这是通过对某些字节码指令的进行访问控制来实现的,因此对于要与字节码指令一起使用的值,它必须具有所需的能力(如果需要的话,并非每条指令都由能力控制)
四种能力 (The Four Abilities)
The four abilities are:
copy- Allows values of types with this ability to be copied.
drop- Allows values of types with this ability to be popped/dropped.
store- Allows values of types with this ability to exist inside a struct in global storage.
key- Allows the type to serve as a key for global storage operations.
这四种能力分别是:
-
copy复制- 允许此类型的值被复制
-
drop丢弃- 允许此类型的值被弹出/丢弃
-
store存储- 允许此类型的值存在于全局存储的某个结构体中
-
key键值- 允许此类型作为全局存储中的键(具有
key能力的类型才能保存到全局存储中)
- 允许此类型作为全局存储中的键(具有
copy
The copy ability allows values of types with that ability to be copied. It gates the ability to copy values out of local variables with the copy operator and to copy values via references with dereference *e.
If a value has copy, all values contained inside of that value have copy.
copy 能力允许具有此能力的类型的值被复制。 它限制了从本地变量通过 copy能力复制值以及通过 dereference *e复制值这两种情况之外的复制操作。
如果一个值具有 copy 能力,那么这个值内部的所有值都有 copy 能力。
drop
The drop ability allows values of types with that ability to be dropped. By dropped, we mean that value is not transferred and is effectively destroyed as the Move program executes. As such, this ability gates the ability to ignore values in a multitude of locations, including:
- not using the value in a local variable or parameter
- not using the value in a sequence via
; - overwriting values in variables in assignments
- overwriting values via references when writing
*e1 = e2.
If a value has drop, all values contained inside of that value have drop.
drop 能力允许类型的值被丢弃。丢弃的意思程序执行后值会被有效的销毁而不必被转移。因此,这个能力限制在多个位置忽略使用值的可能性,包括:
- 未被使用的局部变量或者参数
- 未被使用的
sequencevia;中的值 - 覆盖赋值(assignments)变量中的值
- 写入(writing)
*e1 = e2时通过引用覆盖的值。
如果一个值具有 drop 能力,那么这个值内部的所有值都有 drop 能力。
store
The store ability allows values of types with this ability to exist inside of a struct (resource) in global storage, but not necessarily as a top-level resource in global storage. This is the only ability that does not directly gate an operation. Instead it gates the existence in global storage when used in tandem with key.
If a value has store, all values contained inside of that value have store
store 能力允许具有这种能力的类型的值位于全局存储中的结构体(资源)内, 但不一定是 全局存储中的顶级资源。这是唯一不直接限制操作的能力。相反,当(store)与 key 一起使用时,它对全局存储中的可行性进行把关。。
如果一个值具有 store 能力,那么这个值内部的所有值都有 store 能力。
key
The key ability allows the type to serve as a key for global storage operations. It gates all global storage operations, so in order for a type to be used with move_to, borrow_global, move_from, etc., the type must have the key ability. Note that the operations still must be used in the module where the key type is defined (in a sense, the operations are private to the defining module).
If a value has key, all values contained inside of that value have store. This is the only ability with this sort of asymmetry.
key 能力允许此类型作为全局存储中的键。它会限制所有全局存储中的操作,因此一个类型如果与 move_to, borrow_global, move_from 等一起使用,那么这个类型必须具备 key 能力。请注意,这些操作仍然必须在定义 key 类型的模块中使用(从某种意义上说,这些操作是此模块的私有操作)。
如果有一个值有 key 能力,那么这个值包含的所有字段值也都具有 store 能力,key 能力是唯一一个具有非对称的能力。
Builtin Types (内置类型)
Most primitive, builtin types have copy, drop, and store with the exception of signer, which just has store
bool,u8,u64,u128, andaddressall havecopy,drop, andstore.signerhasdrop- Cannot be copied and cannot be put into global storage
vector<T>may havecopy,drop, andstoredepending on the abilities ofT.- See Conditional Abilities and Generic Types for more details.
- Immutable references
&and mutable references&mutboth havecopyanddrop.- This refers to copying and dropping the reference itself, not what they refer to.
- References cannot appear in global storage, hence they do not have
store.
None of the primitive types have key, meaning none of them can be used directly with the global storage operations.
几乎所有内置的基本类型具都有 copy,drop,以及 store 能力,singer 除外,它只有 drop 能力(原文是 store 有误,译者注)
bool,u8,u64,u128,address都具有copy,drop, 以及store能力。signer具有drop能力。 不能被复制以及不能被存放在全局存储中vector<T>可能具有copy,drop,以及store能力,这依赖于T具有的能力。 查看 条件能力与泛型类型获取详情- 不可变引用
&和可变引用&mut都具有copy和drop能力。- 这是指复制和删除引用本身,而不是它们所引用的内容。
- 引用不能出现在全局存储中,因此它们没有
store能力。
所有基本类型都没有 key,这意味着它们都不能直接用于全局存储操作。
Annotating Structs (标注结构体)
To declare that a struct has an ability, it is declared with has <ability> after the struct name but before the fields. For example:
要声明一个 struct 具有某个能力,它在结构体名称之后, 在字段之前用 has <ability> 声明。例如:
struct Ignorable has drop { f: u64 }
struct Pair has copy, drop, store { x: u64, y: u64 }
In this case: Ignorable has the drop ability. Pair has copy, drop, and store.
在这个例子中:Ignorable 具有 drop 能力。 Pair 具有 copy、drop 和 store 能力。
All of these abilities have strong guarantees over these gated operations. The operation can be performed on the value only if it has that ability; even if the value is deeply nested inside of some other collection!
所有这些能力对这些访问操作都有强有力的保证。只有具有该能力,才能对值执行对应的操作;即使该值深层嵌套在其他集合中!
As such: when declaring a struct’s abilities, certain requirements are placed on the fields. All fields must satisfy these constraints. These rules are necessary so that structs satisfy the reachability rules for the abilities given above. If a struct is declared with the ability...
copy, all fields must havecopy.drop, all fields must havedrop.store, all fields must havestore.key, all fields must havestore.keyis the only ability currently that doesn’t require itself.
因此:在声明结构体的能力时,对字段提出了某些要求。所有字段都必须满足这些约束。这些规则是必要的,以便结构体满足上述功能的可达性规则。如果一个结构被声明为具有某能力:
copy, 所有的字段必须具有copy能力。drop,所有的字段必须具有drop能力。store,所有的字段必须具有store能力。key,所有的字段必须具有store能力。key是目前唯一不需要包含自身的能力。
例如:
// A struct without any abilities
struct NoAbilities {}
struct WantsCopy has copy {
f: NoAbilities, // ERROR 'NoAbilities' does not have 'copy'
}
and similarly:
类似的:
// A struct without any abilities
struct NoAbilities {}
struct MyResource has key {
f: NoAbilities, // Error 'NoAbilities' does not have 'store'
}
Conditional Abilities and Generic Types (条件能力与泛型类型)
When abilities are annotated on a generic type, not all instances of that type are guaranteed to have that ability. Consider this struct declaration:
在泛型类型上标注能力时,并非该类型的所有实例都保证具有该能力。考虑这个结构体声明:
struct Cup<T> has copy, drop, store, key { item: T }
It might be very helpful if Cup could hold any type, regardless of its abilities. The type system can see the type parameter, so it should be able to remove abilities from Cup if it sees a type parameter that would violate the guarantees for that ability.
This behavior might sound a bit confusing at first, but it might be more understandable if we think about collection types. We could consider the builtin type vector to have the following type declaration:
如果 Cup 可以容纳任何类型,可能会很有帮助,不管它的能力如何。类型系统可以 看到 类型参数,因此,如果它 发现 一个类型参数违反了对该能力的保证,它应该能够从 Cup 中删除能力。
这种行为一开始可能听起来有点令人困惑,但如果我们考虑一下集合类型,它可能会更容易理解。我们可以认为内置类型 Vector 具有以下类型声明:
vector<T> has copy, drop, store;
We want vectors to work with any type. We don't want separate vector types for different abilities. So what are the rules we would want? Precisely the same that we would want with the field rules above. So, it would be safe to copy a vector value only if the inner elements can be copied. It would be safe to ignore a vector value only if the inner elements can be ignored/dropped. And, it would be safe to put a vector in global storage only if the inner elements can be in global storage.
To have this extra expressiveness, a type might not have all the abilities it was declared with depending on the instantiation of that type; instead, the abilities a type will have depends on both its declaration and its type arguments. For any type, type parameters are pessimistically assumed to be used inside of the struct, so the abilities are only granted if the type parameters meet the requirements described above for fields. Taking Cup from above as an example:
Cuphas the abilitycopyonly ifThascopy.- It has
droponly ifThasdrop. - It has
storeonly ifThasstore. - It has
keyonly ifThasstore.
我们希望 vector 适用于任何类型。我们不希望针对不同的能力使用不同的 vector 类型。那么我们想要的规则是什么?与上面的字段规则完全相同。因此,仅当可以复制内部元素时,复制vector 值才是安全的。仅当可以忽略/丢弃内部元素时,忽略 vector 值才是安全的。而且,仅当内部元素可以在全局存储中时,将向量放入全局存储中才是安全的。
为了具有这种额外的表现力,一个类型可能不具备它声明的所有能力,具体取决于该类型的实例化;相反,一个类型的能力取决于它的声明 和 它的类型参数。对于任何类型,类型参数都被悲观地假定为在结构体内部使用,因此只有在类型参数满足上述字段要求时才授予这些能力。以上面的 Cup 为例:
Cup拥有copy能力 仅当T拥有copy能力时。Cup拥有drop能力 仅当T拥有drop能力时。Cup拥有store能力 仅当T拥有store能力时。Cup拥有key能力 仅当T拥有store能力时。
Here are examples for this conditional system for each ability:
以下是每个能力的条件系统的示例:
Example: conditional copy
struct NoAbilities {}
struct S has copy, drop { f: bool }
struct Cup<T> has copy, drop, store { item: T }
fun example(c_x: Cup<u64>, c_s: Cup<S>) {
// Valid, 'Cup<u64>' has 'copy' because 'u64' has 'copy'
let c_x2 = copy c_x;
// Valid, 'Cup<S>' has 'copy' because 'S' has 'copy'
let c_s2 = copy c_s;
}
fun invalid(c_account: Cup<signer>, c_n: Cup<NoAbilities>) {
// Invalid, 'Cup<signer>' does not have 'copy'.
// Even though 'Cup' was declared with copy, the instance does not have 'copy'
// because 'signer' does not have 'copy'
let c_account2 = copy c_account;
// Invalid, 'Cup<NoAbilities>' does not have 'copy'
// because 'NoAbilities' does not have 'copy'
let c_n2 = copy c_n;
}
Example: conditional drop
struct NoAbilities {}
struct S has copy, drop { f: bool }
struct Cup<T> has copy, drop, store { item: T }
fun unused() {
Cup<bool> { item: true }; // Valid, 'Cup<bool>' has 'drop'
Cup<S> { item: S { f: false }}; // Valid, 'Cup<S>' has 'drop'
}
fun left_in_local(c_account: Cup<signer>): u64 {
let c_b = Cup<bool> { item: true };
let c_s = Cup<S> { item: S { f: false }};
// Valid return: 'c_account', 'c_b', and 'c_s' have values
// but 'Cup<signer>', 'Cup<bool>', and 'Cup<S>' have 'drop'
0
}
fun invalid_unused() {
// Invalid, Cannot ignore 'Cup<NoAbilities>' because it does not have 'drop'.
// Even though 'Cup' was declared with 'drop', the instance does not have 'drop'
// because 'NoAbilities' does not have 'drop'
Cup<NoAbilities> { item: NoAbilities {}};
}
fun invalid_left_in_local(): u64 {
let n = Cup<NoAbilities> { item: NoAbilities {}};
// Invalid return: 'c_n' has a value
// and 'Cup<NoAbilities>' does not have 'drop'
0
}
Example: conditional store
struct Cup<T> has copy, drop, store { item: T }
// 'MyInnerResource' is declared with 'store' so all fields need 'store'
struct MyInnerResource has store {
yes: Cup<u64>, // Valid, 'Cup<u64>' has 'store'
// no: Cup<signer>, Invalid, 'Cup<signer>' does not have 'store'
}
// 'MyResource' is declared with 'key' so all fields need 'store'
struct MyResource has key {
yes: Cup<u64>, // Valid, 'Cup<u64>' has 'store'
inner: Cup<MyInnerResource>, // Valid, 'Cup<MyInnerResource>' has 'store'
// no: Cup<signer>, Invalid, 'Cup<signer>' does not have 'store'
}
Example: conditional key
struct NoAbilities {}
struct MyResource<T> has key { f: T }
fun valid(account: &signer) acquires MyResource {
let addr = signer::address_of(account);
// Valid, 'MyResource<u64>' has 'key'
let has_resource = exists<MyResource<u64>>(addr);
if (!has_resource) {
// Valid, 'MyResource<u64>' has 'key'
move_to(account, MyResource<u64> { f: 0 })
};
// Valid, 'MyResource<u64>' has 'key'
let r = borrow_global_mut<MyResource<u64>>(addr)
r.f = r.f + 1;
}
fun invalid(account: &signer) {
// Invalid, 'MyResource<NoAbilities>' does not have 'key'
let has_it = exists<MyResource<NoAbilities>>(addr);
// Invalid, 'MyResource<NoAbilities>' does not have 'key'
let NoAbilities {} = move_from<NoAbilities>(addr);
// Invalid, 'MyResource<NoAbilities>' does not have 'key'
move_to(account, NoAbilities {});
// Invalid, 'MyResource<NoAbilities>' does not have 'key'
borrow_global<NoAbilities>(addr);
}
使用与别名(Uses and Aliases)
The use syntax can be used to create aliases to members in other modules. use can be used to
create aliases that last either for the entire module, or for a given expression block scope.
use 语法可用于为其他模块中的成员创建别名。 use 可用于创建持续整个模块或给定表达式块范围的别名。
语法(Syntax)
There are several different syntax cases for use. Starting with the most simple, we have the
following for creating aliases to other modules
这里有几种不同的语法案例可供使用。从最简单的开始,我们有以下例子用于为其他模块创建别名
use <address>::<module name>;
use <address>::<module name> as <module alias name>;
For example 举例
use std::vector;
use std::vector as V;
use std::vector; introduces an alias vector for std::vector. This means that anywhere you
would want to use the module name std::vector (assuming this use is in scope), you could use
vector instead. use std::vector; is equivalent to use std::vector as vector;
use std::vector;为 std::vector 引入别名向量。这意味着在任何您想使用模块名称 std::vector 的地方(假设此use在作用域内),您都可以使用 vector 代替使用std::vector;
Similarly use std::vector as V; would let you use V instead of std::vector
同样使用 std::vector as V;会让你使用 V 代替 std::vector
use std::vector;
use std::vector as V;
fun new_vecs(): (vector<u8>, vector<u8>, vector<u8>) {
let v1 = std::vector::empty();
let v2 = vector::empty();
let v3 = V::empty();
(v1, v2, v3)
}
If you want to import a specific module member (such as a function, struct, or constant). You can use the following syntax.
如果要导入特定的模块成员(例如函数、结构或常量)。您可以使用以下语法。
use <address>::<module name>::<module member>;
use <address>::<module name>::<module member> as <member alias>;
For example 举例
use std::vector::empty;
use std::vector::empty as empty_vec;
This would let you use the function std::vector::empty without full qualification. Instead you
could use empty and empty_vec respectively. Again, use std::vector::empty; is equivalent to
use std::vector::empty as empty;
这将允许您在没有前缀限定的情况下使用函数 std::vector::empty。相反,您可以分别使用 empty 和 empty_vec,使用 std::vector::empty;使用empty 相当于使用std::vector::empty;
use std::vector::empty;
use std::vector::empty as empty_vec;
fun new_vecs(): (vector<u8>, vector<u8>, vector<u8>) {
let v1 = std::vector::empty();
let v2 = empty();
let v3 = empty_vec();
(v1, v2, v3)
}
If you want to add aliases for multiple module members at once, you can do so with the following syntax
如果要一次为多个模块成员添加别名,可以使用以下语法
use <address>::<module name>::{<module member>, <module member> as <member alias> ... };
For example 举例
use std::vector::{push_back, length as len, pop_back};
fun swap_last_two<T>(v: &mut vector<T>) {
assert!(len(v) >= 2, 42);
let last = pop_back(v);
let second_to_last = pop_back(v);
push_back(v, last);
push_back(v, second_to_last)
}
If you need to add an alias to the Module itself in addition to module members, you can do that in a
single use using Self. Self is a member of sorts that refers to the module.
如果除了模块成员之外,您还需要为模块本身添加别名,您可以使用 Self 在一次use中完成。 Self 是指模块的各种成员。
use std::vector::{Self, empty};
For clarity, all of the following are equivalent:
For clarity, all of the following are equivalent:
为清晰起见,以下所有内容都是等效的:
use std::vector;
use std::vector as vector;
use std::vector::Self;
use std::vector::Self as vector;
use std::vector::{Self};
use std::vector::{Self as vector};
If needed, you can have as many aliases for any item as you like
如果需要,您可以为任何项目设置任意数量的别名
use std::vector::{
Self,
Self as V,
length,
length as len,
};
fun pop_twice<T>(v: &mut vector<T>): (T, T) {
// all options available given the `use` above
assert!(vector::length(v) > 1, 42);
assert!(V::length(v) > 1, 42);
assert!(length(v) > 1, 42);
assert!(len(v) > 1, 42);
(vector::pop_back(v), vector::pop_back(v))
}
模块内部(Inside a module)
Inside of a module all use declarations are usable regardless of the order of declaration.
在模块内部,无论声明顺序如何,所有 use 声明都是可用的。
address 0x42 {
module example {
use std::vector;
fun example(): vector<u8> {
let v = empty();
vector::push_back(&mut v, 0);
vector::push_back(&mut v, 10);
v
}
use std::vector::empty;
}
}
The aliases declared by use in the module usable within that module.
在该模块中可用的模块中使用声明的别名。
Additionally, the aliases introduced cannot conflict with other module members. See Uniqueness for more details
此外,引入的别名不能与其他模块成员冲突。有关详细信息,请参阅唯一性。
表达式内部(Inside an expression)
You can add use declarations to the beginning of any expression block
您可以将 use 声明添加到任何表达式块的开头
address 0x42 {
module example {
fun example(): vector<u8> {
use std::vector::{empty, push_back};
let v = empty();
push_back(&mut v, 0);
push_back(&mut v, 10);
v
}
}
}
As with let, the aliases introduced by use in an expression block are removed at the end of that
block.
与 let 一样,在表达式块中使用 use 引入的别名在该块的末尾被删除。
address 0x42 {
module example {
fun example(): vector<u8> {
let result = {
use std::vector::{empty, push_back};
let v = empty();
push_back(&mut v, 0);
push_back(&mut v, 10);
v
};
result
}
}
}
Attempting to use the alias after the block ends will result in an error
在块结束后尝试使用别名将导致错误
fun example(): vector<u8> {
let result = {
use std::vector::{empty, push_back};
let v = empty();
push_back(&mut v, 0);
push_back(&mut v, 10);
v
};
let v2 = empty(); // 错误!
// ^^^^^ 未绑定的函数 'empty'
结果
}
Any use must be the first item in the block. If the use comes after any expression or let, it
will result in a parsing error
任何使用都必须是块中的第一项。如果 use 出现在任何表达式或 let 之后,则会导致解析错误
{
let x = 0;
use std::vector; // 错误!
let v = vector::empty();
}
命名规则(Naming rules)
Aliases must follow the same rules as other module members. This means that aliases to structs or
constants must start with A to Z
别名必须遵循与其他模块成员相同的规则。这意味着结构或常量的别名必须以 A 到 Z 开头
address 0x42 {
module data {
struct S {}
const FLAG: bool = false;
fun foo() {}
}
module example {
use 0x42::data::{
S as s, // 错误!
FLAG as fLAG, // 错误!
foo as FOO, // 有效
foo as bar, // 有效
};
}
}
唯一性(Uniqueness)
Inside a given scope, all aliases introduced by use declarations must be unique.
在给定范围内,所有由 use 声明引入的别名必须是唯一的。
For a module, this means aliases introduced by use cannot overlap
对于一个模块,这意味着使用引入的别名不能重复
address 0x42 {
module example {
use std::vector::{empty as foo, length as foo}; // ERROR!
// ^^^ duplicate 'foo'
use std::vector::empty as bar;
use std::vector::length as bar; // 错误!
// ^^^ 重复的 'bar'
}
}
And, they cannot overlap with any of the module's other members
而且,它们不能与模块的任何其他成员重复
address 0x42 {
module data {
struct S {}
}
module example {
use 0x42::data::S;
struct S { value: u64 } // ERROR!
// ^ conflicts with alias 'S' above
}
}
Inside of an expression block, they cannot overlap with each other, but they can shadow other aliases or names from an outer scope
在表达式块内部,它们不能相互重复,但它们可以遮蔽外部作用域中的其他别名或名称
遮蔽(Shadowing)
use aliases inside of an expression block can shadow names (module members or aliases) from the
outer scope. As with shadowing of locals, the shadowing ends at the end of the expression block;
在表达式块内使用别名可以覆盖外部作用域的名称(模块成员或别名)。当遮蔽局部变量时,遮蔽会在表达式块的末尾结束;
address 0x42 {
module example {
struct WrappedVector { vec: vector<u64> }
fun empty(): WrappedVector {
WrappedVector { vec: std::vector::empty() }
}
fun example1(): (WrappedVector, WrappedVector) {
let vec = {
use std::vector::{empty, push_back};
// 'empty' 现在指向 std::vector::empty
let v = empty();
push_back(&mut v, 0);
push_back(&mut v, 1);
push_back(&mut v, 10);
v
};
// 'empty' 现在指向 Self::empty
(empty(), WrappedVector { vec })
}
fun example2(): (WrappedVector, WrappedVector) {
use std::vector::{empty, push_back};
let w: WrappedVector = {
use 0x42::example::empty;
empty()
};
push_back(&mut w.vec, 0);
push_back(&mut w.vec, 1);
push_back(&mut w.vec, 10);
let vec = empty();
push_back(&mut vec, 0);
push_back(&mut vec, 1);
push_back(&mut vec, 10);
(w, WrappedVector { vec })
}
}
}
未使用的Use或别名(Unused Use or Alias)
An unused use will result in an error
未使用的 use 会导致错误
address 0x42 {
module example {
use std::vector::{empty, push_back}; // ERROR!
// ^^^^^^^^^ 未使用的别名 'push_back'
fun example(): vector<u8> {
empty()
}
}
}
友元函数(Friends)
The friend syntax is used to declare modules that are trusted by the current module.
A trusted module is allowed to call any function defined in the current module that have the public(friend) visibility.
For details on function visibilities, please refer to the Visibility section in Functions.
友元语法用于声明当前模块信任的其它模块。受信任的模块可以调用当前模块中定义的任何具有公开(友元)可见性的函数。有关函数可见性的详细信息,请参阅函数中的可见性部分。
友元声明(Friend declaration)
A module can declare other modules as friends via friend declaration statements, in the format of
一个模块可以通过友元声明语句将其他模块声明为友元,格式为:
-
friend <address::name>— friend declaration using fully qualified module name like the example below, or -
friend <address::name>—使用完全合格的模块名称的友元声明,如下例所示,或address 0x42 { module a { friend 0x42::b; } } -
friend <module-name-alias>— friend declaration using a module name alias, where the module alias is introduced via theusestatement. -
friend <module-name-alias>—使用模块名称别名的友元声明,其中模块别名是通过use语句引入的。address 0x42 { module a { use 0x42::b; friend b; } }
A module may have multiple friend declarations, and the union of all the friend modules forms the friend list.
In the example below, both 0x42::B and 0x42::C are considered as friends of 0x42::A.
一个模块可能有多个友元声明,所有好友模块的并集形成友元列表。在下面的示例中,0x42::B和0x42::C都被视为 的友元函数0x42::A。
address 0x42 {
module a {
friend 0x42::b;
friend 0x42::c;
}
}
Unlike use statements, friend can only be declared in the module scope and not in the expression block scope.
friend declarations may be located anywhere a top-level construct (e.g., use, function, struct, etc.) is allowed.
However, for readability, it is advised to place friend declarations near the beginning of the module definition.
与use语句不同,friend只能在模块作用域内声明,而不能在表达式块的作用域内声明。friend声明可以位于允许顶层构造的任何位置(例如, use, function,struct等)是被允许的。但是,为了可读性,建议将友元声明放在模块定义的开头附近。
Note that the concept of friendship does not apply to Move scripts:
- A Move script cannot declare
friendmodules as doing so is considered meaningless: there is no mechanism to call the function defined in a script. - A Move module cannot declare
friendscripts as well because scripts are ephemeral code snippets that are never published to global storage.
请注意,友元关系(friendship)的概念不适用于 Move 脚本:
Move脚本不能声明friend模块,因为这样做被认为是无意义的:没有机制可以调用脚本中定义的函数。Move模块也不能声明friend脚本,因为脚本是永远不会发布到全局存储的临时代码片段。
友元声明规则(Friend declaration rules)
Friend declarations are subject to the following rules: 友元声明须遵守以下规则:
-
A module cannot declare itself as a friend
-
一个模块不能将自己声明为友元。
address 0x42 { module m { friend Self; // 错误! } // ^^^^ 不能将自己声明为友元 } address 0x43 { module m { friend 0x43::M; // 错误! } // ^^^^^^^ 不能将自己声明为友元 } -
Friend modules must be known by the compiler
-
编译器必须知道友元模块
address 0x42 { module m { friend 0x42::nonexistent; // 错误! } // ^^^^^^^^^^^^^^^^^ 未绑定的模块 '0x42::nonexistent' } -
Friend modules must be within the same account address. (Note: this is not a technical requirement but rather a policy decision which may be relaxed later.)
-
友元模块必须在同一个账号地址内。(注:这不是技术要求,而是以后可能放宽的决策。)
address 0x42 { module m {} } address 0x43 { module n { friend 0x42::m; // 错误! } // ^^^^^^^ 不能声明当前地址外的模块作为友元 } -
友元关系不能创建循环模块依赖关系(Friends relationships cannot create cyclic module dependencies)
Cycles are not allowed in the friend relationships, e.g., the relation 0x2::a friends 0x2::b friends 0x2::c friends 0x2::a is not allowed.
More generally, declaring a friend module adds a dependency upon the current module to the friend module (because the purpose is for the friend to call functions in the current module).
If that friend module is already used, either directly or transitively, a cycle of dependencies would be created.
友元关系中不允许循环,例如 0x2::a 友元 0x2::b 友元 0x2::c 友元0x2::a是不允许的。更普遍地,声明一个友元模块会将对当前模块的依赖添加到友元模块(因为目的是让友元调用当前模块中的函数)。如果该友元模块已被直接或传递地使用,则将形成一个依赖循环。
address 0x2 {
module a {
use 0x2::c;
friend 0x2::b;
public fun a() {
c::c()
}
}
module b {
friend 0x2::c; // 错误!
// ^^^^^^ 这个友元关系形成了一个依赖循环: '0x2::a' 使用了 '0x2::c' 但'0x2::b' 同时是 '0x2::a'和'0x2::b' 的友元
}
module c {
public fun c() {}
}
}
- The friend list for a module cannot contain duplicates.
- 模块的友元列表不能包含重复项。
address 0x42 {
module a {}
module m {
use 0x42::a as aliased_a;
friend 0x42::A;
friend aliased_a; // 错误!
// ^^^^^^^^^ 重复的友元声明 '0x42::a'. 模块内的友元声明必须是唯一的
}
}
程序包(packages)
Packages allow Move programmers to more easily re-use code and share it across projects. The Move package system allows programmers to easily:
- Define a package containing Move code;
- Parameterize a package by named addresses;
- Import and use packages in other Move code and instantiate named addresses;
- Build packages and generate associated compilation artifacts from packages; and
- Work with a common interface around compiled Move artifacts.
包允许 Move 程序员更轻松地重用代码并在项目之间共享。Move 包系统允许程序员轻松地:
- 定义一个包含
Move代码的包; - 通过命名地址参数化包;
- 在其他
Move代码中导入和使用包并实例化命名地址; - 构建包并从包中生成相关的编译源代码;
- 使用围绕已编译
Move工件的通用接口。
包布局和清单语法(Package Layout and Manifest Syntax)
A Move package source directory contains a Move.toml package manifest
file along with a set of subdirectories:
Move 包源目录包含一个Move.toml包清单文件以及一组子目录:
a_move_package
├── Move.toml (required)(需要的)
├── sources (required)(需要的)
├── examples (optional, test & dev mode)(可选的,测试 & 开发者模式)
├── scripts (optional)(可选的)
├── doc_templates (optional)(可选的)
└── tests (optional, test mode)(可选的,测试模式)
The directories marked required must be present in order for the directory
to be considered a Move package and to be compiled. Optional directories can
be present, and if so will be included in the compilation process. Depending on
the mode that the package is built with (test or dev), the tests and
examples directories will be included as well.
标记为required 的目录必须存在才可以将该目录作为 Move 包并进行编译。可选目录被视为可存在的,如果存在,将包含在编译过程里。根据使用 (test或dev)构建包的模式,tests和examples 目录也将包含在内。
The sources directory can contain both Move modules and Move scripts (both
transaction scripts and modules containing script functions). The examples
directory can hold additional code to be used only for development and/or
tutorial purposes that will not be included when compiled outside test or
dev mode.
sources目录可以包含 Move 模块和 Move 脚本(事务脚本和包含脚本函数的模块)。Example目录可以保留仅用于开发和/或用作教程目的附加代码,当在 test 或者dev模式之外时,这些附加代码编译时不会被包括进来。
A scripts directory is supported so transaction scripts can be separated
from modules if that is desired by the package author. The scripts
directory will always be included for compilation if it is present.
Documentation will be built using any documentation templates present in
the doc_templates directory.
scripts目录是被支持的,如果包作者需要,事物脚本可以从模块中分离。如果该scripts目录存在,则编译时将始终包含该目录。
Move将使用存在于doc_templates 目录的任何模板构建文档。
包清单 Move.toml
The Move package manifest is defined within the Move.toml file and has the
following syntax. Optional fields are marked with *, + denotes
one or more elements:
Move 包清单在Move.toml文件中定义,并具有以下语法。可选字段标有*,+表示一个或多个元素:
[package]
name = <string> # e.g., "MoveStdlib"
version = "<uint>.<uint>.<uint>" # e.g., "0.1.1"
license* = <string> # e.g., "MIT", "GPL", "Apache 2.0"
authors* = [<string>] # e.g., ["Joe Smith (joesmith@noemail.com)", "Jane Smith (janesmith@noemail.com)"]
[addresses] # (Optional section) Declares named addresses in this package and instantiates named addresses in the package graph
# One or more lines declaring named addresses in the following format
<addr_name> = "_" | "<hex_address>" # e.g., std = "_" or my_addr = "0xC0FFEECAFE"
[dependencies] # (Optional section) Paths to dependencies and instantiations or renamings of named addresses from each dependency
# One or more lines declaring dependencies in the following format
<string> = { local = <string>, addr_subst* = { (<string> = (<string> | "<hex_address>"))+ } } # local dependencies
<string> = { git = <URL ending in .git>, subdir=<path to dir containing Move.toml inside git repo>, rev=<git commit hash>, addr_subst* = { (<string> = (<string> | "<hex_address>"))+ } } # git dependencies
[dev-addresses] # (Optional section) Same as [addresses] section, but only included in "dev" and "test" modes
# One or more lines declaring dev named addresses in the following format
<addr_name> = "_" | "<hex_address>" # e.g., std = "_" or my_addr = "0xC0FFEECAFE"
[dev-dependencies] # (Optional section) Same as [dependencies] section, but only included in "dev" and "test" modes
# One or more lines declaring dev dependencies in the following format
<string> = { local = <string>, addr_subst* = { (<string> = (<string> | <address>))+ } }
An example of a minimal package manifest with one local dependency and one git dependency:
一个具有局部依赖项和一个 git 依赖项的最小包清单示例:
[package]
name = "AName"
version = "0.0.0"
An example of a more standard package manifest that also includes the Move
standard library and instantiates the named address Std from it with the
address value 0x1:
一个包括 Move 标准库并从中使用地址值0x1实例化命名地址Std的更标准的包清单示例:
[package]
name = "AName"
version = "0.0.0"
license = "Apache 2.0"
[addresses]
address_to_be_filled_in = "_"
specified_address = "0xB0B"
[dependencies]
# Local dependency
LocalDep = { local = "projects/move-awesomeness", addr_subst = { "std" = "0x1" } }
# Git dependency
MoveStdlib = { git = "https://github.com/diem/diem.git", subdir="language/move-stdlib", rev = "56ab033cc403b489e891424a629e76f643d4fb6b" }
[dev-addresses] # For use when developing this module
address_to_be_filled_in = "0x101010101"
Most of the sections in the package manifest are self explanatory, but named addresses can be a bit difficult to understand so it's worth examining them in a bit more detail.
包清单中的大部分段落都是不言自明的,但命名地址可能有点难以理解,因此值得更详细地检查它们。
编译期间的命名地址(Named Addresses During Compilation)
Recall that Move has named addresses and that named addresses cannot be declared in Move. Because of this, until now named addresses and their values needed to be passed to the compiler on the command line. With the Move package system this is no longer needed, and you can declare named addresses in the package, instantiate other named addresses in scope, and rename named addresses from other packages within the Move package system manifest file. Let's go through each of these individually:
回想一下,Move 具有命名地址,并且不能在 Move 中声明命名地址。正因为如此,到目前为止,命名地址及其值都需要在命令行上传递给编译器。但使用 Move 包系统时这将不再需要,您可以在包中声明命名地址,实例化范围内的其他命名地址,并从 Move 包系统清单文件中的其他包重命名命名地址,让我们分别来看看这些:
声明(Declaration)
Let's say we have a Move module in example_pkg/sources/A.move as follows:
假设我们有一个Move模块,example_pkg/sources/A.move如下所示:
module named_addr::A {
public fun x(): address { @named_addr }
}
We could in example_pkg/Move.toml declare the named address named_addr in
two different ways. The first:
我们可以用两种不同example_pkg/Move.toml的方式声明命名地址named_addr。首先:
[package]
name = "ExamplePkg"
...
[addresses]
named_addr = "_"
Declares named_addr as a named address in the package ExamplePkg and
that this address can be any valid address value. Therefore an importing
package can pick the value of the named address named_addr to be any address
it wishes. Intuitively you can think of this as parameterizing the package
ExamplePkg by the named address named_addr, and the package can then be
instantiated later on by an importing package.
声明named_addr为包ExamplePkg中的命名地址,并且 该地址可以是任何有效的地址值。因此,导入包可以选择命名地址的值作为named_addr它希望的任何地址。直观地,您可以将其视为通过命名地址named_addr参数化包 ExamplePkg,然后稍后通过导入包使包被实例化。
named_addr can also be declared as:
named_addr也可以声明为:
[package]
name = "ExamplePkg"
...
[addresses]
named_addr = "0xCAFE"
which states that the named address named_addr is exactly 0xCAFE and cannot be
changed. This is useful so other importing packages can use this named
address without needing to worry about the exact value assigned to it.
这表明命名的地址named_addr是准确的0xCAFE并且不能更改。这很有用,因此其他导入包可以使用这个命名地址,而无需担心分配给它的确切值。
With these two different declaration methods, there are two ways that information about named addresses can flow in the package graph:
- The former ("unassigned named addresses") allows named address values to flow from the importation site to the declaration site.
- The latter ("assigned named addresses") allows named address values to flow from the declaration site upwards in the package graph to usage sites.
使用这两种不同的声明方法,有关命名地址的信息可以通过两种方式在包图中流动:
- 前者(“未分配的命名地址”)允许命名地址值从进口站点流向申报站点。
- 后者(“分配的命名地址”)允许命名地址值从包图中的声明站点向上流动到使用站点。
With these two methods for flowing named address information throughout the package graph the rules around scoping and renaming become important to understand.
通过这两种在整个包图中流动命名地址信息的方法,了解范围和重命名的规则变得很重要。
命名地址的作用域和重命名(Scoping and Renaming of Named Addresses)
A named address N in a package P is in scope if:
- It declares a named address
N; or - A package in one of
P's transitive dependencies declares the named addressNand there is a dependency path in the package graph between betweenPand the declaring package ofNwith no renaming ofN.
在包P中的命名地址N如果满足以下条件,则在作用域内:
- 它声明了一个命名地址
N;或者 P的传递依赖项之一中的包声明了命名地址N,并且封装图在P和没有重命名的声明包N之间有一个依赖路径。
Additionally, every named address in a package is exported. Because of this and
the above scoping rules each package can be viewed as coming with a set of
named addresses that will be brought into scope when the package is imported,
e.g., if the ExamplePkg package was imported, that importation would bring
into scope the named_addr named address. Because of this, if P imports two
packages P1 and P2 both of which declare a named address N an issue
arises in P: which "N" is meant when N is referred to in P? The one
from P1 or P2? To prevent this ambiguity around which package a named
address is coming from, we enforce that the sets of scopes introduced by all
dependencies in a package are disjoint, and provide a way to rename named
addresses when the package that brings them into scope is imported.
此外,包中的每个命名地址都会被导出。由于这个和上面的范围规则,每个包都可以被视为带有一组命名地址,当包被导入时,这些地址将被带入作用域,例如,如果包ExamplePkg被导入,则该导入会将命名地址named_addr带入作用域。 因此,如果P导入两个包P1并且P2都声明了一个命名地址N,在P中则会出现以下问题:当N被引用于P时我们指的是哪个N?来自P1或来自P2的N? 为了防止命名地址来自哪个包的这种歧义,我们强制一个包中所有依赖项引入的范围集是不相交的,并提供一种在将命名地址带入范围的包被导入时重命名命名地址的方法。
Renaming a named address when importing can be done as follows in our P,
P1, and P2 example above:
导入时重命名一个命名地址可以在我们的P,P1和P2上面的示例中完成:
[package]
name = "P"
...
[dependencies]
P1 = { local = "some_path_to_P1", addr_subst = { "P1N" = "N" } }
P2 = { local = "some_path_to_P2" }
With this renaming N refers to the N from P2 and P1N will refer to N
coming from P1:
这种重命名N指的是P2中的N并且P1N将指 P1中的N:
module N::A {
public fun x(): address { @P1N }
}
It is important to note that renaming is not local: once a named address N
has been renamed to N2 in a package P all packages that import P will not
see N but only N2 unless N is reintroduced from outside of P. This is
why rule (2) in the scoping rules at the start of this section specifies a
"dependency path in the package graph between between P and the declaring
package of N with no renaming of N."
重要的是要注意 重命名不是局部的:一旦一个命名地址N在一个包P中被重命名为N2,所有导入P的包都不会看到N但只会看到N2,除非N是从P外引入的。这就是为什么本节开头的范围规则中的规则 (2) 特别说明了“在P和没有重命名的声明包N 的封装图中的依赖路径” 。
实例化(Instantiation)
Named addresses can be instantiated multiple times across the package graph as long as it is always with the same value. It is an error if the same named address (regardless of renaming) is instantiated with differing values across the package graph.
只要命名地址始终具有相同的值,就可以在封装图中多次实例化命名地址。如果在整个封装图中使用不同的值实例化相同的命名地址(无论是否重命名),则会出现错误。
A Move package can only be compiled if all named addresses resolve to a value.
This presents issues if the package wishes to expose an uninstantiated named
address. This is what the [dev-addresses] section solves. This section can
set values for named addresses, but cannot introduce any named addresses.
Additionally, only the [dev-addresses] in the root package are included in
dev mode. For example a root package with the following manifest would not compile
outside of dev mode since named_addr would be uninstantiated:
只有当所有命名地址都解析为一个值时,才能编译 Move 包。如果包希望公开未实例化的命名地址,则会出现问题。这就是[dev-addresses]段要解决的问题。此段可以设置命名地址的值,但不能引入任何命名地址。此外, dev模式下仅根包中的[dev-addresses]会被包括进来。例如,具有以下清单的根包将不会在dev模式之外编译,因为named_addr不会被实例化:
[package]
name = "ExamplePkg"
...
[addresses]
named_addr = "_"
[dev-addresses]
named_addr = "0xC0FFEE"
用法、源代码和数据结构( Usage, Artifacts, and Data Structures)
The Move package system comes with a command line option as part of the Move
CLI move <flags> <command> <command_flags>. Unless a
particular path is provided, all package commands will run in the current working
directory. The full list of commands and flags for the Move CLI can be found by
running move --help.
Move 软件包系统带有一个命令行选项,作为 Move CLI 的一部分move <flags> <command> <command_flags>。除非提供特定路径,否则所有包命令都将在当前工作目录中运行。可以通过运行move --help找到 Move CLI 的命令和标志的完整列表。
用法(Usage)
A package can be compiled either through the Move CLI commands, or as a library
command in Rust with the function compile_package. This will create a
CompiledPackage that holds the compiled bytecode along with other compilation
artifacts (source maps, documentation, ABIs) in memory. This CompiledPackage
can be converted to an OnDiskPackage and vice versa -- the latter being the data of
the CompiledPackage laid out in the file system in the following format:
一个包可以通过 Move CLI 命令,或是当作Rust函数compile_package的库命令来编译。 这种编译方法将创建一个编译包CompiledPackage 保存已编译的字节码以及其他编译内存中的源代码(源映射、文档、ABIs)。这个CompiledPackage可以转换为OnDiskPackage,反之亦然——后者是文件系统中的编译包 CompiledPackage数据,它的格式如下:
a_move_package
├── Move.toml
...
└── build
├── <dep_pkg_name>
│ ├── BuildInfo.yaml
│ ├── bytecode_modules
│ │ └── *.mv
│ ├── source_maps
│ │ └── *.mvsm
│ ├── bytecode_scripts
│ │ └── *.mv
│ ├── abis
│ │ ├── *.abi
│ │ └── <module_name>/*.abi
│ └── sources
│ └── *.move
...
└── <dep_pkg_name>
├── BuildInfo.yaml
...
└── sources
See the move-package crate for more information on these data structures and
how to use the Move package system as a Rust library.
有关这些数据结构和如何将 Move 包系统用作 Rust 库的更多信息,请参阅 move-package 箱(crate) 。
单元测试 (Unit Tests)
Unit testing for Move adds three new annotations to the Move source language:
Move 语言中存在三种单元测试标注:
#[test]#[test_only], and#[expected_failure].
They respectively mark a function as a test, mark a module or module member (use, function, or struct) as code to be included for testing only, and mark that a test is expected to fail. These annotations can be placed on a function with any visibility. Whenever a module or module member is annotated as #[test_only] or #[test], it will not be included in the compiled bytecode unless it is compiled for testing.
它们分别把函数、模块或模块成员(use 声明,函数 function,或结构体 struct)标记为只用于测试的代码,同时也标记期望失败的测试。这些标注可以用在任何可见性(visibility)函数上。无论何种情况,被标注为 #[test_only] 或 #[test] 的模块或模块成员除非用于测试,其它情况都不会被编译成字节码。
测试注解:含义和使用方法(Testing Annotations: Their Meaning and Usage)
Both the #[test] and #[expected_failure] annotations can be used either with or without arguments.
#[test] 和 #[expected_failure] 两个注解均可以在有、无参数情况下使用。
Without arguments, the #[test] annotation can only be placed on a function with no parameters. This annotation simply marks this function as a test to be run by the unit testing harness.
没有参数的 #[test] 标记只能用于没有参数的函数。表示该函数作为单元测试函数被运行。
#[test] // 正确 // OK
fun this_is_a_test() { ... }
#[test] // 编译失败,因为函数需要参数 // Will fail to compile since the test takes an argument
fun this_is_not_correct(arg: signer) { ... }
A test can also be annotated as an #[expected_failure]. This annotation marks that the test should is expected to raise an error. You can ensure that a test is aborting with a specific abort code by annotating it with #[expected_failure(abort_code = <code>)], if it then fails with a different abort code or with a non-abort error the test will fail. Only functions that have the #[test] annotation can also be annotated as an #[expected_failure].
测试也可以使用 #[expected_failure] 标注,表示该函数会抛出错误。你可以使用 #[expected_failure(abort_code = <code>)] 这种方式方式确保此测试会被指定错误码打断,如果抛出不同错误码或没有抛出错误测试将失败。只有被 #[test] 标注的函数才能使用 #[expected_failure] 标注。
#[test]
#[expected_failure]
public fun this_test_will_abort_and_pass() { abort 1 }
#[test]
#[expected_failure]
public fun test_will_error_and_pass() { 1/0; }
#[test]
#[expected_failure(abort_code = 0)]
public fun test_will_error_and_fail() { 1/0; }
#[test, expected_failure] // 可以合并多个属性。测试将会通过。 // Can have multiple in one attribute. This test will pass.
public fun this_other_test_will_abort_and_pass() { abort 1 }
With arguments, a test annotation takes the form #[test(<param_name_1> = <address>, ..., <param_name_n> = <address>)]. If a function is annotated in such a manner, the function's parameters must be a permutation of the parameters <param_name_1>, ..., <param_name_n>, i.e., the order of these parameters as they occur in the function and their order in the test annotation do not have to be the same, but they must be able to be matched up with each other by name.
测试标注可以采用 #[test(<param_name_1> = <address>, ..., <param_name_n> = <address>)] 这种形式指定参数。如果函数使用这样的标注,函数的参数则必须为 <param_name_1>, ..., <param_name_n> 的形式。参数在函数中的顺序不必与注解中顺序一致,但必须要能根据参数名匹配。
Only parameters with a type of signer are supported as test parameters. If a non-signer parameter is supplied, the test will result in an error when run.
只有 signer 类型可以用作测试参数。使用非 signer 类型参数,测试将会失败。
#[test(arg = @0xC0FFEE)] // 正确 // OK
fun this_is_correct_now(arg: signer) { ... }
#[test(wrong_arg_name = @0xC0FFEE)] // 不正确: 参数名不匹配 // Not correct: arg name doesn't match
fun this_is_incorrect(arg: signer) { ... }
#[test(a = @0xC0FFEE, b = @0xCAFE)] // 正确,多参数情况下必须为每个参数提供值。 // OK. We support multiple signer arguments, but you must always provide a value for that argument
fun this_works(a: signer, b: signer) { ... }
// 在某处声明一个命名地址(named address) // somewhere a named address is declared
#[test_only] // 命名地址支持 test-only 注解 // test-only named addresses are supported
address TEST_NAMED_ADDR = @0x1;
...
#[test(arg = @TEST_NAMED_ADDR)] // 支持命名地址! // Named addresses are supported!
fun this_is_correct_now(arg: signer) { ... }
An expected failure annotation can also take the form #[expected_failure(abort_code = <u64>)]. If a test function is annotated in such a way, the test must abort with an abort code equal to <u64>. Any other failure or abort code will result in a test failure.
预期失败的标注使用 #[expected_failure(abort_code = <u64>)] 这种形式。如果函数被这样标注,测试错误码必须为 <u64>。任何其它的错误或错误码都会失败。
#[test, expected_failure(abort_code = 1)] // 这个测试会失败 // This test will fail
fun this_test_should_abort_and_fail() { abort 0 }
#[test]
#[expected_failure(abort_code = 0)] // 这个测试会通过 // This test will pass
fun this_test_should_abort_and_pass_too() { abort 0 }
A module and any of its members can be declared as test only. In such a case the item will only be included in the compiled Move bytecode when compiled in test mode. Additionally, when compiled outside of test mode, any non-test uses of a #[test_only] module will raise an error during compilation.
模块和它的成员可以被声明为仅测试用。这种情况它们只会在测试模式下编译。此外,在非测试模式下,任何被 #[test_only] 标记的模块都会在编译时报错。
#[test_only] // test only 属性可以用于模块 // test only attributes can be attached to modules
module abc { ... }
#[test_only] // test only 属性可以用于命名地址 // test only attributes can be attached to named addresses
address ADDR = @0x1;
#[test_only] // .. 用于 use 声明 // .. to uses
use 0x1::some_other_module;
#[test_only] // .. 用于结构体 // .. to structs
struct SomeStruct { ... }
#[test_only] // .. 用于函数。只能在测试函数中调用,但自身不是测试 // .. and functions. Can only be called from test code, but not a test
fun test_only_function(...) { ... }
运行单元测试(Running Unit Tests)
Unit tests for a Move package can be run with the move test
command.
使用 move test 命令运行包中的单元测试。
When running tests, every test will either PASS, FAIL, or TIMEOUT. If a test case fails, the location of the failure along with the function name that caused the failure will be reported if possible. You can see an example of this below.
运行测试的结果包括 PASS、FAIL 或 TIMEOUT。如果测试失败,将会尽可能的提供执行失败的位置及函数名信息。请看下面的例子。
A test will be marked as timing out if it exceeds the maximum number of instructions that can be executed for any single test. This bound can be changed using the options below, and its default value is set to 5000 instructions. Additionally, while the result of a test is always deterministic, tests are run in parallel by default, so the ordering of test results in a test run is non-deterministic unless running with only one thread (see OPTIONS below).
任何测试执行超过最大数量指令限制将会标记成超时。可以通过参数调整此限制,默认值为 5000 条指令。此外,虽然测试结果是确定的,但由于测试默认并行执行,所以测试结果的顺序是不确定的,除非使用单线程模式(见下述参数)。
There are also a number of options that can be passed to the unit testing binary to fine-tune testing and to help debug failing tests. These can be found using the the help flag:
存在大量参数细粒度调整测试工具的行为,帮助调试失败的测试。可以通过 help 参数查看。
$ move -h
示例(Example)
A simple module using some of the unit testing features is shown in the following example:
下面例子展示了一个简单的使用了单元测试特性的模块:
First create an empty package and change directory into it:
首先创建一个空 package 进入目录:
$ move new TestExample; cd TestExample
Next add the following to the Move.toml:
接下来添加下面内容到 Move.toml 文件:
[dependencies]
MoveStdlib = { git = "https://github.com/diem/diem.git", subdir="language/move-stdlib", rev = "56ab033cc403b489e891424a629e76f643d4fb6b", addr_subst = { "std" = "0x1" } }
Next add the following module under the sources directory:
接下来在 sources 目录下添加下述模块:
// 文件路径: sources/my_module.move // filename: sources/my_module.move
module 0x1::my_module {
struct MyCoin has key { value: u64 }
public fun make_sure_non_zero_coin(coin: MyCoin): MyCoin {
assert!(coin.value > 0, 0);
coin
}
public fun has_coin(addr: address): bool {
exists<MyCoin>(addr)
}
#[test]
fun make_sure_non_zero_coin_passes() {
let coin = MyCoin { value: 1 };
let MyCoin { value: _ } = make_sure_non_zero_coin(coin);
}
#[test]
// 如果不关心错误码也可以使用 #[expected_failure] // Or #[expected_failure] if we don't care about the abort code
#[expected_failure(abort_code = 0)]
fun make_sure_zero_coin_fails() {
let coin = MyCoin { value: 0 };
let MyCoin { value: _ } = make_sure_non_zero_coin(coin);
}
#[test_only] // 仅用作测试的帮助方法 // test only helper function
fun publish_coin(account: &signer) {
move_to(account, MyCoin { value: 1 })
}
#[test(a = @0x1, b = @0x2)]
fun test_has_coin(a: signer, b: signer) {
publish_coin(&a);
publish_coin(&b);
assert!(has_coin(@0x1), 0);
assert!(has_coin(@0x2), 1);
assert!(!has_coin(@0x3), 1);
}
}
运行测试(Running Tests)
You can then run these tests with the move test command:
你可以使用 move test 命令运行测试。
$ move test
BUILDING MoveStdlib
BUILDING TestExample
Running Move unit tests
[ PASS ] 0x1::my_module::make_sure_non_zero_coin_passes
[ PASS ] 0x1::my_module::make_sure_zero_coin_fails
[ PASS ] 0x1::my_module::test_has_coin
Test result: OK. Total tests: 3; passed: 3; failed: 0
使用测试参数(Using Test Flags)
-f <str> 或 --filter <str>(-f <str> or --filter <str>)
This will only run tests whose fully qualified name contains <str>. For example if we wanted to only run tests with "zero_coin" in their name:
仅运行名字包含 <str> 字符的测试。例如只想运行名字包含 "zero_coin" 的测试:
$ move test -f zero_coin
CACHED MoveStdlib
BUILDING TestExample
Running Move unit tests
[ PASS ] 0x1::my_module::make_sure_non_zero_coin_passes
[ PASS ] 0x1::my_module::make_sure_zero_coin_fails
Test result: OK. Total tests: 2; passed: 2; failed: 0
-i <bound> 或 --instructions <bound>(-i <bound> or --instructions <bound>)
This bounds the number of instructions that can be executed for any one test to <bound>:
调整测试指令限制为 <bound>:
$ move test -i 0
CACHED MoveStdlib
BUILDING TestExample
Running Move unit tests
[ TIMEOUT ] 0x1::my_module::make_sure_non_zero_coin_passes
[ TIMEOUT ] 0x1::my_module::make_sure_zero_coin_fails
[ TIMEOUT ] 0x1::my_module::test_has_coin
Test failures:
Failures in 0x1::my_module:
┌── make_sure_non_zero_coin_passes ──────
│ Test timed out
└──────────────────
┌── make_sure_zero_coin_fails ──────
│ Test timed out
└──────────────────
┌── test_has_coin ──────
│ Test timed out
└──────────────────
Test result: FAILED. Total tests: 3; passed: 0; failed: 3
-s 或 --statistics(-s or --statistics)
With these flags you can gather statistics about the tests run and report the runtime and instructions executed for each test. For example, if we wanted to see the statistics for the tests in the example above:
使用此参数你可以得到每个测试的运行报告及执行指令的统计信息。例如查看上述示例的统计数据:
$ move test -s
CACHED MoveStdlib
BUILDING TestExample
Running Move unit tests
[ PASS ] 0x1::my_module::make_sure_non_zero_coin_passes
[ PASS ] 0x1::my_module::make_sure_zero_coin_fails
[ PASS ] 0x1::my_module::test_has_coin
Test Statistics:
┌────────────────────────────────────────────────┬────────────┬───────────────────────────┐
│ Test Name │ Time │ Instructions Executed │
├────────────────────────────────────────────────┼────────────┼───────────────────────────┤
│ 0x1::my_module::make_sure_non_zero_coin_passes │ 0.009 │ 1 │
├────────────────────────────────────────────────┼────────────┼───────────────────────────┤
│ 0x1::my_module::make_sure_zero_coin_fails │ 0.008 │ 1 │
├────────────────────────────────────────────────┼────────────┼───────────────────────────┤
│ 0x1::my_module::test_has_coin │ 0.008 │ 1 │
└────────────────────────────────────────────────┴────────────┴───────────────────────────┘
Test result: OK. Total tests: 3; passed: 3; failed: 0
-g 或 --state-on-error(-g or --state-on-error)
These flags will print the global state for any test failures. e.g., if we added the following (failing) test to the my_module example:
这个参数会在测试失败情况下打印全局状态。如在 my_module 模块中添加下述失败测试:
module 0x1::my_module {
...
#[test(a = @0x1)]
fun test_has_coin_bad(a: signer) {
publish_coin(&a);
assert!(has_coin(@0x1), 0);
assert!(has_coin(@0x2), 1);
}
}
we would get get the following output when running the tests:
当运行测试时我们将得到下面的输出:
$ move test -g
CACHED MoveStdlib
BUILDING TestExample
Running Move unit tests
[ PASS ] 0x1::my_module::make_sure_non_zero_coin_passes
[ PASS ] 0x1::my_module::make_sure_zero_coin_fails
[ PASS ] 0x1::my_module::test_has_coin
[ FAIL ] 0x1::my_module::test_has_coin_bad
Test failures:
Failures in 0x1::my_module:
┌── test_has_coin_bad ──────
│ error[E11001]: test failure
│ ┌─ /home/tzakian/TestExample/sources/my_module.move:47:10
│ │
│ 44 │ fun test_has_coin_bad(a: signer) {
│ │ ----------------- In this function in 0x1::my_module
│ ·
│ 47 │ assert!(has_coin(@0x2), 1);
│ │ ^^^^^^^^^^^^^^^^^^^^^^^^^^ Test was not expected to abort but it aborted with 1 here
│
│
│ ────── Storage state at point of failure ──────
│ 0x1:
│ => key 0x1::my_module::MyCoin {
│ value: 1
│ }
│
└──────────────────
Test result: FAILED. Total tests: 4; passed: 3; failed: 1
全局存储 —— 结构(Global Storage - Structure)
The purpose of Move programs is to read from and write to tree-shaped persistent global storage. Programs cannot access the filesystem, network, or any other data outside of this tree.
Move 程序的目的是读取和写入树形的持久全局存储。程序不能访问文件系统、网络或任何此树以外的数据。
In pseudocode, the global storage looks something like:
在伪代码中,全局存储看起来像:
struct GlobalStorage {
resources: Map<(address, ResourceType), ResourceValue>
modules: Map<(address, ModuleName), ModuleBytecode>
}
Structurally, global storage is a forest consisting of trees rooted at an account address. Each address can store both resource data values and module code values. As the pseudocode above indicates, each address can store at most one resource value of a given type and at most one module with a given name.
从结构上讲,全局存储是一个森林(forest),这个森林由以账户地址(address)为根的树组成。每个地址可以存储资源(resource)数据和模块(module)代码。如上面的伪代码所示,每个地址(address)最多可以存储一个给定类型的资源值,最多可以存储一个给定名称的模块。
全局存储 - 操作(Global Storage - Operators)
Move programs can create, delete, and update resources in global storage using the following five instructions:
Move程序可以使用下面五种指令创建、删除、更新全局存储中的资源:
| Operation | Description | Aborts? |
|---|---|---|
move_to<T>(&signer,T) | Publish T under signer.address | If signer.address already holds a T |
move_from<T>(address): T | Remove T from address and return it | If address does not hold a T |
borrow_global_mut<T>(address): &mut T | Return a mutable reference to the T stored under address | If address does not hold a T |
borrow_global<T>(address): &T | Return an immutable reference to the T stored under address | If address does not hold a T |
exists<T>(address): bool | Return true if a T is stored under address | Never |
| 操作符 | 描述 | 出错 |
|---|---|---|
move_to<T>(&signer,T) | 在 signer.address 下发布 T | 如果 signer.address 已经存在 T |
move_from<T>(address): T | 从 address 下删除 T 并返回 | 如果 address 下没有 T |
borrow_global_mut<T>(address): &mut T | 返回 address 下 T 的可变引用 mutable reference | 如果 address 下没有 T |
borrow_global<T>(address): &T | 返回 address 下 T 的不可变引用 immutable reference | 如果 address 下没有 T |
exists<T>(address): bool | 返回 address 下的 T | 永远不会 |
Each of these instructions is parameterized by a type T with the key ability. However, each type T must be declared in the current module. This ensures that a resource can only be manipulated via the API exposed by its defining module. The instructions also take either an address or &signer representing the account address where the resource of type T is stored.
每个指令的参数 T 都具有 key 能力。然而,类型 T 必须在当前模块中声明。这确保资源只能通过当前模块暴露的 API 来操作。指令在存储 T 类型资源的同时,使用 address 或 &signer 表示账户地址。
资源参考(References to resources)
References to global resources returned by borrow_global or borrow_global_mut mostly behave like references to local storage: they can be extended, read, and written using ordinary reference operators and passed as arguments to other function. However, there is one important difference between local and global references: a function cannot return a reference that points into global storage. For example, these two functions will each fail to compile:
borrow_global 或 borrow_global_mut 指令返回的全局资源引用在大多数情况下类似本地存储的引用:它们可以通过引用操作进行拓展、读和写,也可以作为其它函数的参数。然而本地引用和全局引用有个重要差异:函数不能返回指向全局存储的引用。例如,下面两个函数编译会失败:
struct R has key { f: u64 }
// 不能编译 // will not compile
fun ret_direct_resource_ref_bad(a: address): &R {
borrow_global<R>(a) // error!
}
// 也不能编译 // also will not compile
fun ret_resource_field_ref_bad(a: address): &u64 {
&borrow_global<R>(a).f // error!
}
Move must enforce this restriction to guarantee absence of dangling references to global storage. This section contains much more detail for the interested reader.
Move必须强制这种限制来保证全局存储引用不会出现空引用。对于感兴趣的读者,此节包含了更多的细节。
使用泛型的全局存储操作(Global storage operators with generics)
Global storage operations can be applied to generic resources with both instantiated and uninstantiated generic type parameters:
全局存储操作可以与实例化和未实例化的泛型资源参数使用:
struct Container<T> has key { t: T }
/// 发布用于存储调用者提供 T 类型对象的 Container /// Publish a Container storing a type T of the caller's choosing
fun publish_generic_container<T>(account: &signer, t: T) {
move_to<Container<T>>(account, Container { t })
}
/// 发布存储 u64 类型的 Container /// Publish a container storing a u64
fun publish_instantiated_generic_container(account: &signer, t: u64) {
move_to<Container<u64>>(account, Container { t })
}
The ability to index into global storage via a type parameter chosen at runtime is a powerful Move feature known as storage polymorphism. For more on the design patterns enabled by this feature, see Move generics.
能够通过参数类型在运行时中索引全局存储的能力是 Move 的强大特性,该特性称之为存储多态性。关于此特性更多的设计模式,请参考Move泛型这节。
示例: Counter (Example: Counter)
The simple Counter module below exercises each of the five global storage operators. The API exposed by this module allows:
- Anyone to publish a
Counterresource under their account - Anyone to check if a
Counterexists under any address - Anyone to read or increment the value of a
Counterresource under any address - An account that stores a
Counterresource to reset it to zero - An account that stores a
Counterresource to remove and delete it
下面简单的 Counter 模块使用五种全局存储操作。该模块暴露的API允许:
- 任何人可以在他们的账户下发布
Counter资源。 - 任何人可以检查任何地址下是否包含
Counter。 - 任何人可以读或增加任何地址下的
Counter值。 - 存储
Counter资源的账号可以将其重置为 0。 - 存储
Counter资源的账号可以删除该对象。
address 0x42 {
module counter {
use std::signer;
/// 包含整数的资源 /// Resource that wraps an integer counter
struct Counter has key { i: u64 }
/// 给定账户下发布带有 `i` 值的 `Counter` 资源 /// Publish a `Counter` resource with value `i` under the given `account`
public fun publish(account: &signer, i: u64) {
// “打包"(创建)Counter 资源。这是需要授权的操作,只能在声明 `Counter` 资源的此模块内执行。 // "Pack" (create) a Counter resource. This is a privileged operation that can only be done inside the module that declares the `Counter` resource
move_to(account, Counter { i })
}
/// 读取 `addr` 地址下 `Counter` 内的值 /// Read the value in the `Counter` resource stored at `addr`
public fun get_count(addr: address): u64 acquires Counter {
borrow_global<Counter>(addr).i
}
/// 增加 `addr` 地址下 `Counter` 内的值 /// Increment the value of `addr`'s `Counter` resource
public fun increment(addr: address) acquires Counter {
let c_ref = &mut borrow_global_mut<Counter>(addr).i;
*c_ref = *c_ref + 1
}
/// 将 `account` 的 `Counter` 重置为 0 /// Reset the value of `account`'s `Counter` to 0
public fun reset(account: &signer) acquires Counter {
let c_ref = &mut borrow_global_mut<Counter>(signer::address_of(account)).i;
*c_ref = 0
}
/// 删除 `account` 的 `Counter` 资源并返回其内值 /// Delete the `Counter` resource under `account` and return its value
public fun delete(account: &signer): u64 acquires Counter {
// 删除 Counter 资源 // remove the Counter resource
let c = move_from<Counter>(signer::address_of(account));
// 将 `Counter` 资源“拆”为字段。这是需要授权的操作,只能在声明 `Counter` 资源的此模块内执行。 // "Unpack" the `Counter` resource into its fields. This is a privileged operation that can only be done inside the module that declares the `Counter` resource
let Counter { i } = c;
i
}
/// 如果 `addr` 下包含 `Counter` 资源,则返回 `true`。 /// Return `true` if `addr` contains a `Counter` resource
public fun exists(addr: address): bool {
exists<Counter>(addr)
}
}
}
acquires 函数标注(Annotating functions with acquires)
In the counter example, you might have noticed that the get_count, increment, reset, and delete functions are annotated with acquires Counter. A Move function m::f must be annotated with acquires T if and only if:
- The body of
m::fcontains amove_from<T>,borrow_global_mut<T>, orborrow_global<T>instruction, or - The body of
m::finvokes a functionm::gdeclared in the same module that is annotated withacquires
在 counter 例子中,可以注意到 get_count、increment、reset 和 delete 方法都使用 acquires Counter 进行标注。函数 m::f 在且仅在下述情况必须使用 acquires T 进行标注:
m::f的主体包含move_from<T>、borrow_global_mut<T>或borrow_global<T>指令调用m::f的主体调用了同模块内被acquires注解的m::g的函数
For example, the following function inside Counter would need an acquires annotation:
例如,下面 Counter 内的函数需要使用 acquires 标注:
// 由于 `increment` 使用了 `acquires` 标注,所以函数需要 `acquires` // Needs `acquires` because `increment` is annotated with `acquires`
fun call_increment(addr: address): u64 acquires Counter {
counter::increment(addr)
}
However, the same function outside Counter would not need an annotation:
然而,在 Counter 外面的函数则不需要进行标注:
address 0x43 {
module m {
use 0x42::counter;
// 可以,仅在函数声明在同一模块内时需要标注 // Ok. Only need annotation when resource acquired by callee is declared in the same module
fun call_increment(addr: address): u64 {
counter::increment(addr)
}
}
}
If a function touches multiple resources, it needs multiple acquires:
如果函数需要多个资源,acquires 则需要多个参数:
address 0x42 {
module two_resources {
struct R1 has key { f: u64 }
struct R2 has key { g: u64 }
fun double_acquires(a: address): u64 acquires R1, R2 {
borrow_global<R1>(a).f + borrow_global<R2>.g
}
}
}
The acquires annotation does not take generic type parameters into account:
acquires 标注不会将泛型类型参数纳入声明中:
address 0x42 {
module m {
struct R<T> has key { t: T }
// 效果为 `acquires R` 而不是 `acquires R<T>` // `acquires R`, not `acquires R<T>`
fun acquire_generic_resource<T: store>(a: addr) acquires R {
let _ = borrow_global<R<T>>(a);
}
// 效果为 `acquires R` 而不是 `acquiresR<u64>` // `acquires R`, not `acquires R<u64>
fun acquire_instantiated_generic_resource(a: addr) acquires R {
let _ = borrow_global<R<u64>>(a);
}
}
}
Finally: redundant acquires are not allowed. Adding this function inside Counter will result in a compilation error:
最后:不允许使用不必要的 acquires。在 Counter 内添加下述方法将会导致编译错误:
// 下面代码不会编译,因为函数体没有使用全局存储指令也没调用使用 `acquires` 注解的函数 // This code will not compile because the body of the function does not use a global storage instruction or invoke a function with `acquires`
fun redundant_acquires_bad() acquires Counter {}
For more information on acquires, see Move functions.
关于 acquires 更多信息,参见 Move 函数。
全局资源引用安全(Reference Safety For Global Resources)
Move prohibits returning global references and requires the acquires annotation to prevent dangling references. This allows Move to live up to its promise of static reference safety (i.e., no dangling references, no null or nil dereferences) for all reference types.
Move 禁止返回全局引用并且需要使用 acquires 标注来防止空引用。这使 Move 保证了所有引用类型的静态引用安全性(例如,没有空引用、不会解引用 null 或 nil 对象)。
This example illustrates how the Move type system uses acquires to prevent a dangling reference:
这个例子展示了 Move 类型系统如何通过使用 acquires 来防止空引用:
address 0x42 {
module dangling {
struct T has key { f: u64 }
fun borrow_then_remove_bad(a: address) acquires T {
let t_ref: &mut T = borrow_global_mut<T>(a);
let t = remove_t(a); // 类型系统不允许 t_ref 这种空引用 // type system complains here
// t_ref now dangling!
let uh_oh = *&t_ref.f
}
fun remove_t(a: address): T acquires T {
move_from<T>(a)
}
}
}
In this code, line 6 acquires a reference to the T stored at address a in global storage. The callee remove_t then removes the value, which makes t_ref a dangling reference.
代码中第六行获取了 a 地址在全局存储中 T 类型资源的引用。remove_t 调用删除了该值,使 t_ref 变成空引用。
Fortunately, this cannot happen because the type system will reject this program. The acquires annotation on remove_t lets the type system know that line 7 is dangerous, without having to recheck or introspect the body of remove_t separately!
幸运的是,由于类型系统拒绝编译程序导致这种情况不会发生。remove_t 方法的 acquires 标注让类型系统知道第七行是危险的,不需要再分析 remove_t 的函数体。
The restriction on returning global references prevents a similar, but even more insidious problem:
禁止返回全局引用的限制同时也防止了类似却更隐晦的问题:
address 0x42 {
module m1 {
struct T has key {}
public fun ret_t_ref(a: address): &T acquires T {
borrow_global<T>(a) // 报错 类型系统在这不能继续编译 // error! type system complains here
}
public fun remove_t(a: address) acquires T {
let T {} = move_from<T>(a);
}
}
module m2 {
fun borrow_then_remove_bad(a: address) {
let t_ref = m1::ret_t_ref(a);
let t = m1::remove_t(a); // t_ref 为空引用 // t_ref now dangling!
}
}
}
Line 16 acquires a reference to a global resource m1::T, then line 17 removes that same resource, which makes t_ref dangle. In this case, acquires annotations do not help us because the borrow_then_remove_bad function is outside of the m1 module that declares T (recall that acquires annotations can only be used for resources declared in the current module). Instead, the type system avoids this problem by preventing the return of a global reference at line 6.
第十六行获取了全局资源 m1::T 类型的引用,然后第十七行删除了同一资源,这使 t_ref 变成空引用。在这个例子中,acquires 标注没有帮助到我们,因为 borrow_then_remove_bad 函数在声明了 T 类型(回顾 acquires 标注只用在声明此类型的模块内)的 m1 模块外。然而禁止返回全局引用的规则使第六行避免了这个问题。
Fancier type systems that would allow returning global references without sacrificing reference safety are possible, and we may consider them in future iterations of Move. We chose the current design because it strikes a good balance between expressivity, annotation burden, and type system complexity.
允许返回全局引用而尽可能不牺牲引用安全的高级类型系统是可行的,我们将会在 Move 未来的迭代过程中考虑此事。我们选择目前的设计方式是因为它很好的平衡了语言表现力、复杂的标注和复杂的类型系统三者的关系。
标准库(Standard Library)
The Move standard library exposes interfaces that implement the following functionality:
- Basic operations on vectors.
- Option types and operations on
Optiontypes. - A common error encoding code interface for abort codes.
- 32-bit precision fixed-point numbers.
Move标准库公开了实现以下功能的接口:
向量(vector)
The vector module defines a number of operations over the primitive
vector type. The module is published under the
named address Std and consists of a number of native functions, as
well as functions defined in Move. The API for this module is as follows.
向量模块在原生类型向量上定义了许多操作。该模块以命名地址Std发布,并由许多原生函数以及在Move中定义的函数组成。此模块的API如下所示:
函数(Functions)
Create an empty vector.
The Element type can be both a resource or copyable type.
创建一个空的向量。
Element类型可以是资源或可复制类型。
native public fun empty<Element>(): vector<Element>;
Create a vector of length 1 containing the passed in element.
创建一个长度为1的vector,并且包含传入的element。
public fun singleton<Element>(e: Element): vector<Element>;
Destroy (deallocate) the vector v. Will abort if v is non-empty.
Note: The emptiness restriction is due to the fact that Element can be a
resource type, and destruction of a non-empty vector would violate
resource conservation.
销毁(释放)向量v。如果v非空操作将终止。
注意:空的限制是由于Element可以是资源类型,而销毁非空的向量会违反资源保护机制。
native public fun destroy_empty<Element>(v: vector<Element>);
Acquire an immutable reference to the ith element of the vector v. Will abort if
the index i is out of bounds for the vector v.
获取向量v的第i个元素的不可变引用。如果索引i超出了向量v的范围,操作将会终止。
native public fun borrow<Element>(v: &vector<Element>, i: u64): ∈
Acquire a mutable reference
to the ith element of the vector v. Will abort if
the index i is out of bounds for the vector v.
获取向量v的第i个元素的可变引用。如果索引i超出了向量v的范围,操作将会终止。
native public fun borrow_mut<Element>(v: &mut vector<Element>, i: u64): &mut Element;
Empty and destroy the other vector, and push each of the elements in
the other vector onto the lhs vector in the same order as they occurred in other.
清空并销毁other动态数组,并将other向量中的每个元素按顺序添加到lhs动态数组。
public fun append<Element>(lhs: &mut vector<Element>, other: vector<Element>);
Push an element e of type Element onto the end of the vector v. May
trigger a resizing of the underlying vector's memory.
将类型为Element的元素e添加到向量v的末尾。可能触发底层向量内存的大小调整。
native public fun push_back<Element>(v: &mut vector<Element>, e: Element);
Pop an element from the end of the vector v in-place and return the owned
value. Will abort if v is empty.
从向量v的末尾取出一个元素并返回。如果v为空将终止操作。
native public fun pop_back<Element>(v: &mut vector<Element>): Element;
Remove the element at index i in the vector v and return the owned value
that was previously stored at i in v. All elements occurring at indices
greater than i will be shifted down by 1. Will abort if i is out of bounds
for v.
移除向量v中索引i处的元素,并返回之前存储在v中的i处的值。所有下标大于i的元素将向前移动1个位置。如果i超出了v的范围,操作将会终止。
public fun remove<Element>(v: &mut vector<Element>, i: u64): Element;
Swap the ith element of the vector v with the last element and then pop
this element off of the back of the vector and return the owned value that
was previously stored at index i.
This operation is O(1), but does not preserve ordering of elements in the vector.
Aborts if the index i is out of bounds for the vector v.
将向量v的第i个元素与最后一个元素交换,然后将这个元素从向量的后面取出,并返回之前存储在索引i处的所有元素的值。
这个操作时间复杂度是O(1),但是不保持向量容器中元素的顺序。
如果索引i超出了向量v的边界,则操作终止。
public fun swap_remove<Element>(v: &mut vector<Element>, i: u64): Element;
Swap the elements at the i'th and j'th indices in the vector v. Will
abort if either of i or j are out of bounds for v.
交换向量v中下标为第i和第j的元素。如果i或j中的任何一个超出了v的范围,则操作将终止。
native public fun swap<Element>(v: &mut vector<Element>, i: u64, j: u64);
Reverse the order of the elements in the vector v in-place.
将向量v中的元素顺序颠倒。
public fun reverse<Element>(v: &mut vector<Element>);
Return the index of the first occurrence of an element in v that is
equal to e. Returns (true, index) if such an element was found, and
(false, 0) otherwise.
返回v中第一个与e相等的元素的索引。如果找到这样的元素,则返回(true, index),否则返回(false, 0)。
public fun index_of<Element>(v: &vector<Element>, e: &Element): (bool, u64);
Return if an element equal to e exists in the vector v.
如果向量v中存在等于e的元素,则返回true, 否则返回false。
public fun contains<Element>(v: &vector<Element>, e: &Element): bool;
Return the length of a vector.
返回向量的长度。
native public fun length<Element>(v: &vector<Element>): u64;
Return whether the vector v is empty.
如果向量v中没有元素,则返回true, 否则返回false。
public fun is_empty<Element>(v: &vector<Element>): bool;
选项(option)
The option module defines a generic option type Option<T> that represents a
value of type T that may, or may not, be present. It is published under the named address Std.
option模块定义了一个泛型option类型Option<T>,它表示类型为T的值可能存在,也可能不存在。它发布在命名地址Std下。
The Move option type is internally represented as a singleton vector, and may
contain a value of resource or copyable kind. If you are familiar with option
types in other languages, the Move Option behaves similarly to those with a
couple notable exceptions since the option can contain a value of kind resource.
Particularly, certain operations such as get_with_default and
destroy_with_default require that the element type T be of copyable kind.
Move option类型在内部表示为一个单例向量,可能包含资源或可复制类型的值。如果你熟悉其他语言中的option类型,Move Option的行为与那些类似,但有几个显著的例外,因为option可以包含一个类型为资源的值。
特别地,某些操作如get_with_default和destroy_with_default要求元素类型T为可复制类型。
The API for the option module is as as follows
option模块的API如下所示:
类型(Types)
Generic type abstraction of a value that may, or may not, be present. Can contain
a value of either resource or copyable kind.
一个值的泛型类型的抽象,可能存在,也可能不存在。它可以包含资源或可复制类型的值。
struct Option<T>;
函数(Functions)
Create an empty Option of that can contain a value of Element type.
创建一个可以包含Element类型值的空Option。
public fun none<Element>(): Option<Element>;
Create a non-empty Option type containing a value e of type Element.
创建一个非空的Option类型,包含类型为Element的值e。
public fun some<Element>(e: T): Option<Element>;
Return an immutable reference to the value inside the option opt_elem
Will abort if opt_elem does not contain a value.
返回opt_elem内部值的不可变引用,如果opt_elem不包含值,则将终止操作。
public fun borrow<Element>(opt_elem: &Option<Element>): ∈
Return a reference to the value inside opt_elem if it contains one. If
opt_elem does not contain a value the passed in default_ref reference will be returned.
Does not abort.
如果opt_elem中包含值,则返回该值的引用。如果opt_elem不包含值,将返回传入的default_ref引用。不会终止操作。
public fun borrow_with_default<Element>(opt_elem: &Option<Element>, default_ref: &Element): ∈
Return a mutable reference to the value inside opt_elem. Will abort if
opt_elem does not contain a value.
返回opt_elem内部值的可变引用。如果opt_elem不包含值,则操作将终止。
public fun borrow_mut<Element>(opt_elem: &mut Option<Element>): &mut Element;
Convert an option value that contains a value to one that is empty in-place by
removing and returning the value stored inside opt_elem.
Will abort if opt_elem does not contain a value.
通过删除并返回存储在opt_elem中的值,将包含值的opt_elem转换为空option类型。
如果opt_elem不包含值,则将终止。
public fun extract<Element>(opt_elem: &mut Option<Element>): Element;
Return the value contained inside the option opt_elem if it contains one.
Will return the passed in default value if opt_elem does not contain a
value. The Element type that the Option type is instantiated with must be
of copyable kind in order for this function to be callable.
如果opt_elem中包含值,则返回该值。
如果opt_elem不包含值,将返回传入的default值。default类型必须是可复制类型,这样该函数才能被调用。
public fun get_with_default<Element: copyable>(opt_elem: &Option<Element>, default: Element): Element;
Convert an empty option opt_elem to an option value that contains the value e.
Will abort if opt_elem already contains a value.
将空option类型opt_elem转换为包含值e的option类。
如果opt_elem已经包含值,则操作将终止。
public fun fill<Element>(opt_elem: &mut Option<Element>, e: Element);
Swap the value currently contained in opt_elem with new_elem and return the
previously contained value. Will abort if opt_elem does not contain a value.
将opt_elem当前包含的值与new_elem交换,并返回先前包含的值。如果opt_elem不包含值,则操作将终止。
public fun swap<Element>(opt_elem: &mut Option<Element>, e: Element): Element;
Return true if opt_elem contains a value equal to the value of e_ref.
Otherwise, false will be returned.
如果opt_elem包含一个等于e_ref的值,则返回true。否则,将返回false。
public fun contains<Element>(opt_elem: &Option<Element>, e_ref: &Element): bool;
Return true if opt_elem does not contain a value.
如果opt_elem不包含值,则返回true。
public fun is_none<Element>(opt_elem: &Option<Element>): bool;
Return true if opt_elem contains a value.
如果opt_elem包含值,则返回true。
public fun is_some<Element>(opt_elem: &Option<Element>): bool;
Unpack opt_elem and return the value that it contained.
Will abort if opt_elem does not contain a value.
解包opt_elem并返回它所包含的值。
如果opt_elem不包含值,则操作将终止。
public fun destroy_some<Element>(opt_elem: Option<Element>): Element;
Destroys the opt_elem value passed in. If opt_elem contained a value it
will be returned otherwise, the passed in default value will be returned.
销毁传入的opt_elem。如果opt_elem包含值,它将被返回,否则将返回传入的default值。
public fun destroy_with_default<Element: copyable>(opt_elem: Option<Element>, default: Element): Element;
Destroys the opt_elem value passed in, opt_elem must be empty and not
contain a value. Will abort if opt_elem contains a value.
销毁传入的opt_elem,opt_elem必须为空且不包含值。如果opt_elem包含一个值,则会终止操作。
public fun destroy_none<Element>(opt_elem: Option<Element>);
错误(errors)
Recall that each abort code in Move is represented as an unsigned 64-bit integer. The errors module defines a common interface that can be used to "tag" each of these abort codes so that they can represent both the error category along with an error reason.
回想一下,Move中的每个终止代码都表示为无符号64位整数。errors模块定义了一个通用接口,可用于"标记"每个终止代码,以便它们既可以表示错误类别,也可以表示错误原因。
Error categories are declared as constants in the errors module and are globally unique with respect to this module. Error reasons on the other hand are module-specific error codes, and can provide greater detail (perhaps, even a particular reason) about the specific error condition. This representation of a category and reason for each error code is done by dividing the abort code into two sections.
错误类别在errors模块中声明为常量,并且对该模块来说是全局唯一的。另一方面,错误原因是特定于模块的错误代码,可以提供关于特定错误条件的更详细的信息(甚至可能是一个特定的_reason_)。每个错误代码的类别和原因的这种表示是通过将终止代码分成两部分来完成的。
The lower 8 bits of the abort code hold the error category. The remaining 56 bits of the abort code hold the error reason. The reason should be a unique number relative to the module which raised the error and can be used to obtain more information about the error at hand. It should mostly be used for diagnostic purposes as error reasons may change over time if the module is updated.
| Category | Reason |
|---|---|
| 8 bits | 56 bits |
Since error categories are globally stable, these present the most stable API and should in general be what is used by clients to determine the messages they may present to users (whereas the reason is useful for diagnostic purposes). There are public functions in the errors module for creating an abort code of each error category with a specific reason number (represented as a u64).
终止代码的较低8位保存错误类别。终止代码的其余56位包含错误原因。 原因应该是相对于引发错误的模块的唯一数字,并且可以用来获取关于当前错误的更多信息。它应该主要用于诊断目的,因为如果模块更新,错误原因可能会随着时间的推移而变化。
| 类型 | 原因 |
|---|---|
| 8 bits | 56 bits |
由于错误类别是全局稳定的,所以它们提供了稳定的API,通常应该由客户端用来确定它们可能向用户提供的消息(而原因则用于诊断目的)。在errors模块中有一些公共函数,用于创建每个错误类别的带有特定原因号的终止代码(表示为u64)。
常量(Constants)
The system is in a state where the performed operation is not allowed.
系统处于不允许操作的状态。
const INVALID_STATE: u8 = 1;
A specific account address was required to perform an operation, but a different address from what was expected was encounterd.
执行操作需要一个特定的帐户地址,但遇到的地址与预期的不同。
const REQUIRES_ADDRESS: u8 = 2;
An account did not have the expected role for this operation. Useful for Role Based Access Control (RBAC) error conditions.
帐户没有此操作的预期角色。用于基于角色访问控制(RBAC)错误。
const REQUIRES_ROLE: u8 = 3;
An account did not not have a required capability. Useful for RBAC error conditions.
帐户没有所需的能力。用于RBAC错误。
const REQUIRES_CAPABILITY: u8 = 4;
A resource was expected, but did not exist under an address.
地址下不存在期望的资源。
const NOT_PUBLISHED: u8 = 5;
Attempted to publish a resource under an address where one was already published.
试图在已发布资源的地址发布资源。
const ALREADY_PUBLISHED: u8 = 6;
An argument provided for an operation was invalid.
为操作提供的参数无效。
const INVALID_ARGUMENT: u8 = 7;
A limit on a value was exceeded.
超过了一个值的限制。
const LIMIT_EXCEEDED: u8 = 8;
An internal error (bug) has occurred.
发生了内部错误(bug)。
const INTERNAL: u8 = 10;
A custom error category for extension points.
扩展自定义错误类别。
const CUSTOM: u8 = 255;
函数(Functions)
Should be used in the case where invalid (global) state is encountered. Constructs an abort code with specified reason and category INVALID_STATE. Will abort if reason does not fit in 56 bits.
在遇到无效(全局)状态的情况下应使用。构造一个具有指定的reason和类别INVALID_STATE的终止代码。如果reason不适合56位,将会终止操作。
public fun invalid_state(reason: u64): u64;
Should be used if an account's address does not match a specific address. Constructs an abort code with specified reason and category REQUIRES_ADDRESS. Will abort if reason does not fit in 56 bits.
当账户地址与特定地址不匹配时应使用。构造一个具有指定的reason和类别REQUIRES_ADDRESS的终止代码。如果reason不适合56位,将会终止操作。
public fun requires_address(reason: u64): u64;
Should be used if a role did not match a required role when using RBAC. Constructs an abort code with specified reason and category REQUIRES_ROLE. Will abort if reason does not fit in 56 bits.
在使用RBAC时,角色与所需角色不匹配时应使用。构造一个具有指定的reason和类别REQUIRES_ROLE的终止代码。如果reason不适合56位,将会终止操作。
public fun requires_role(reason: u64): u64;
Should be used if an account did not have a required capability when using RBAC. Constructs an abort code with specified reason and category REQUIRES_CAPABILITY. Should be Will abort if reason does not fit in 56 bits.
在使用RBAC时,帐户没有必要的能力时应使用。构造一个具有指定的reason和类别REQUIRES_CAPABILITY的终止代码。如果reason不适合56位,将会终止操作。
public fun requires_capability(reason: u64): u64;
Should be used if a resource did not exist where one was expected. Constructs an abort code with specified reason and category NOT_PUBLISHED. Will abort if reason does not fit in 56 bits.
在需要资源的地方不存在资源时应使用。构造一个具有指定的reason和类别NOT_PUBLISHED的终止代码。如果reason不适合56位,将会终止操作。
public fun not_published(reason: u64): u64;
Should be used if a resource already existed where one was about to be published. Constructs an abort code with specified reason and category ALREADY_PUBLISHED. Will abort if reason does not fit in 56 bits.
要发布资源的地方已经存在资源时使用。构造一个具有指定的reason和类别ALREADY_PUBLISHED的终止代码。如果reason不适合56位,将会终止操作。
public fun already_published(reason: u64): u64;
Should be used if an invalid argument was passed to a function/operation. Constructs an abort code with specified reason and category INVALID_ARGUMENT. Will abort if reason does not fit in 56 bits.
当向函数/操作传递无效参数时使用。构造一个具有指定的reason和类别INVALID_ARGUMENT的终止代码。如果reason不适合56位,将会终止操作。
public fun invalid_argument(reason: u64): u64;
Should be used if a limit on a specific value is reached, e.g., subtracting 1 from a value of 0. Constructs an abort code with specified reason and category LIMIT_EXCEEDED. Will abort if reason does not fit in 56 bits.
当达到特定值的限制时应使用,例如,0减去1。构造一个具有指定的reason和类别LIMIT_EXCEEDED的终止代码。如果reason不适合56位,将会终止操作。
public fun limit_exceeded(reason: u64): u64;
Should be used if an internal error or bug was encountered. Constructs an abort code with specified reason and category INTERNAL. Will abort if reason does not fit in 56 bits.
在遇到内部错误或错误时使用。构造一个具有指定的reason和类别INTERNAL的终止代码。如果reason不适合56位,将会终止操作。
public fun internal(reason: u64): u64;
Used for extension points, should be not used under most circumstances. Constructs an abort code with specified reason and category CUSTOM. Will abort if reason does not fit in 56 bits.
用于扩展,大多数情况下不应使用。构造一个具有指定的reason和类别CUSTOM的终止代码。如果reason不适合56位,将会终止操作。
public fun custom(reason: u64): u64;
32位精确定点数字(fixed_point32)
The fixed_point32 module defines a fixed-point numeric type with 32 integer bits and 32 fractional bits. Internally, this is represented as a u64 integer wrapped in a struct to make a unique fixed_point32 type. Since the numeric representation is a binary one, some decimal values may not be exactly representable, but it provides more than 9 decimal digits of precision both before and after the decimal point (18 digits total). For comparison, double precision floating-point has less than 16 decimal digits of precision, so you should be careful about using floating-point to convert these values to decimal.
fixed_point32模块定义了一个具有32个整数位和32个小数位的定点数值类型。在内部,它被表示为一个u64整数,包装在一个结构中,形成一个唯一的fixed_point32类型。由于数字表示是二进制的,一些十进制值可能不能完全表示,但它在小数点之前和之后都提供了9位以上的十进制精度(总共18位)。为了进行比较,双精度浮点数的精度小于16位十进制数字,因此在使用浮点数将这些值转换为十进制时应该小心。
类型(Types)
Represents a fixed-point numeric number with 32 fractional bits.
表示具有32个小数位的定点数字。
struct FixedPoint32;
函数(Functions)
Multiply a u64 integer by a fixed-point number, truncating any fractional part of the product. This will abort if the product overflows.
当u64整数乘以定点数,截断乘积的任何小数部分。如果乘积溢出,该操作将终止。
public fun multiply_u64(val: u64, multiplier: FixedPoint32): u64;
Divide a u64 integer by a fixed-point number, truncating any fractional part of the quotient. This will abort if the divisor is zero or if the quotient overflows.
当u64整数除以定点数,截断商的任何小数部分。如果除数为零或商溢出,该操作将终止。
public fun divide_u64(val: u64, divisor: FixedPoint32): u64;
Create a fixed-point value from a rational number specified by its numerator and denominator. Calling this function should be preferred for using fixed_point32::create_from_raw_value which is also available. This will abort if the denominator is zero. It will also abort if the numerator is nonzero and the ratio is not in the range $2^{-32}\ldots2^{32}-1$. When specifying decimal fractions, be careful about rounding errors: if you round to display $N$ digits after the decimal point, you can use a denominator of $10^N$ to avoid numbers where the very small imprecision in the binary representation could change the rounding, e.g., 0.0125 will round down to 0.012 instead of up to 0.013.
根据分子和分母指定的有理数创建定点值。如果fixed_point32::create_from_raw_value函数可用,应优先使用。如果分母为零,该操作将终止。如果分子非零且比值不在$2^{-32}\ldots2^{32}-1$范围内,该操作将终止。指定小数时,请注意四舍五入错误:如果要对小数点后$N$位进行四舍五入,则可以用$10^N$做分母,这样就能避免精确度丢失问题,例如,0.0125将四舍五入到0.012而不是0.013。
public fun create_from_rational(numerator: u64, denominator: u64): FixedPoint32;
Create a fixedpoint value from a raw u64 value.
通过u64原始值创建一个定点值。
public fun create_from_raw_value(value: u64): FixedPoint32;
Returns true if the decimal value of num is equal to zero.
如果num的十进制值等于0,则返回true。
public fun is_zero(num: FixedPoint32): bool;
Accessor for the raw u64 value. Other less common operations, such as adding or subtracting FixedPoint32 values, can be done using the raw values directly.
获取u64原始值的方法。其他不太常见的操作,例如添加或减去FixedPoint32值,可以直接使用原始值来完成。
public fun get_raw_value(num: FixedPoint32): u64;
Move 编码规范(Move Coding Conventions)
This section lays out some basic coding conventions for Move that the Move team has found helpful. These are only recommendations, and you should feel free to use other formatting guidelines and conventions if you have a preference for them.
本节列出了 Move 团队认为有用的一些基本的 Move 编码约定。这些只是建议,如果你喜欢其他格式指南和约定,你可以随时使用它们。
命名(Naming)
- Module names: should be lower snake case, e.g.,
fixed_point32,vector. - Type names: should be camel case if they are not a native type, e.g.,
Coin,RoleId. - Function names: should be lower snake case, e.g.,
destroy_empty. - Constant names: should be upper snake case, e.g.,
REQUIRES_CAPABILITY. - Generic types should be descriptive, or anti-descriptive where appropriate, e.g.,
TorElementfor the Vector generic type parameter. Most of the time the "main" type in a module should be the same name as the module e.g.,option::Option,fixed_point32::FixedPoint32. - Module file names: should be the same as the module name e.g.,
Option.move. - Script file names: should be lower snake case and should match the name of the “main” function in the script.
- Mixed file names: If the file contains multiple modules and/or scripts, the file name should be lower snake case, where the name does not match any particular module/script inside.
- 模块名称:应该使用小写的蛇形命名法,例如:
fixed_point32、vector。 - 类型名称:如果不是原生数据类型,则应使用驼峰命名法,例如:
Coin、RoleId。 - 函数名称:应该使用小写的蛇形命名法,例如:
destroy_empty。 - 常量名称:应该使用大写的蛇形命名法,例如:
REQUIRES_CAPABILITY。 - 泛型类型应该具备描述性,当然在适当的情况下也可以是反描述性的,例如:Vector 泛型类型的参数可以是
T或Element。大多数情况下,模块中的“主”类型命名应该与模块名相同,例如:option::Option,fixed_point32::FixedPoint32。 - 模块文件名称:应该与模块名相同,例如:
Option.move。 - 脚本文件名称:应该使用小写的蛇形命名法,并且应该与脚本中的“主”函数名匹配。
- 混合文件名称:如果文件包含多个模块和/或脚本,文件命名应该使用小写的蛇形命名法,并且不需要与内部的任何特定模块/脚本名匹配。
导入(Imports)
- All module
usestatements should be at the top of the module. - Functions should be imported and used fully qualified from the module in which they are declared, and not imported at the top level.
- Types should be imported at the top-level. Where there are name clashes,
asshould be used to rename the type locally as appropriate.
For example, if there is a module:
- 所有模块的
use语句都应该位于模块的顶部。 - 函数应该从声明它们的模块中完全限定地导入和使用, 而不是在顶部导入。
- 类型应该在顶部导入。如果存在名称冲突,应使用
as在本地适当地重命名类型。
例如,如果有一个模块:
module 0x1::foo {
struct Foo { }
const CONST_FOO: u64 = 0;
public fun do_foo(): Foo { Foo{} }
...
}
this would be imported and used as:
此时将被导入并使用:
module 0x1::bar {
use 0x1::foo::{Self, Foo};
public fun do_bar(x: u64): Foo {
if (x == 10) {
foo::do_foo()
} else {
abort 0
}
}
...
}
And, if there is a local name-clash when importing two modules:
并且,如果在导入两个模块时存在本地名称冲突:
module other_foo {
struct Foo {}
...
}
module 0x1::importer {
use 0x1::other_foo::Foo as OtherFoo;
use 0x1::foo::Foo;
...
}
注释(Comments)
- Each module, struct, and public function declaration should be commented.
- Move has doc comments
///, regular single-line comments//, block comments/* */, and block doc comments/** */.
- 每个模块、结构体和公共函数声明都应该有对应的注释。
- Move 有文档注释
///,常规单行注释//,块注释/* */,和块文档注释/** */。
格式化(Formatting)
The Move team plans to write an autoformatter to enforce formatting conventions. However, in the meantime:
- Four space indentation should be used except for
scriptandaddressblocks whose contents should not be indented. - Lines should be broken if they are longer than 100 characters.
- Structs and constants should be declared before all functions in a module.
Move 团队计划编写一个自动格式化程序来执行格式化约定。然而,在此期间:
- 除
script和address块外,其他的内容应使用四个空格的缩进。 - 每行代码,如果超过 100 个字符,应该换行。
- 结构体和常量应该在模块中的所有函数之前声明。